App Discovery
Initial set up with App Discovery
Cisco Cloudlock App Discovery analyzes the risks presented by cloud-enabled apps installed in your network by end-users. It does this by analyzing the logs from your network devices such as the Cisco Web Security Appliance (WSA).
Prerequisites for Cisco Cloudlock App Discovery
These requirements must be satisfied In order to activate Cisco Cloudlock App Discovery:
● Cisco recommends the latest version of either Google Chrome or the Firefox browser be used for this activation process.
● At least one Cisco WSA device to generate logs for Cloudlock to analyze. Port 24 must be open on your firewall; that port is used for SCP (Secure Copy Protocol) transfer of logs.
● Admin access to the WSA admin portal and to the Cisco Cloudlock application
● Cisco Cloudlock App Discovery license must be enabled in the Cloudlock application. Contact [email protected] if Discovered Apps does not appear in the Cloudlock navigation panel.
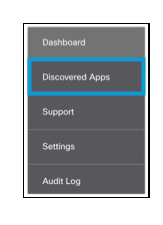
App Discovery Activation
At a high level, activating Cisco Cloudlock App Discovery involves these activities:
- Configure your WSA device(s) with a log subscription in order to send logs to Cloudlock for analysis.
- Configure your firewall to enable the WSA log subscription to transmit logs via port 24.
- Identify and authenticate WSA device(s) to Cloudlock, using the App Discovery Wizard.
After WSA devices and Cisco Cloudlock are configured to enable the integration, it takes approximately 24 hours for data to appear in the Cloudlock console.
WSA Device(s) Preparation
Use the WSA web portal console to configure log subscriptions on the WSA device. In addition, port 24 must be open on the firewall; this port is used to securely copy logs to Cisco Cloudlock.
Identification and Authentication
For this process, Cisco recommends that both the Cisco Cloudlock App Discovery Wizard and the WSA web portal console be open simultaneously on the same computer, in order to facilitate pasting information from one environment to the other.
- In Cisco Cloudlock, open the App Discovery tab on the Settings page.
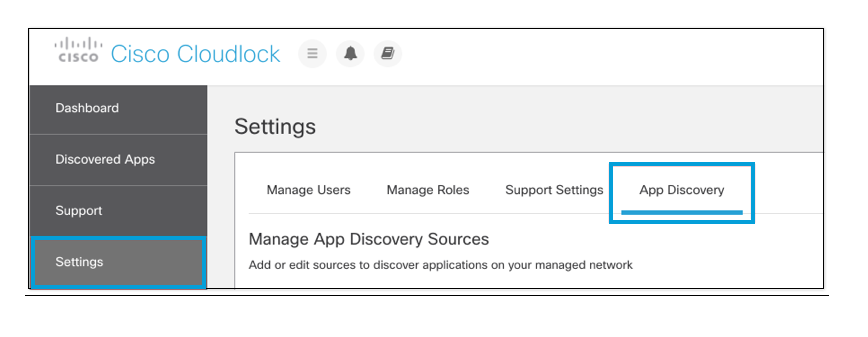
- Select Add New Source.
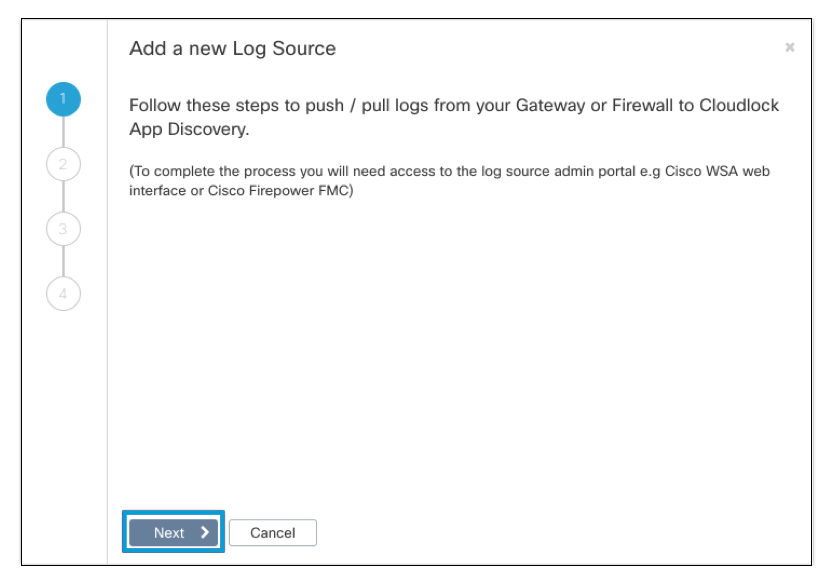
- In the App Discovery Wizard, select Next.
- Enter a unique name for the device to be used as a log source, select Cisco WSA, then specify whether the WSA device is running the latest software (11.5), or a previous version.
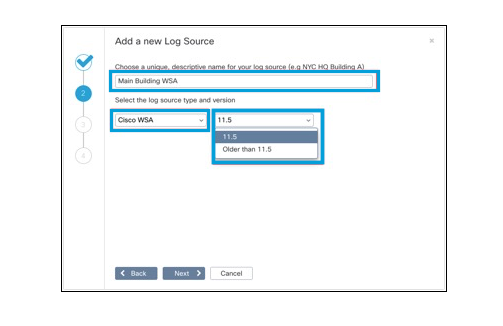
Note: the following procedure is valid only for WSA version 11.5. If your WSA Device is running a previous build, continue instead with WSA Pre-11.5 Procedure.
- Select Next, then follow the instructions provided in the Wizard.
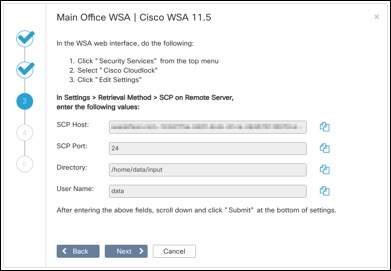
- Select Next, then paste the SSH key from the WSA console into the App Discovery Wizard.
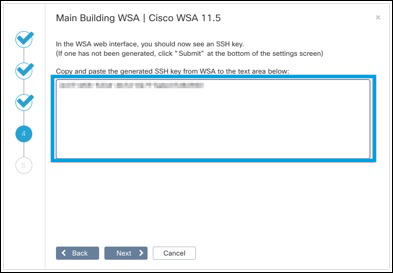
The WSA console may display two keys: ssh-dss and ssh-rsa. You can identify these by the prefix “ssh-dss” or “ssh-rsa”. Copy only one (it does not matter which). Be sure to copy the prefix in addition to the rest of the key, as shown here:

- Select Next. Follow the instructions in the final Wizard panel to commit changes in the WSA console, then select Done.
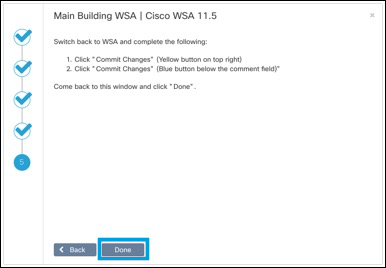
You have finished setting up a log source for App Discovery. If you have additional WSA devices to integrate as log sources, select Add New Source (Identification and Authentication Step 2) to reopen the Wizard and repeat the process for each log source.
Both WSA 11.5 and pre-11.5 devices can be used as log sources at the same time.
It will take approximately 24 hours for data to begin to appear in your Cisco Cloudlock App Discovery console. If no data appears even after 24 hours, please contact [email protected] for assistance.
WSA Pre-11.5 Procedure
If your WSA device is running a software version previous to 11.5, follow these steps to continue setting up your WSA as a log source for App Discovery. The difference between this process and the procedure for WSA 11.5 is that the 11.5 software automates some of the steps that here must be performed manually, as detailed below.
- Enter a unique name for the device to be used as a log source, select Cisco WSA, then specify that your device is running an older-than-11.5 version of software.
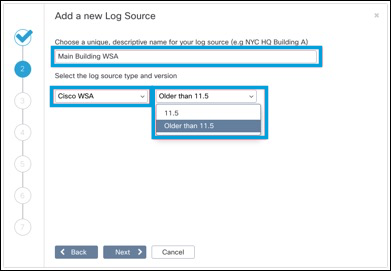
- Select Next, then follow the instructions provided in the Wizard.
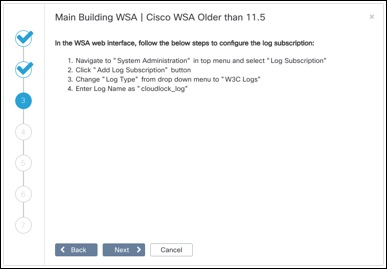
- Select Next, then follow the next set of instructions in the Wizard.
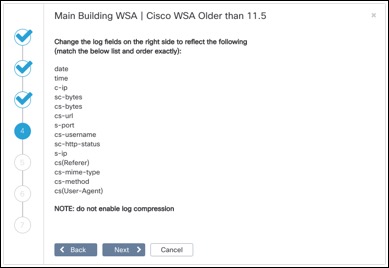
In order to easily create the required list of Selected Log Fields in the WSA console, it can be easier to select all the fields in the right-side list, click Remove, then add the needed fields from the left-side list. Use the Move Up/Move Down controls if necessary to make sure the fields are
in the order specified in the Wizard:
- Select Next, then follow the next set of instructions in the Wizard.
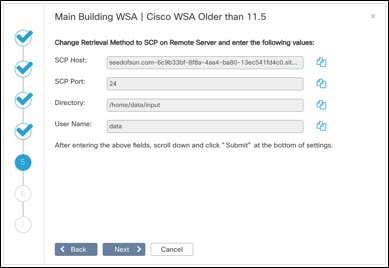
- Select Next and paste the SSH key from the WSA console into the Wizard, as shown.
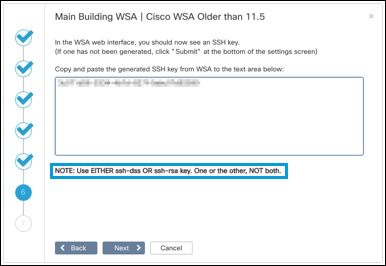
The WSA console may display two keys: ssh-dss and ssh-rsa. You can identify these by the prefix “ssh-dss” or “ssh-rsa”. Copy only one (it does not matter which). Be sure to copy the prefix in addition to the rest of the key, as shown here.

- Select Next. Follow the instructions in the final Wizard panel to commit changes in the WSA console, then select Done.
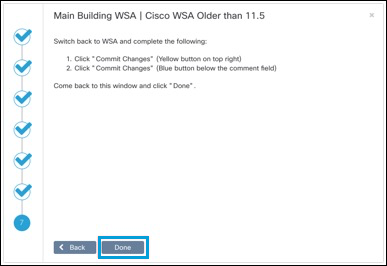
You have finished setting up a log source for App Discovery. If you have additional WSA devices to integrate as log sources, select Add New Source (Identification and Authentication Step 2) to reopen the Wizard and repeat the process for each log source.
Both WSA 11.5 and pre-11.5 devices can be used as log sources at the same time.
It will take approximately 24 hours for data to begin to appear in your Cisco Cloudlock App Discovery console. If no data appears even after 24 hours, please contact [email protected] for assistance.
Updated almost 6 years ago
