Deploy VAs in Microsoft Azure
Deploy Umbrella Virtual Appliances (VAs) in Microsoft Azure.
An Umbrella site requires two Umbrella Virtual Appliances (VAs). It is critical that these VAs are not cloned or copied in any way. You must set up and configure each VA manually.
Table of Contents
Prerequisites
- Full Admin user role. For more information, see Manage Accounts.
- For information about the requirements for deploying Umbrella VAs, see Prerequisites.
- If you use the VA on Azure as a DNS server for your on-premise endpoints, then DNS traffic from these endpoints should not traverse through a Network Address Translation (NAT) device en route to the VA. The VA should receive DNS packets with the source IP as the internal IP of the endpoints. An ExpressRoute or dedicated MPLS or site-to-site VPN connection from your on-premise environment to Azure will meet this requirement.
- A system running Windows 10 with the Hyper-V role enabled to convert VHD images to an Azure-acceptable format.
- Only VAs running version 2.4 or above can be deployed in Microsoft Azure.
Configure Authentication for the Virtual Appliances
- For more information, see Configure Authentication for Virtual Appliances.
Before You Begin
- Add internal.cloudapp.net to the internal domains list for VAs.
- Unless you are using your own DNS server in Azure, you should configure 168.63.129.16 as the local DNS server in the VA settings. This is the virtual IP used by Azure for recursive and local DNS queries.
Procedure
- Step 1: Prepare the Virtual Appliance Image on Azure. This is a one time task.
- Step 2: Launch the Virtual Appliance on Azure. Perform this task for each VA after you have performed the one-time task of preparing the VA image.
Step 1: Prepare the Virtual Appliance Image on Azure
Download the software package for the Umbrella Virtual Appliance.
When you download the software package for the VA and if you did not configure API key credentials for your AD Connectors and VAs, Umbrella displays a warning message. We recommend that you configure API keys for your AD Connectors and Umbrella VAs. For more information, see Configure Authentication for Virtual Appliances.
This is a one-time task to create an image in Azure that can be used to launch multiple VAs.
Note: Second generation VMs are not supported for VA deployments.
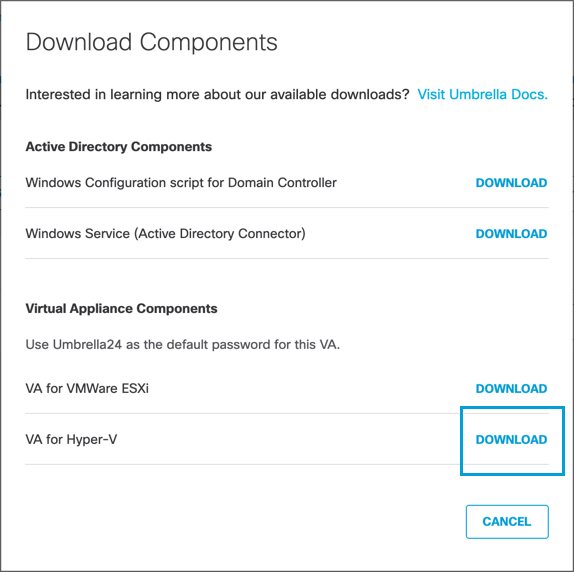
a. Navigate to Deployments > Configuration > Sites and Active Directory and click Download.

b. Click Download for VA for Hyper-V.

Umbrella generates and downloads to your computer a .tar file unique to your deployment.
This tar file includes:
- a .zip file containing the virtual hard disks that need to be deployed on Azure
- a signature file
- a Cisco public certificate to validate the signature
- a readme file
c. Extract the contents of the tar file using the command
tar –xvf.
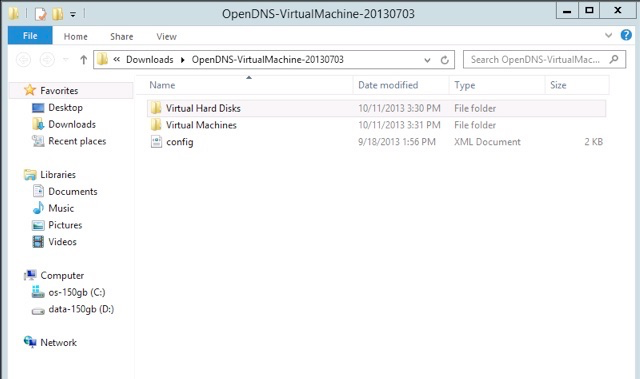
To verify the integrity of the downloaded file, validate the signature by following the instructions provided in the readme file. On successful signature validation, you should see a message saying “Verified OK."d. Extract the downloaded zip file. You'll find two folders—Virtual Hard Disks and Virtual Machines—and a config file.

e. Open Windows PowerShell as Administrator, navigate to the Virtual Hard Disks folder, and convert the vhd files (forwarder and dynamic) in their respective folders to a fixed type format acceptable by Azure.
To convert and resize the forwarder file, run the following commands:
Convert-VHD -Path .\forwarder-va.vhd -DestinationPath forwarder-fixed.vhd -VHDType fixed
Resize-VHD .\forwarder-fixed.vhd  -SizeBytes 8GB
To convert and resize the dynamic file, run the following commands:
Convert-VHD -Path .\dynamic.vhd -DestinationPath dynamic-fixed.vhd -VHDType fixed
Resize-VHD .\dynamic-fixed.vhd -SizeBytes 30MB
Conversion free disk space requirements
Conversion requires at least 9GB of free disk space to create the modified disks. The new forwarder-fixed.vhd will consume approximately 8GB of space. Machines with less than 9GB of space will fail to convert with a red error message.
f. Upload the
forwarder-fixed.vhdanddynamic-fixed.vhdto a blob in your Azure storage account using the Azure portal or the AZ CLI.
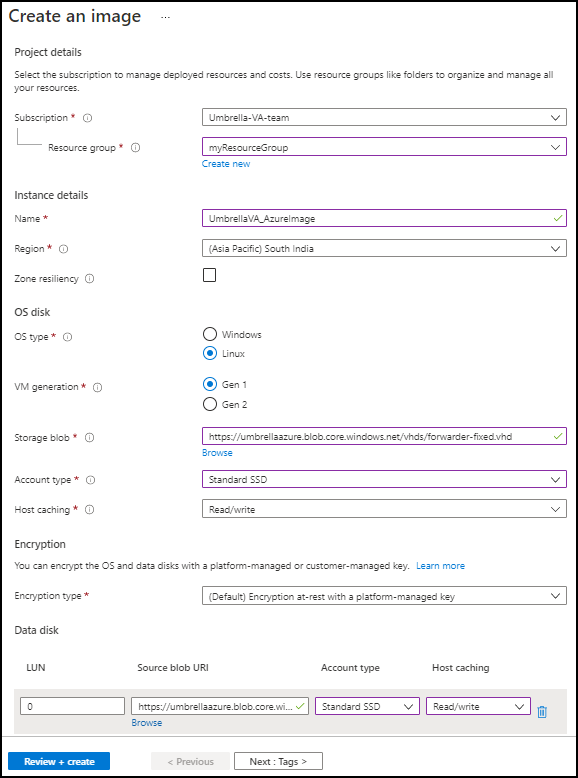
Note: This is a one-time upload.g. Create an image in Azure from these virtual hard disks using the Azure portal.
Use theforwarder-fixed.vhdas the OS disk (OS type: Linux) and thedynamic-fixed.vhdas the data disk.
Note: Ensure that Host caching for both the OS disk and data disk is set toRead/write. Since second generation VMs are not supported for VA deployments, ensure that you set VM Generation toGen 1.

h. Once the VA image is created in Azure, use this image to launch multiple VAs. For more information, see Step 2: Launch the Virtual Appliance on Azure.
Step 2: Launch the Virtual Appliance on Azure
Note: Before performing this task, you must complete the one-time task of preparing the virtual appliance image on Azure. For more information, see Step 1: Prepare the Virtual Appliance Image on Azure.
a. Use the Azure portal to launch Umbrella VAs in Azure using the VA image you created in Step 1: Prepare the Virtual Appliance Image on Azure:
- Choose a VM size with at least one VCPU and 1024 MB RAM.
Note: VM sizes above eight VCPUs are not supported. - For the Administrator account, set the Authentication type to Password.
Note: It is a security risk to specify a public IP address for the VA, and is not recommended except in case of SNAT port exhaustion issues. If you need to configure a public IP for the VA on Azure for these issues, ensure that inbound access from the Internet is not permitted. For more information, see Troubleshoot Intermittent DNS Resolution Failures on a VA Deployed in Azure. - Provide the username as vmadmin and enter a password that meets complexity requirements.
Note: The admin-password you create here is not actually set on the VA.
b. You may also use the Azure Cloud Shell to launch VAs in Azure using the VA images you created in Step 1: Prepare the Virtual Appliance Image on Azure. VM sizes above eight VCPUs are not supported.
You may specify the static IP as part of the command. For example:
az vm create --resource-group MyResourceGroup --size Standard_B2s --name UmbrellaVA
  --image VAImage --authentication-type password --admin-username vmadmin
  --admin-password <password> --vnet-name MyVnet --subnet MySubnet
  --private-ip-address 10.0.0.1
c. In Umbrella, navigate to Deployments > Configuration > Sites and Active Directory.
You should see the VA listed here.d. Use the same image to launch multiple VAs as required. Provide a different name and different static IP for each VA.
Note: If you do not specify the private IP address, the VA will automatically pull a DHCP IP and register to Umbrella with this IP address. This IP address will be listed as the VA name on Umbrella's Sites and Active Directory page.
Diagnostic Settings
It is not recommended to turn on Diagnostic Settings (Guest-level monitoring) or install any extension for a VA on Azure. Enabling diagnostics results in huge log files being generated on the VA, which causes the VA to run out of disk space.
If your VA on Azure is reporting disk space issues, navigate to the Settings > Extensions page against your VA on the Azure portal and remove any extensions. Also, navigate to the Monitoring > Diagnostic Settings page against your VA on the Azure portal and verify that Guest-level monitoring is turned off.
Azure Update Manager
We do not recommend enabling Azure Update Manager, as it may lead to the VA running out of disk space.
For more information, see Azure Update Manager.
Deploy VAs in VMware < Deploy VAs in Microsoft Azure > Deploy VAs in Amazon Web Services
Updated 4 months ago
