Add a DNS Policy
Before You Start
Plan your DNS policy. Before you start adding a DNS policy to Umbrella, we recommend that you read through these sections in full. Decide before you start as to how your DNS policy will define security and access controls for your identities.
Through DNS policies, you set the rules as to how Umbrella protects and manages your systems—your identities. Add a DNS policy to Umbrella to provide DNS-layer visibility and enforcement of your web traffic with the ability to selectively proxy risky domains.
Note: Various features of the policy wizard may not be available for your Umbrella package. To determine your current package, navigate to Admin > Licensing. For more information, see Determine Your Current Package. If you encounter a feature described here that you do not have access to, contact your sales representative for more information about your current package. See also, Cisco Umbrella Packages.
There are two parts to adding a new DNS policy:
- Part One — Set up the Policy Wizard.
Select protection options and components for your policy along with the identities to which this policy will be applied. The selections you make here determine which steps of the policy wizard are made available to you for configuration in Part Two — Configure the Policy. - Part Two — Configure the Policy.
Once you have set up the Policy wizard, configure your policy by moving through the wizard and selecting various Umbrella features for implementation. The steps available here are determined by the choices you made in Part One — Set up the Policy Wizard.
Table of Contents
- Prerequisites
- Part One — Set up the Policy Wizard
- Part Two — Configure the Policy
- Configure Security Settings
- Configure Content Category Settings
- Configure Application Settings
- Configure Destination Lists
- Configure File Analysis
- Configure Block Page Settings
- Save Your DNS Policy
Prerequisites
- Identities are added and configured. See Manage Identities.
- Full Admin access to the Umbrella dashboard. See Manage User Roles.
Part One — Set up the Policy Wizard
- Navigate to Policies > Management > DNS Policies and click Add.
When the DNS Policies page opens for the first time, it only lists the Default policy, which should be configured as your policy of last resort.
Note: The Default policy always applies to all identities available to DNS policies.

2. Select the Policy wizard components you'd like enabled and determine how Umbrella will block threats.
The first page of the Policy wizard is where you choose the components of the policy that you want to configure. The options you choose here determine which steps of the Policy wizard become available for configuration and thus how this policy will protect your identities.
Selecting an option here makes that component available for configuration in the Policy wizard's later steps. However, selecting an option here does not necessarily activate that feature as some features require additional configuration steps.
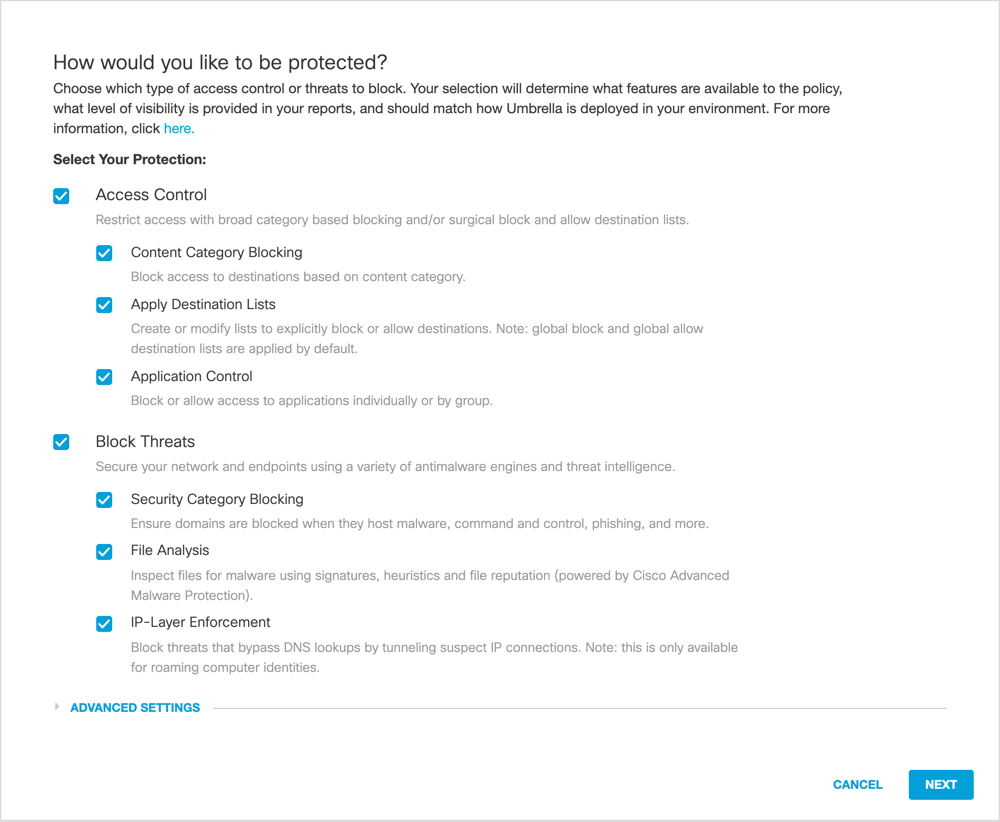
- Access Control options are:
- Content Category Blocking—When selected, the Policy wizard's Content step is available.
- Apply Destination Lists—When selected, the Policy wizard's Destinations step is available.
- Application Control—When selected, the Policy wizard's Applications step is available. SSL Decryption must also be enabled.
- Block Threats options are:
- Security Category Blocking—When selected, the Policy wizard's Security step is available.
- File Analysis—When selected, the Policy wizard's File Analysis step is available. Unavailable, if the intelligent proxy is disabled.
3. Optionally, expand Advanced Settings, enable the intelligent proxy and related SSL Decryption features, SafeSearch, and logging.
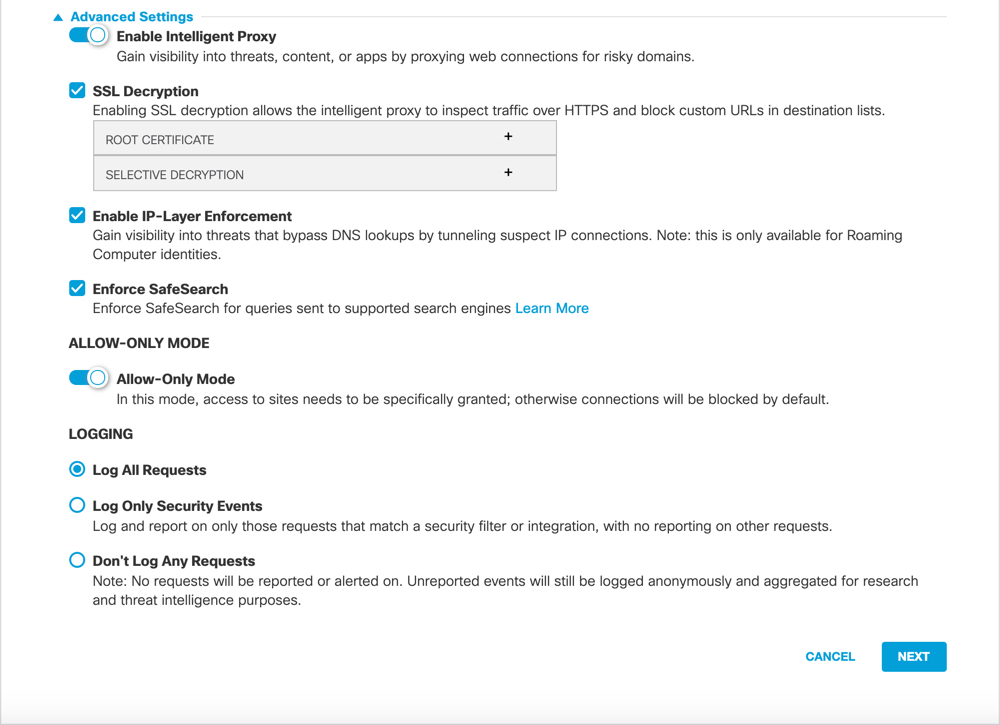
- Enable Intelligent Proxy—When enabled, Umbrella uses the Cisco Talos web reputation and other third-party feeds to determine if a URL is malicious. The intelligent proxy also uses anti-virus (AV) engines and Cisco Advanced Malware Protection (AMP) to inspect files before they are downloaded. When disabled, File Analysis is also disabled. For more information about the intelligent proxy, see Manage the Intelligent Proxy.
- SSL Decryption—When selected, allows the intelligent proxy to inspect traffic over HTTPS and block custom URLs in destination lists. The intelligent proxy must be enabled. For more information, see SSL Decryption Requirements and Implementation.
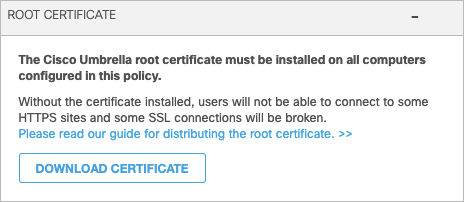
Note: SSL Decryption is required to block applications. See Configure Application Settings. - Root Certificate—If SSL Decryption is selected, download and install the Cisco Umbrella root certificate on all computers integrated with this policy; for example, all computers integrated with the Network identity. For more information, see Install the Cisco Umbrella Root Certificate.
a. Expand Root Certificate and click Download Certificate.
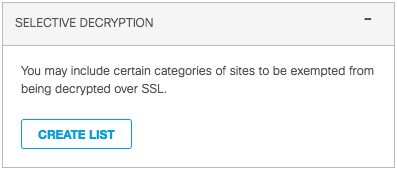
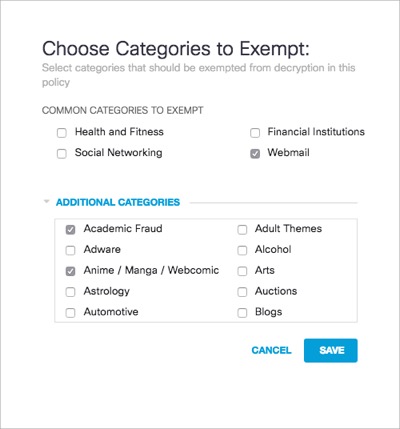
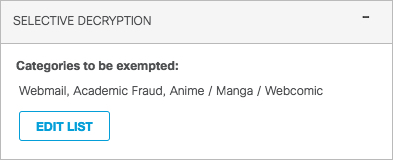
- Selective Decryption—Create a list of content categories to exclude from inspection by the intelligent proxy.
Create Selective Decryption List
a. Expand Selective Decryption and click Create List.
b. Select content categories to exempt from being proxied—inspected—and click Save.
Note: The content categories Terrorism, Internet Watch Foundation, and German Youth Protection are excluded from this list and are always proxied.
- Enforce SafeSearch—Enables SafeSearch for all computers integrated with this policy. SafeSearch is a feature of the major search engines that restricts and filters explicit images and results. Umbrella provides the ability to enforce traffic to Google, YouTube, and Bing on a per-policy basis. For more information, see Enforce SafeSearch for DNS Policies.
- Allow-Only mode—Select to only allow access to a small subset of domains through destination lists and automatically block all other domains. Because the result of enabling this feature is to effectively block access to the internet except for that part you've defined as "allowable", we recommend caution when enabling this feature. When enabled, you can only add Allowed destination lists.
Logging settings are:
- Log All Requests—For full logging, whether for content, security or otherwise.
- Log Only Security Events—For security logging only, which gives your users more privacy—a good setting for people with the roaming client installed on personal devices.
- Don't Log Any Requests—Disables all logging. If you select this option, most reporting for identities with this policy will not be helpful as nothing is logged to report on.
For more information about managing your logs, see Manage Your Logs.
- Click Next.
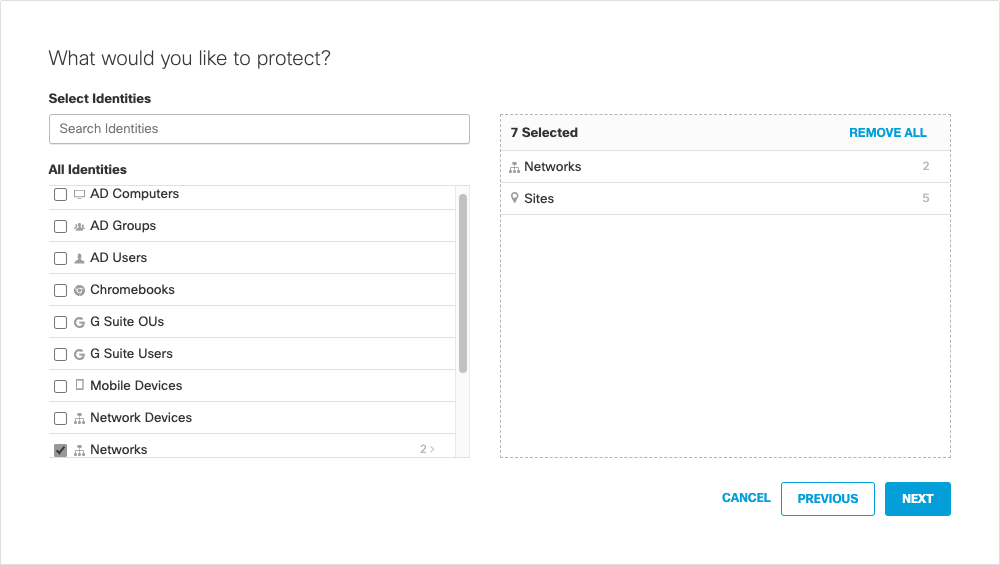
- Select the identities you wish to apply this policy to.
Identities that are listed with a number to the right can be clicked through to more selectively choose identities.
Note: Tags are not identities, but rather groupings of roaming computer identities. For more information, see Group Roaming Computers with Tags.
- Click Next.
When you click Next you move to part two of the Policy wizard, a progress bar appears listing the step you are on and the number of steps remaining until you've fully configured the policy. Steps listed correspond to the policy components selected in Set up the Policy Wizard.

Part Two — Configure the Policy
The steps available here are determined by the choices you made in Part One — Set up the Policy Wizard.
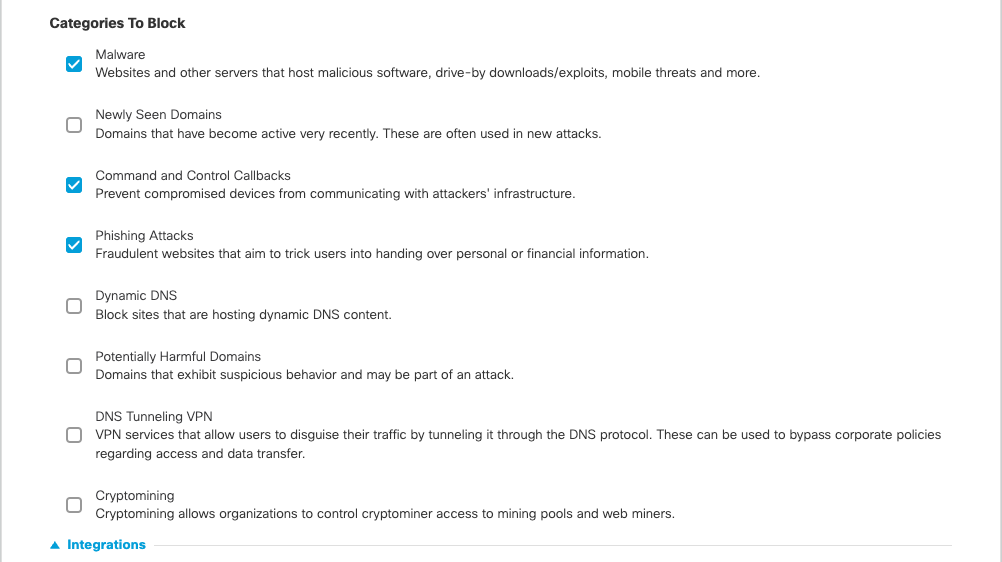
1. Configure Security Settings
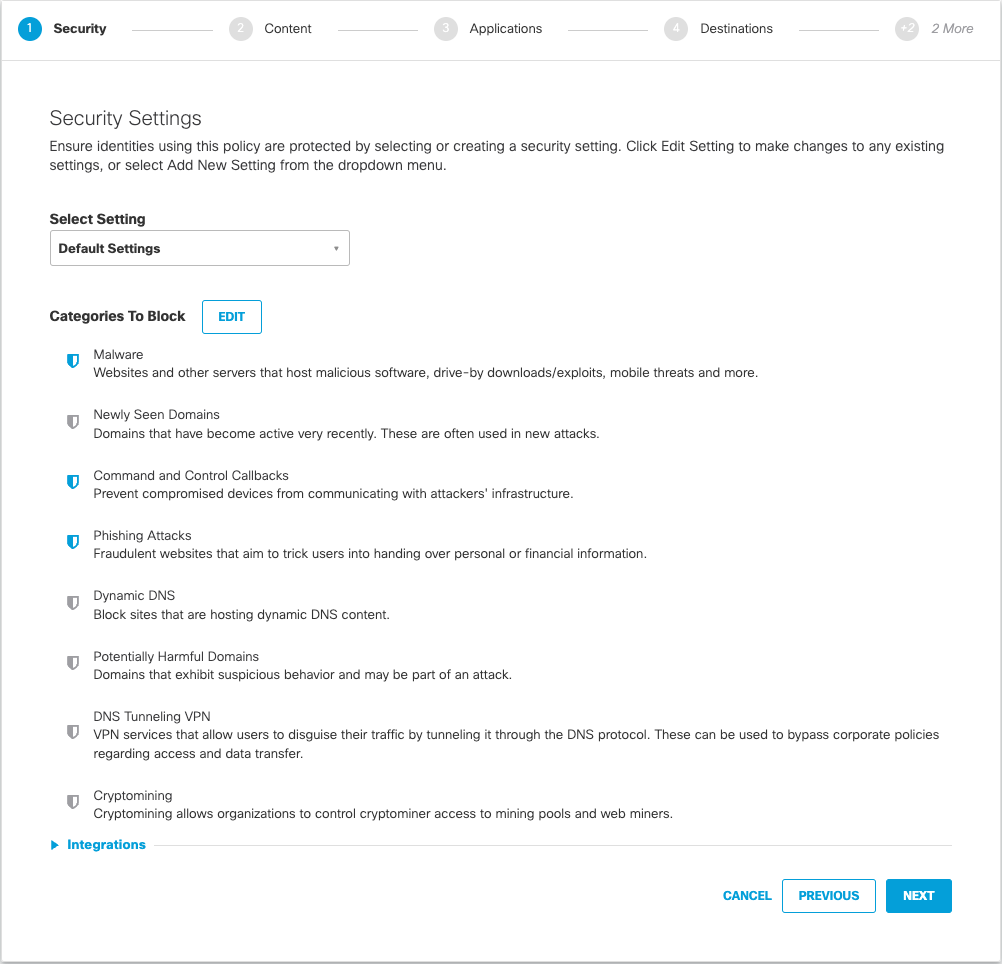
Security settings determine which categories of security threat Umbrella blocks. For more information about each category, see Manage Security Settings.
- Click Next to use default settings or click Edit, select or clear categories, and then click Save.
Note: A grey shield indicates that the item is not selected.
Select or Create Preconfigured Settings
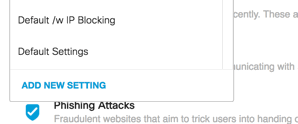
If this is not your first policy, as an alternative to clicking Edit, you can select a preconfigured grouping of security settings or create a new setting.
a. From the Security Settings drop-down list, choose a security setting or Add New Setting.
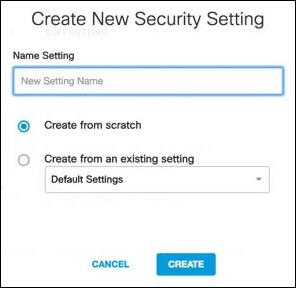
If you choose Add New Setting, a window appears allowing you to add a new setting.
b. Give the Security setting a good meaningful name, choose how you are going to create it, and click Create.
c. Select or clear categories and click Save.
Integrations
- Optionally, expand Integrations.
Only custom integrations enabled and configured under your account appear. For more information about integrations, see Umbrella Integrations.
Integrations become available for selection when you click Add New Setting—if this is your first policy—or Edit at the top of the page.


- Select integrations as necessary and click Save.
- Once you've configured security settings, click Next.
2. Configure Content Category Settings
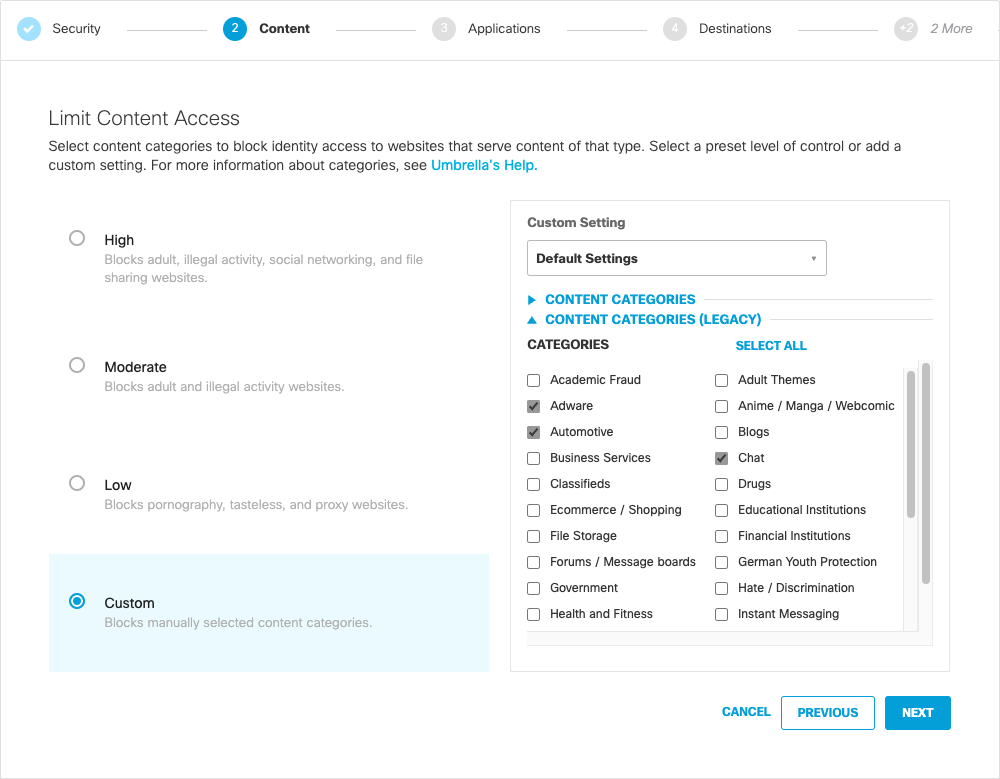
Content categories organize destinations—in this case, websites—into categories based on the type of information served by the website; for example, gambling, social networking, or alcohol. Select content categories to block identity access to destinations that serve up content of that type. When an identity attempts to access a destination that is blocked because of a DNS content setting, an Umbrella block page appears. For a list of all categories and a definition for each, see DNS Content Categories.
- Select a preset categorization level:
- High—Blocks adult-related sites, illegal activity, social networking, video sharing sites, and general time-wasters. Note that not all content categories are listed under High. There is a sub-listing of content categories that are only available to Custom.
- Moderate—Blocks all adult-related web sites and illegal activity.
- Low—Blocks pornography and anonymous web surfing.
- Custom—For the creation of a custom grouping. Lists all content categories.
The High, Moderate, and Low levels propagate upward. Low categories are included with Moderate and both Moderate and Low category presets are included in High. Custom includes all categories included with the High setting.
2. If you choose Custom, select Categories to Block as needed.
Optionally, from the Custom Setting drop-down list, choose Create New Setting.
- Once you've configured content categories, click Next.
3. Configure Application Settings
Select applications you'd like to block identities from accessing. You may want to block access to applications because they represent an unacceptable security risk or when their functionality is inappropriate. Conversely, if an application should override a block, such as in the case of a content category match with the application, then change the block action to allow. For more information about controlling access to applications, see Manage Application Settings.
Note: You must enable SSL Decryption. If not already done, you must also download and install the Cisco Umbrella root certificate. For more information, see Install the Cisco Umbrella Root Certificate.

- Select an application category to select applications associated with the category or expand the category to choose individual applications within the category.
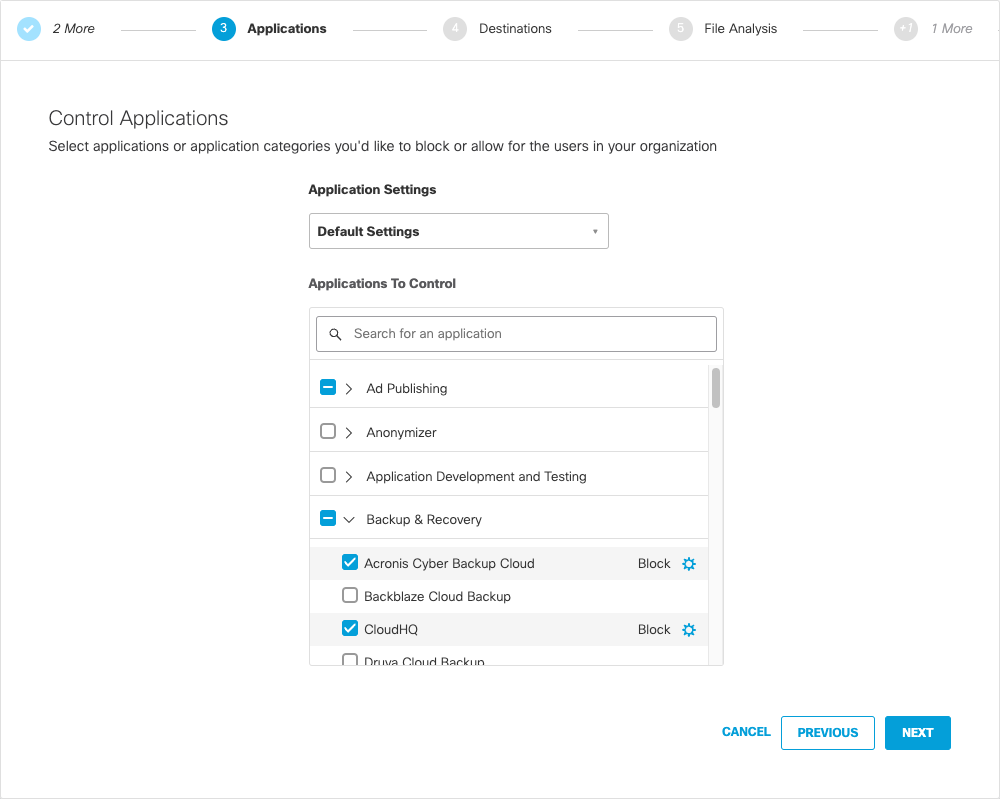
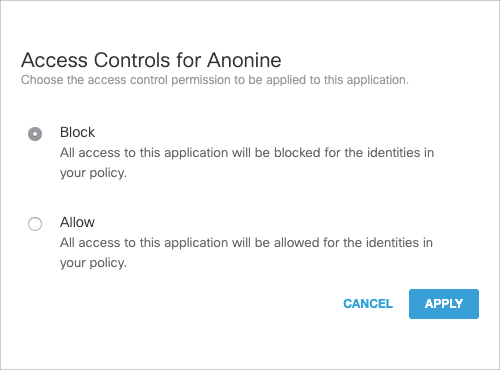
- Expand a category to allow or block individual applications within a category:
a. Click the wheel icon.
b. Select Block or Allow.
c. Click Apply.
- Click Next.
- Click Proceed to confirm your application selections.
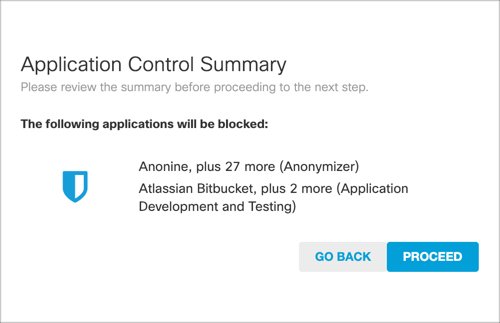
- Once you've configured application settings, click Next.
4. Configure Destination Lists
Destination lists control identity access—allowed or blocked—to specific internet destinations. Destinations supported are:
- Blocked—Domains and URLs. For URLs, you must also enable the intelligent proxy, SSL decryption and install the Cisco Umbrella root certificate. See Advanced Settings.
- Allowed—Domain, IP address (IPv4), or CIDR.
Note: If you enabled Allow-Only Mode under Advanced Settings, you can only add Allowed destination lists.

- Click Add New List or click a list to edit it.
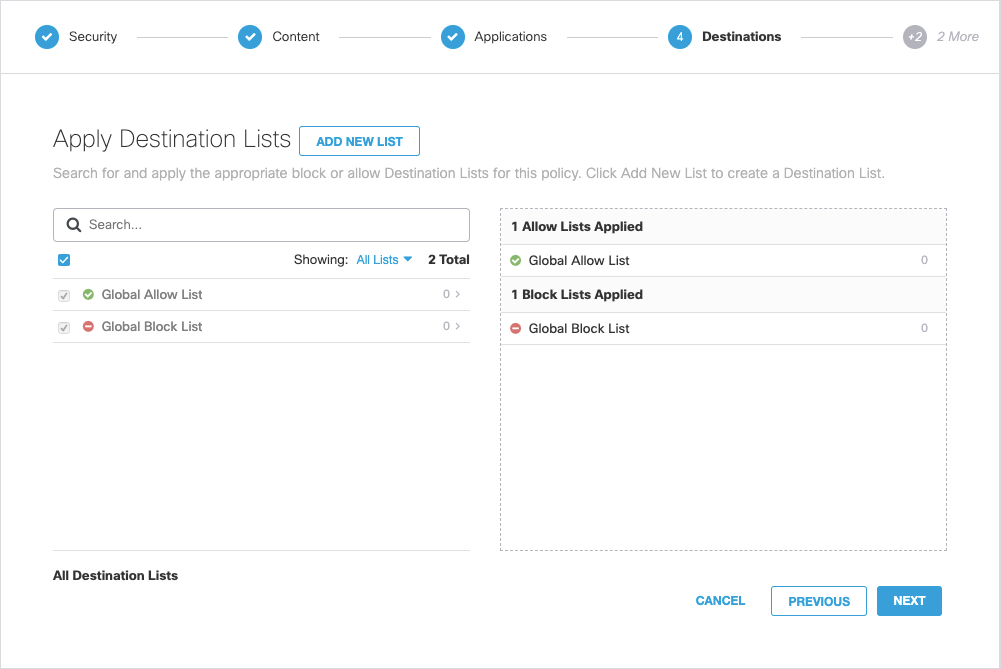
- Give your list a good meaningful name, select Blocked or Allowed, add destinations, and click Save.
For more information, see Manage Destination Lists. - Click Upload to bulk upload destinations through a text file.
For more information, see Add Destinations in Bulk.
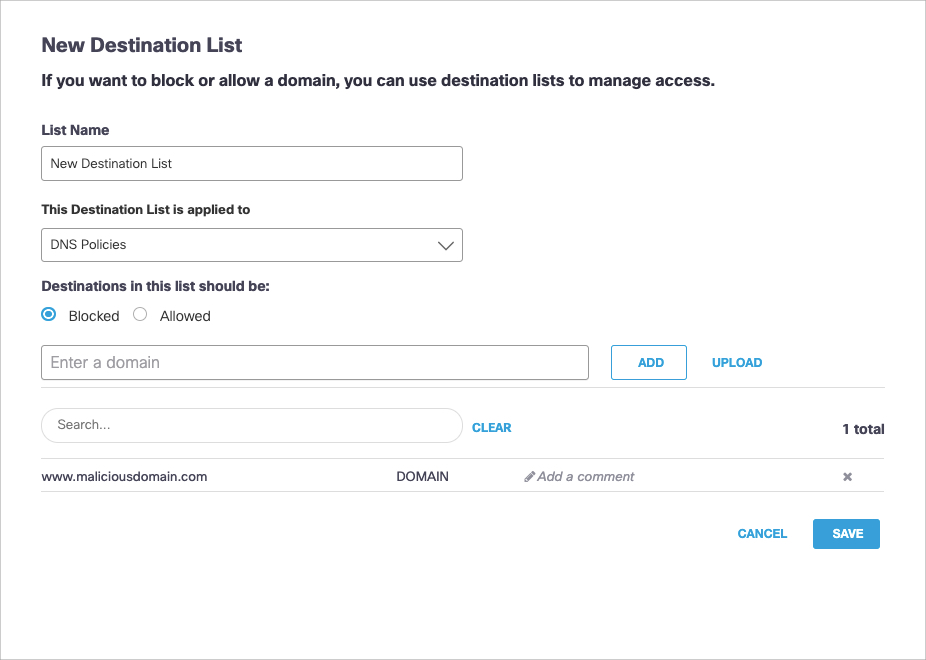
Your new destination list is added to the policy.

- Once you've configured destination lists, click Next.
When enabled, Umbrella inspects inbound files for malware using anti-virus signatures and AMP file reputation before the files are downloaded.
- Enable File Inspection.
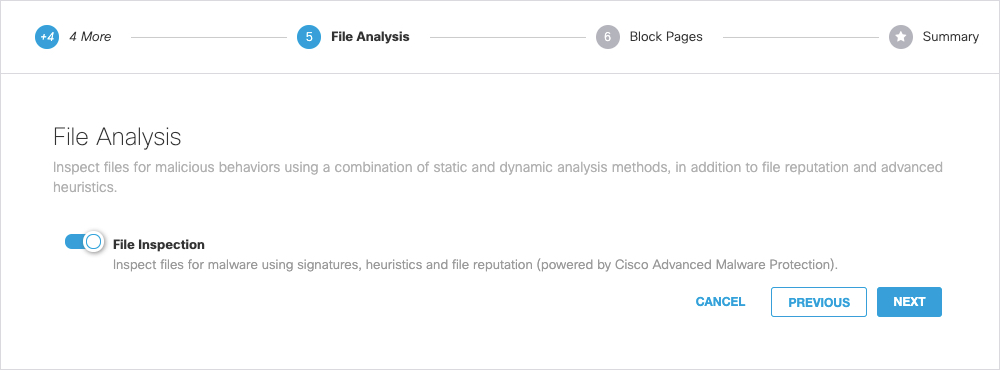
- Click Next.
###6. Configure Block Page Settings
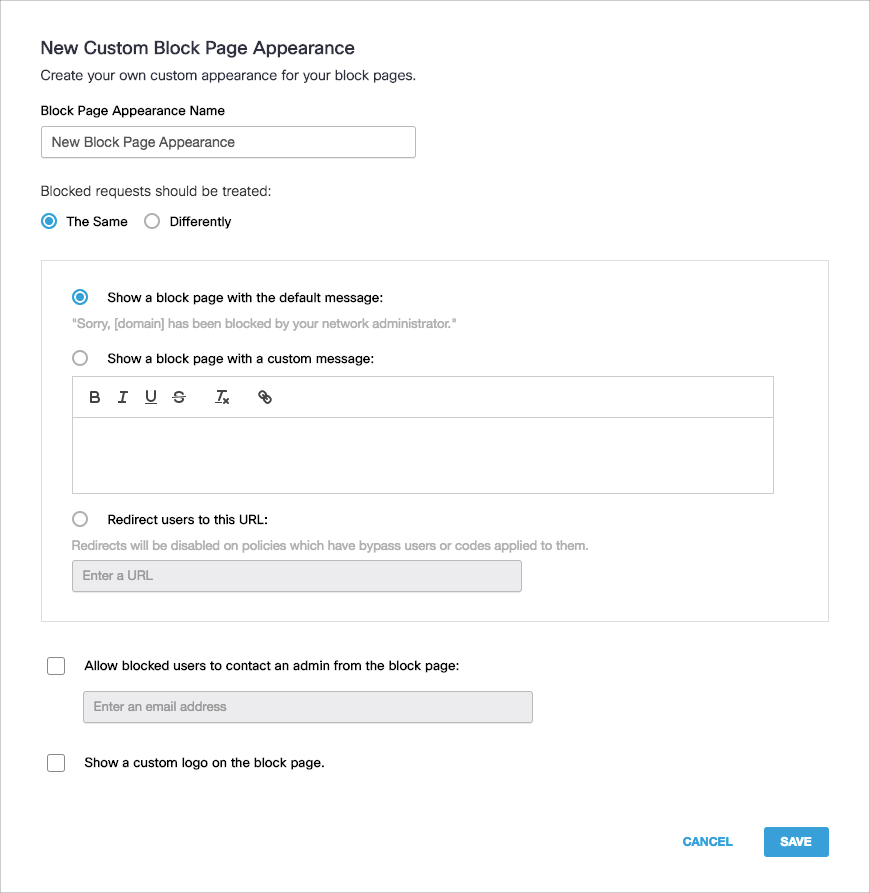
Block Page settings let you set the appearance of the block page that displays when a request is made to access a web page that is blocked by policy settings. You can customize the block page's appearance and redirect blocked identities to a custom domain. Bypass users and bypass codes let you set up a mechanism that allows identities access to blocked destinations. For more information about block pages, see Customize Block and Warn Pages.
Note: Not all categories can be bypassed. If access is blocked for a Security or Malware category, the site is considered malicious and should not be accessed under any circumstances.
- Click Use Umbrella's Default Appearance or Use a Custom Appearance.
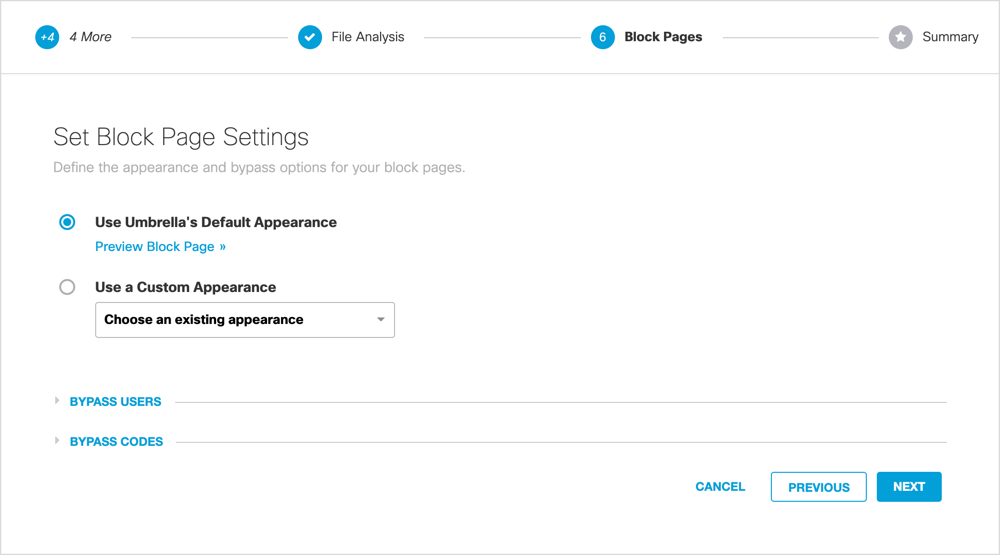
- If you clicked Use a Custom Appearance, choose Create New Appearance from the drop-down list.
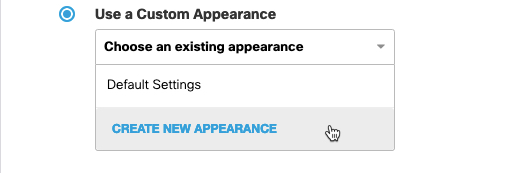
- Configure options as necessary and click Save.
Add a Bypass User
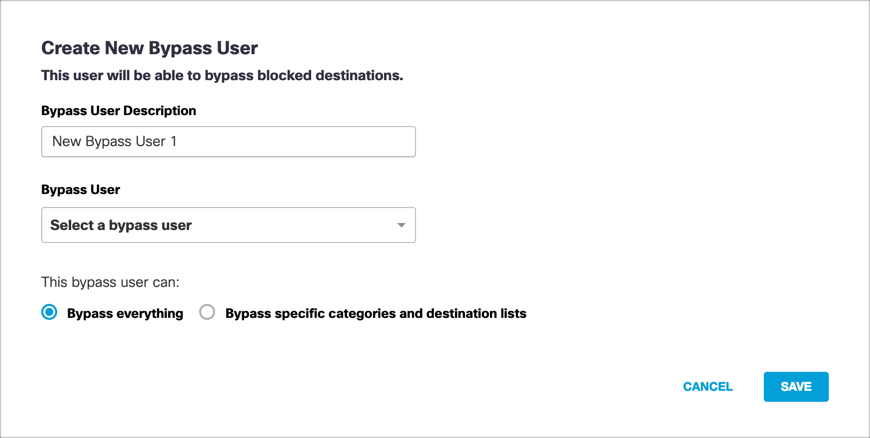
A bypass user can bypass block pages by authenticating against the block page. However, a bypass user cannot bypass a security block. A user must have an Admin Account to be added to a policy as a bypass user. For more information and the procedure, see Add a New User.
- Expand Bypass Users, select a user or click Create New.

- Add a good meaningful description, choose a Bypass User, select what can be bypassed, and click Save.
You can select specific content categories and destination lists.
Create a Bypass Code
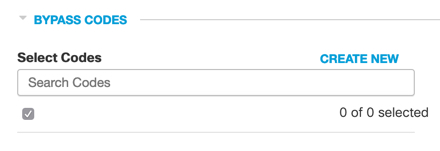
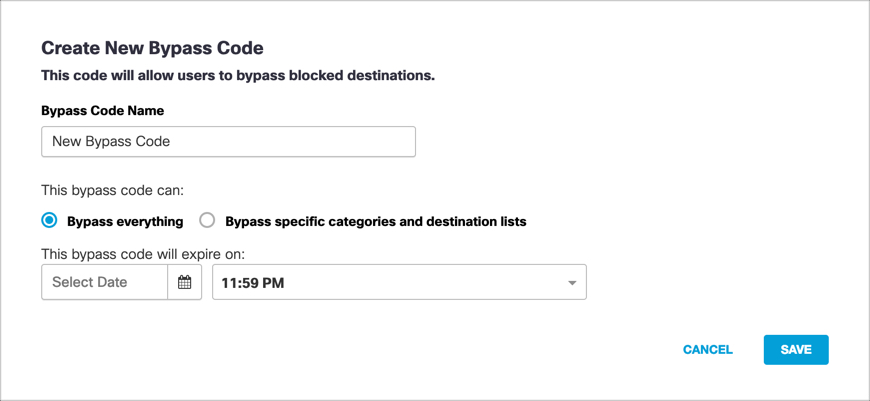
Bypass codes allow a bypass user access to a blocked page. All bypass codes have a configurable expiry date and can be extended at any time.
- Expand Bypass Codes, select a code or click Create New.
- Add a good meaningful name, select what can be bypassed, configure an expiry date, and click Save.
You can select specific content categories and destination lists.
Once you've set your block page and bypass settings, click Next.
The last step of the DNS Policy wizard is the Policy Summary page, which lists the DNS policy's current configuration.
- Give your DNS policy a meaningful name, review settings, and then click Save.
Your DNS policy is complete and operational. It is added to the list of DNS policies and becomes part of the enforcement evaluation process.
Note: Once the DNS policy is saved, it may take upwards of five minutes for the policy to replicate through Umbrella’s global infrastructure and start taking effect.
- To change a setting, click the relevant Edit button and the Policy wizard opens at that step. Make changes as needed and click Set & Return.
- Click Disable to disable a setting.
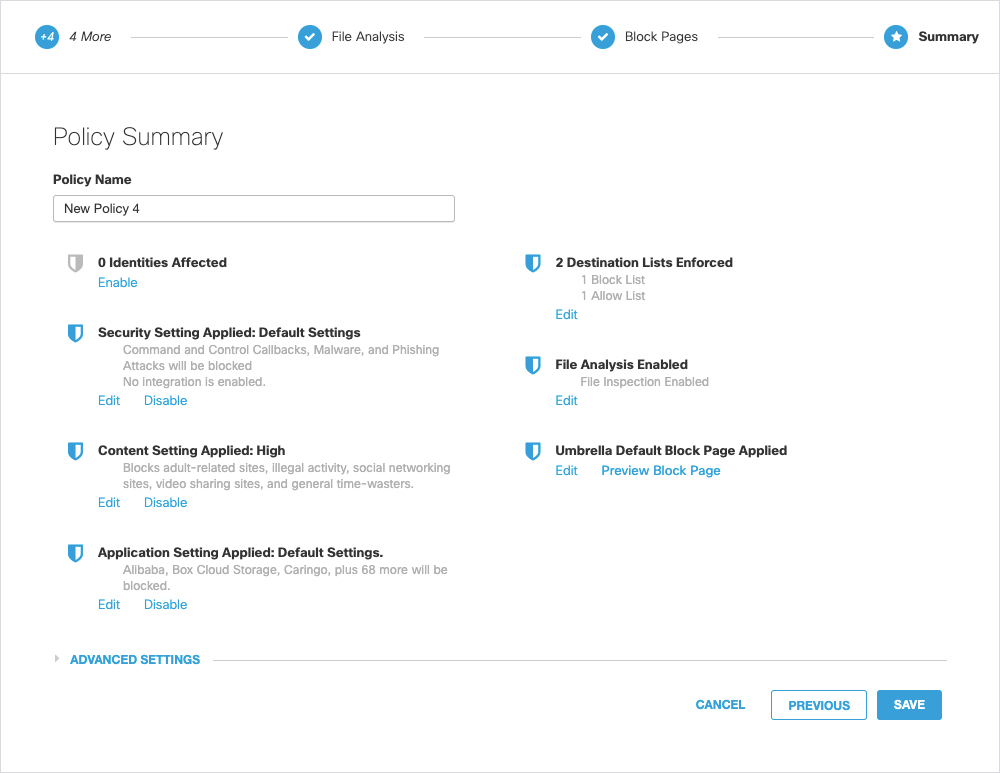
As you add identities and configurations to Umbrella, you may need to reevaluate your policies. You can update a policy at any time. When you open a policy, the Summary page appears. Click Edit for any setting that requires updating.
Manage DNS Policies < Add a DNS Policy > Test a DNS Policy
Updated almost 2 years ago
