
Mass Deployment (macOS)
Contents
(Optional) Package Customization
We recommend that on macOS platform, you customize the installation package before performing a mass deployment. For detailed instructions see Customize the macOS installation of Cisco Secure Client.
You can customize the macOS installer image (.dmg file) to embed the Umbrella profile (OrgInfo.json) within it before deployment. The profile will then be automatically imported during installation. The package can also include customizations to (optionally) disable the Secure Client VPN functionality.
You can use this customization to create a preconfigured deployment package that can be executed without additional scripts. For detailed instructions see Customize the macOS installation of Cisco Secure Client.
Add Umbrella Profile
Use the macOShdiutil command to create and mount a writable version of the .dmg image.
hdiutil convert cisco-secure-client-macos-<version>-predeploy-k9.dmg -format UDRW -o csc-writeable.dmg
hdiutil attach csc-writeable.dmg
You can then add the Umbrella profile (OrgInfo.json) to the package in the following location:
/Volumes/Cisco\ Secure\ Client\ <version>/Profiles/Umbrella/OrgInfo.json
(Optional) Disable VPN Functionality
You can edit the following file (within the mounted DMG image) to disable the VPN functionality.
/Volumes/Cisco\ Secure\ Client\ <version>/Profiles/ACTransforms.xml
Add the following configuration to ACTransforms.xml:
<Transforms>
<DisableVPN>true</DisableVPN> <DisableCustomerExperienceFeedback>true</DisableCustomerExperienceFeedback> </Transforms>
Save the .dmg image
Eject the mounted disk image and convert it back to a read-only format.
diskutil eject /Volumes/Cisco\\ Secure\\ Client\\ <version>
hdiutil convert csc-writeable.dmg -format UDRO -o csc-readable.dmg
The resulting file (csc-readable.dmg) can be distributed to users for manual installation or used as part of the Automated Installation process.
Automated Installation (macOS)
You can install Cisco Secure Client using a scripted, unattended process that follows the same workflow as the standard manual installation.
Installation (Pre-Deployment Package)
Cisco Secure Client (and its modules) are provided as a single ‘pre-deployment’ .dmg package. You must provide the attached install_choices.xml file to customize the installation so that only the necessary modules are installed. The attached install_choices.xml is preconfigured to install the minimum modules (Core VPN + Umbrella).
This installation method is possible only if you are performing a scripted installation or if your endpoint management tool supports the -applyChoiceChangesXML parameter.
Example:
hdiutil attach ~/Downloads/cisco-secure-client-macos-X.X.XXXX-core-vpn-predeploy-k9.dmg

sudo installer -pkg /Volumes/Cisco\\ Secure\\ Client\<version>/Cisco\\ Secure\\ Client.pkg -applyChoiceChangesXML ~/Downloads/install_choices.xml -target /
Note:
The ‘install_choices.xml’ file is used to install the Core Secure Client and Umbrella modules. Additionally, it can be edited to include the installation of other Secure Client modules as well.
Installation (Web Deployment Package)
Cisco also provides a web deployment package that contains each Cisco Secure Client module as individual .dmg files. This alternative is only recommended if your endpoint management tool can't supply the required -applyChoiceChangesXML parameter to select the corresponding modules.
Download the alternative headend (webdeploy) package (.pkg) and extract it with the macOS archive utility. Locate the relevant .dmg files in the binaries/ directory of the extracted package.
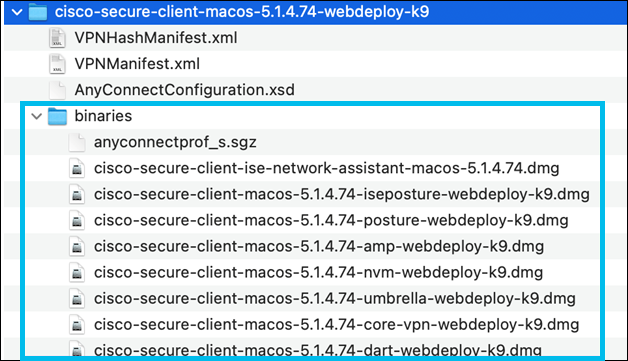
Both the Core VPN module and the Umbrella module must be installed separately as shown in the following examples:
hdiutil attach cisco-secure-client-macos-X.X.XXXX-core-vpn-webdeploy-k9.dmg
sudo installer -pkg /Volumes/Cisco\\ Secure\\ Client\\ -\\ AnyConnect\\ VPN\\ X.X.X.XX/ -target /

hdiutil attach cisco-secure-client-macos-X.X.XXXX-umbrella-webdeploy-k9.dmg
sudo installer -pkg /Volumes/Cisco\\ Secure\\ Client\\ -\\ Umbrella\\ X.X.X.XX/ -target /
Install Umbrella Profile
This is necessary unless the profile is already bundled with the installation package, see Package Customization.
After installation, copy the Umbrella profile to the correct folder on the local machine to register and activate the Umbrella module. This method is useful for endpoint management software that can push the files to the endpoint. The profile must be placed in the following location:
/opt/cisco/secureclient/umbrella/OrgInfo.json
Instead of copying the umbrella profile, you can create it with a script. This is useful if your endpoint management tools support post-install scripts.
The following example shows how to create the OrgInfo.json file using a bash script. Replace ORG_ID, FINGERPRINT, and USER_ID values with the ones from your profile.
# !/bin/bash

orginfo_file="/opt/cisco/secureclient/umbrella/OrgInfo.json"
data="{\\n
    "organizationId" : "ORG_ID",\\n
    "fingerprint" : "FINGERPRINT",\\n
    "userId" : "USER_ID"\\n
}"
if ! test -f $orginfo_file; then
	echo -e $data > $orginfo_file
fi
Note:
The Meraki Systems Manager (SM) Deployment guide explains how to deploy the Umbrella profile using scripts.
(Optional) Disable VPN Functionality (Post-Installation)
If the VPN functionality is not disabled during installation, it can be (optionally) disabled with a post-installation task or script. The Secure Client VPN functionality can be disabled after installation by creating a special profile, VPNDisable_ServiceProfile.xml. Place the profile in the following directory:
/opt/cisco/secureclient/vpn/profile/VPNDisable_ServiceProfile.xml
Instead of copying the umbrella profile, you can create it with a script. This is useful for management software that supports post-install script. The following example shows how to create the VPNDisable_ServiceProfile.xml using a bash script.
# !/bin/bash

profile_file="/opt/cisco/secureclient/vpn/profile/VPNDisable_ServiceProfile.xml"
data="<?xml version="1.0" encoding="utf-8"?>\\n
<AnyConnectProfile xmlns="http://schemas.xmlsoap.org/encoding/" xmlns:xsi="http://www.w3.org/2001/XMLSchema-instance" xsi:schemaLocation="http://schemas.xmlsoap.org/encoding/ AnyConnectProfile.xsd">\\n
  <ClientInitialization>\\n
    <ServiceDisable>true</ServiceDisable>\\n
  </ClientInitialization>\\n
</AnyConnectProfile>\\n"

if ! test -f $profile_file; then
	echo -e $data > $profile_file
fi
For more information, see How to Disable VPN Functionality in Cisco Secure Client.
Allow Secure Client System Extensions
By default, macOS requires users to accept the activation of a new system extension. As a result, users are presented with a dialog box when they first install Cisco Secure Client. Users must follow the prompts to allow the Cisco Secure Client - Socket Filter’ extension.
Alternatively, the system extension can be approved centrally by the administrator using endpoint management, or device management suites if the device is managed by UEM tools. For more information, see the advice in Approving the Cisco Secure Client System Extension.
Customize Windows Installation of Cisco Secure Client < Mass Deployment (macOS) > Customize macOS Installation of Cisco Secure Client
Updated about 1 year ago