
Add a SaaS API Rule to the Data Loss Prevention Policy
Configure a SaaS API Rule to set the criteria as to what triggers the scanning. As files in the selected tenant are scanned upon content and/or context (sharing) change, Umbrella assesses the file against this rule’s criteria. In case of a rule violation, the rule's action automatically triggers. You may also trigger a manual response action from the Data Loss Prevention Report.
An SaaS API Rule must have at least one of the following two criteria defined:
- Data Classifications — Include files that match data classification of your own making or a built-in data classification provided by Secure Access.
- File Labels — Include files that have specific file label names configured in the value of the files' document properties. This can be a MIP or Titus label, or (for MS 365 or Box only) a Sensitivity label.
Note: Changes to the share permissions or other options on a folder does not trigger a scan of the contents of that folder.
SaaS API rules configured to scan Microsoft Outlook messages scan only outgoing messages. Violations can be triggered by material found in the email subject, message body, or attachments; a single email message may trigger multiple violations: one for the message subject and body, and one for each attachment.
- Navigate to Policies > Management > Data Loss Prevention Policy. The page displays a list of all Real Time and SaaS API Rules created.
- From the Add Rule drop-down, choose SaaS API Rule.

- In the Add New SaaS API Rule page, enter a meaningful Rule Name and Description. Choose a Severity value from the drop-down based on the risk involved or the importance within the ruleset. (Assigning severity values can help later on when you need to filter events in the Data Loss Prevention report).

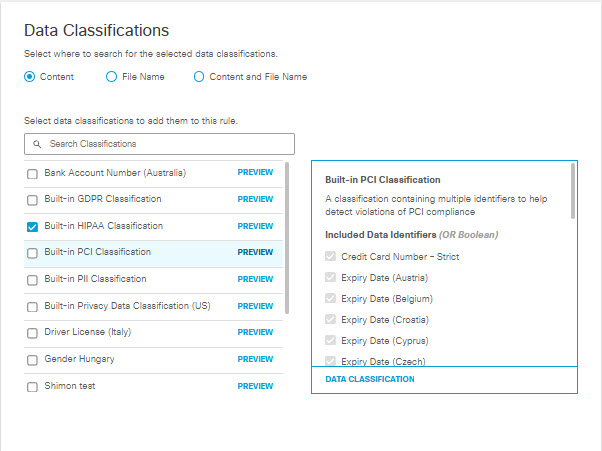
- Under Data Classifications select where in scanned files you would like this rule to search for the data classifications that you choose:

Content—(Default) Scans only the content of files for the selected data classifications. (For Outlook this option scans the message body of incoming email, and the file content of attachments to incoming email.)
File Name—Scans only file names for the selected data classifications. (For Outlook this option scans the subject line for incoming email, and the file name for attachments to incoming email.)
Content and File Name—Scans content and file names for the selected data classifications. Both content and file name do not need to match for the rule to apply, only one or the other.
Note: Choosing Content, File Name, or Content and File Name refers to scanning file uploads for the selected data classifications and configured file labels.
- Select Data Classifications to apply this rule; you can choose data classifications of your own making or built-in data classifications provided by Umbrella. (See Manage Data Classifications and Built-In Data Classifications.) Hover over PREVIEW to view data identifiers associated with each data classification.
- In the Files Control area, choose the file filters to apply to this rule. The file filters available depend on the platform you have chosen:
- For AWS S3, Azure Storage, Dropbox, Google Drive, ServiceNow, Slack, and Webex Teams you can apply filters for MIP and Titus labels, and file size.
- For Microsoft 365 and Box you can apply filters for MIP and Titus labels, sensitivity labels, and file size. (Within the Box application, sensitivity labels are referred to as classification labels.)
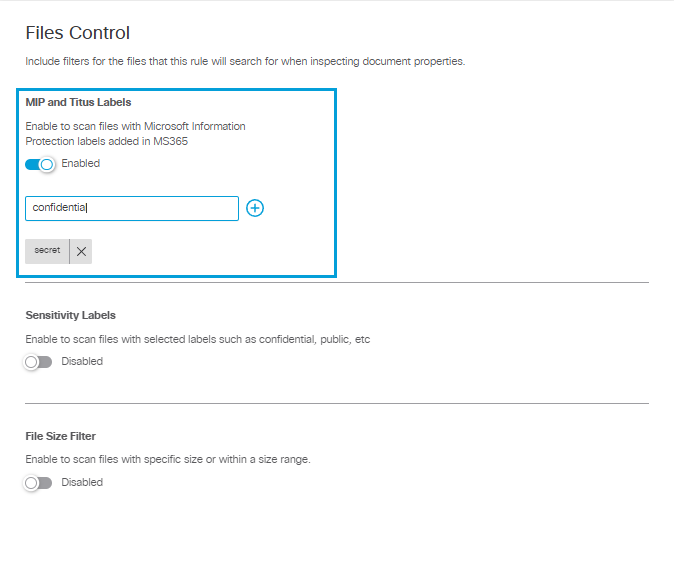
MIP and Titus Labels
For all platforms, you can enable MIP and Titus labels and add up to 10 case-sensitive file label names to apply to the rule. The rule will search for any of the configured label names in the files’ document properties. This includes Microsoft Office Document Properties and Adobe PDF Document Properties.
For Outlook, this applies to files attached to incoming mail. File uploads to Confluence and Jira are not scanned for file labels.
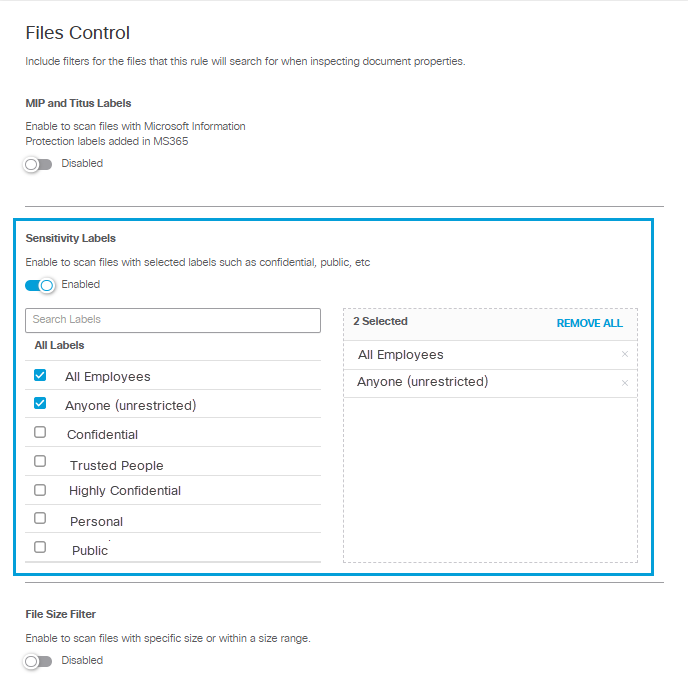
Sensitivity Labels
For Microsoft 365 OneDrive or SharePoint tenants, or for Box tenants, you can enable Sensitivity Labels and select from the list of sensitivity labels that have been created for your tenant. You may select any number of the labels displayed.
Note: Within the Box application, these labels are referred to as classification labels.
Microsoft Sensitivity Labels
Umbrella currently supports the detection of Microsoft sensitivity labels in the inspected file's properties values for Microsoft Word, Excel, PowerPoint, and .pdf files. Ensure you configure the rule with the name of the sensitivity labels, not the display names.
The system does not scan the following for file labels:
- Files attached to Outlook emails
- File uploads to Jira
- File uploads to Confluence
Note: If you create new sensitivity labels for your Microsoft 365 or Box tenant, it may take up to four hours for them to appear in the Umbrella interface.
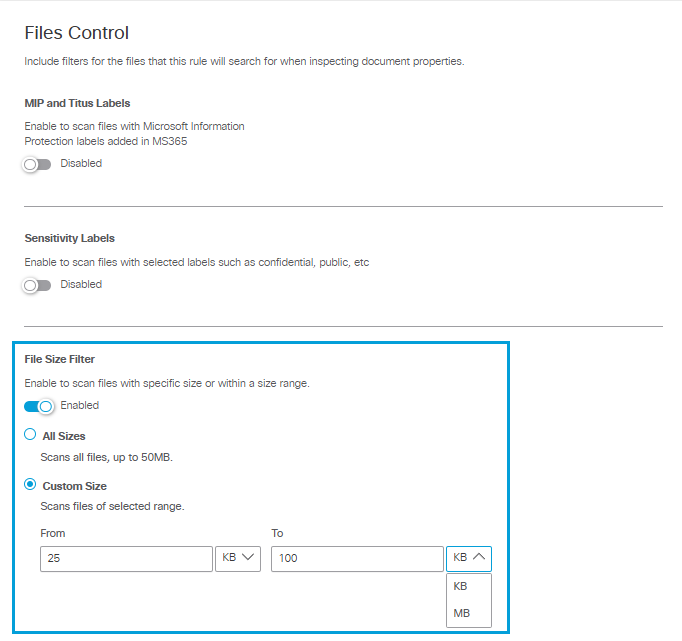
File Size Filter
For all platforms you can select file size filter criteria. The DLP applies the rule action to files that match the other criteria, within the file size specified up to the first 50 MB of plain text. (Umbrella does not scan file content beyond the first 50 MB regardless of the file size specified here.)
In the File Size area choose from two options:
- All Sizes to scan up to the first 50 MB of plain text of all files that meet other criteria defined by this rule. (A rule that specifies All Sizes must also specify Data Classifications.)
- Custom Size to specify the minimum and maximum size limits the system will scan for files that meet other inclusion criteria defined by this rule, if there are any. If the file size exceeds the first 50 MB of the file, Secure Access scans only up to the first 50 MB of plain text in the file. (I.e., if you specify a minimum file size greater than 50 MB, Umbrella will not scan for other criteria specified in the rule.)
You can choose to apply the rule action only to files that are greater than a minimum size you specify, or to files that are within a range of sizes you specify. (If you specify a maximum size without specifying a minimum size, the minimum size defaults to 0.) You can specify file sizes in KB or MB.
- In the Platform area, select one platform and one tenant for this rule. Only platforms with authorized tenants will appear in this list.
Note: When you select Microsoft 365 you can select both OneDrive and SharePoint, but you cannot select Outlook in combination with Microsoft OneDrive or SharePoint in the same rule.

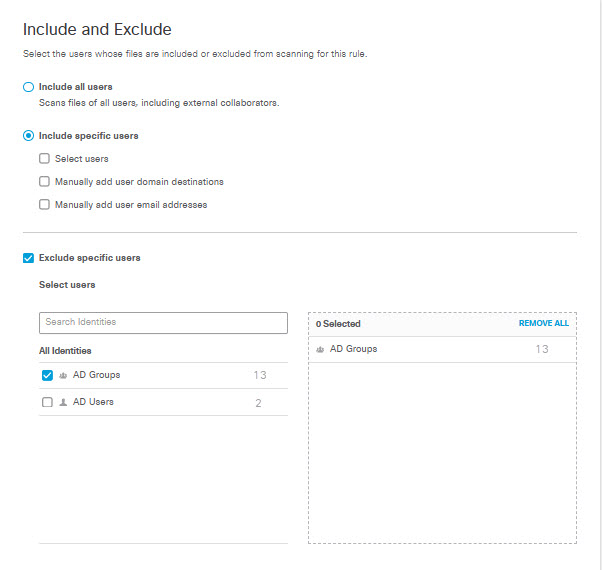
- In the Include and Exclude area, select users whose files are included or excluded from scanning for this rule. Make selections to include or exclude users from being matched. (For Outlook, user refers to the email sender.)
- Click the Include all users radio button to scan files from all users, including external collaborators.
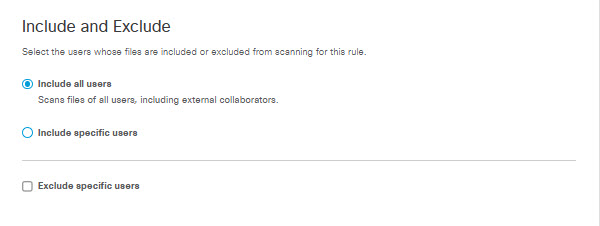
- Click the Include specific users radio button to scan files from specific users in one of the following ways:
- Check the Select users check box to include scanning for selected users as per the rule. You can select the entire AD group or search for identities by AD username or AD Group. The selected identities will appear in the box on the right.
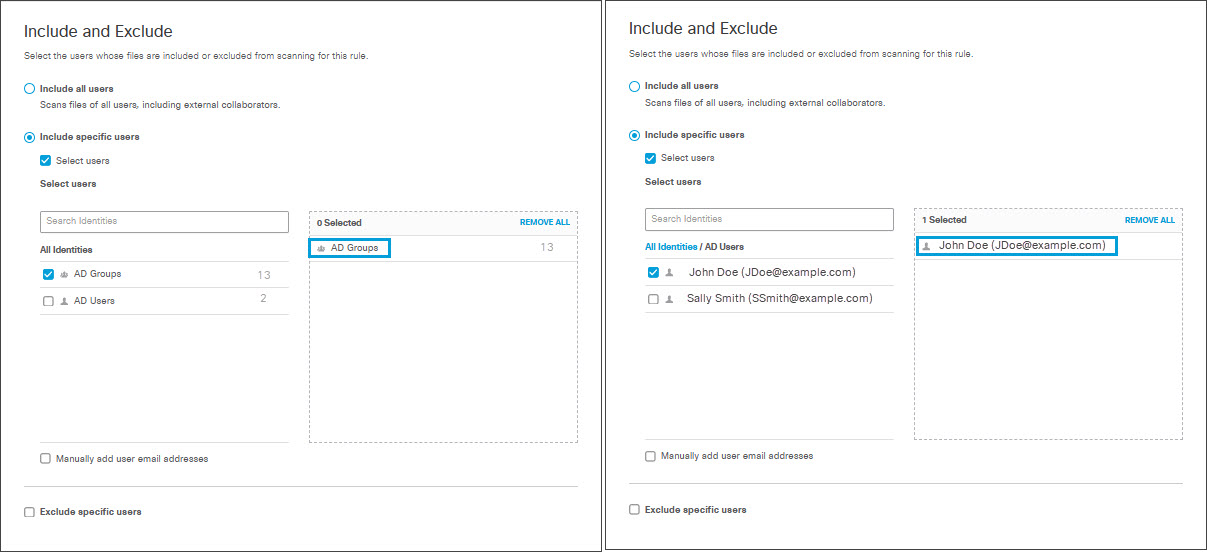
Note: Identities added to a category after the category has been included or excluded from a rule will be treated as if they were part of the category when the rule was created.
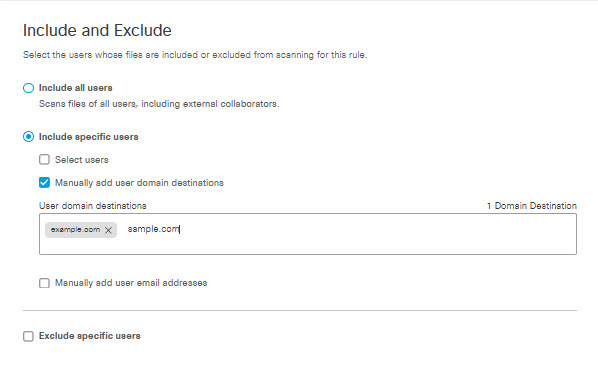
- Check the Manually add user domain destinations check box to specify domains where rules will apply to users within those domains.
Note: This option appears only if you have chosen Outlook or Webex Teams for Platform. You can enter a maximum of 1,000 user domain destinations.
- For Outlook Umbrella scans message recipients for domain destination matches.
- For Webex Teams Umbrella scans the Webex space owner for domain destination matches.
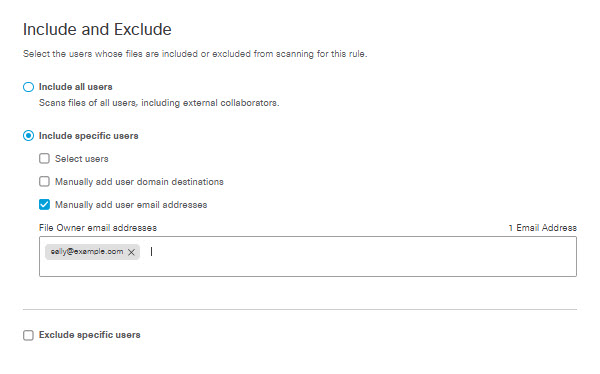
- Check the Manually add user email addresses check box to specify email addresses of file owners to which the rule will apply.
Enter the users' email addresses in the text box.
- Check the Exclude specific users check box to exclude selected users from being matched by this rule. Similarly to selecting identities for inclusion, you can select all AD groups, All AD Users, individual groups, or individual users. You can search for identities by AD username or AD Group. The selected identities will appear in the box on the right.
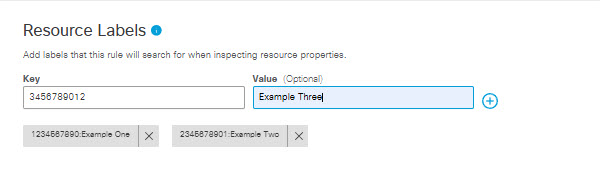
- The Resource Labels area appears only if you have selected AWS or Azure for Platform. In the Resource Labels area, enter key/value pairs you have applied as tags to objects in AWS S3 buckets or Azure storage accounts or containers. Each resource label you enter here identifies the data Umbrella will monitor within your buckets (for AWS) or storage accounts or containers (for Azure). It may take a few minutes for resource labels you enter here to propagate to the policy page, depending on how many there are and the state of the discovery process.
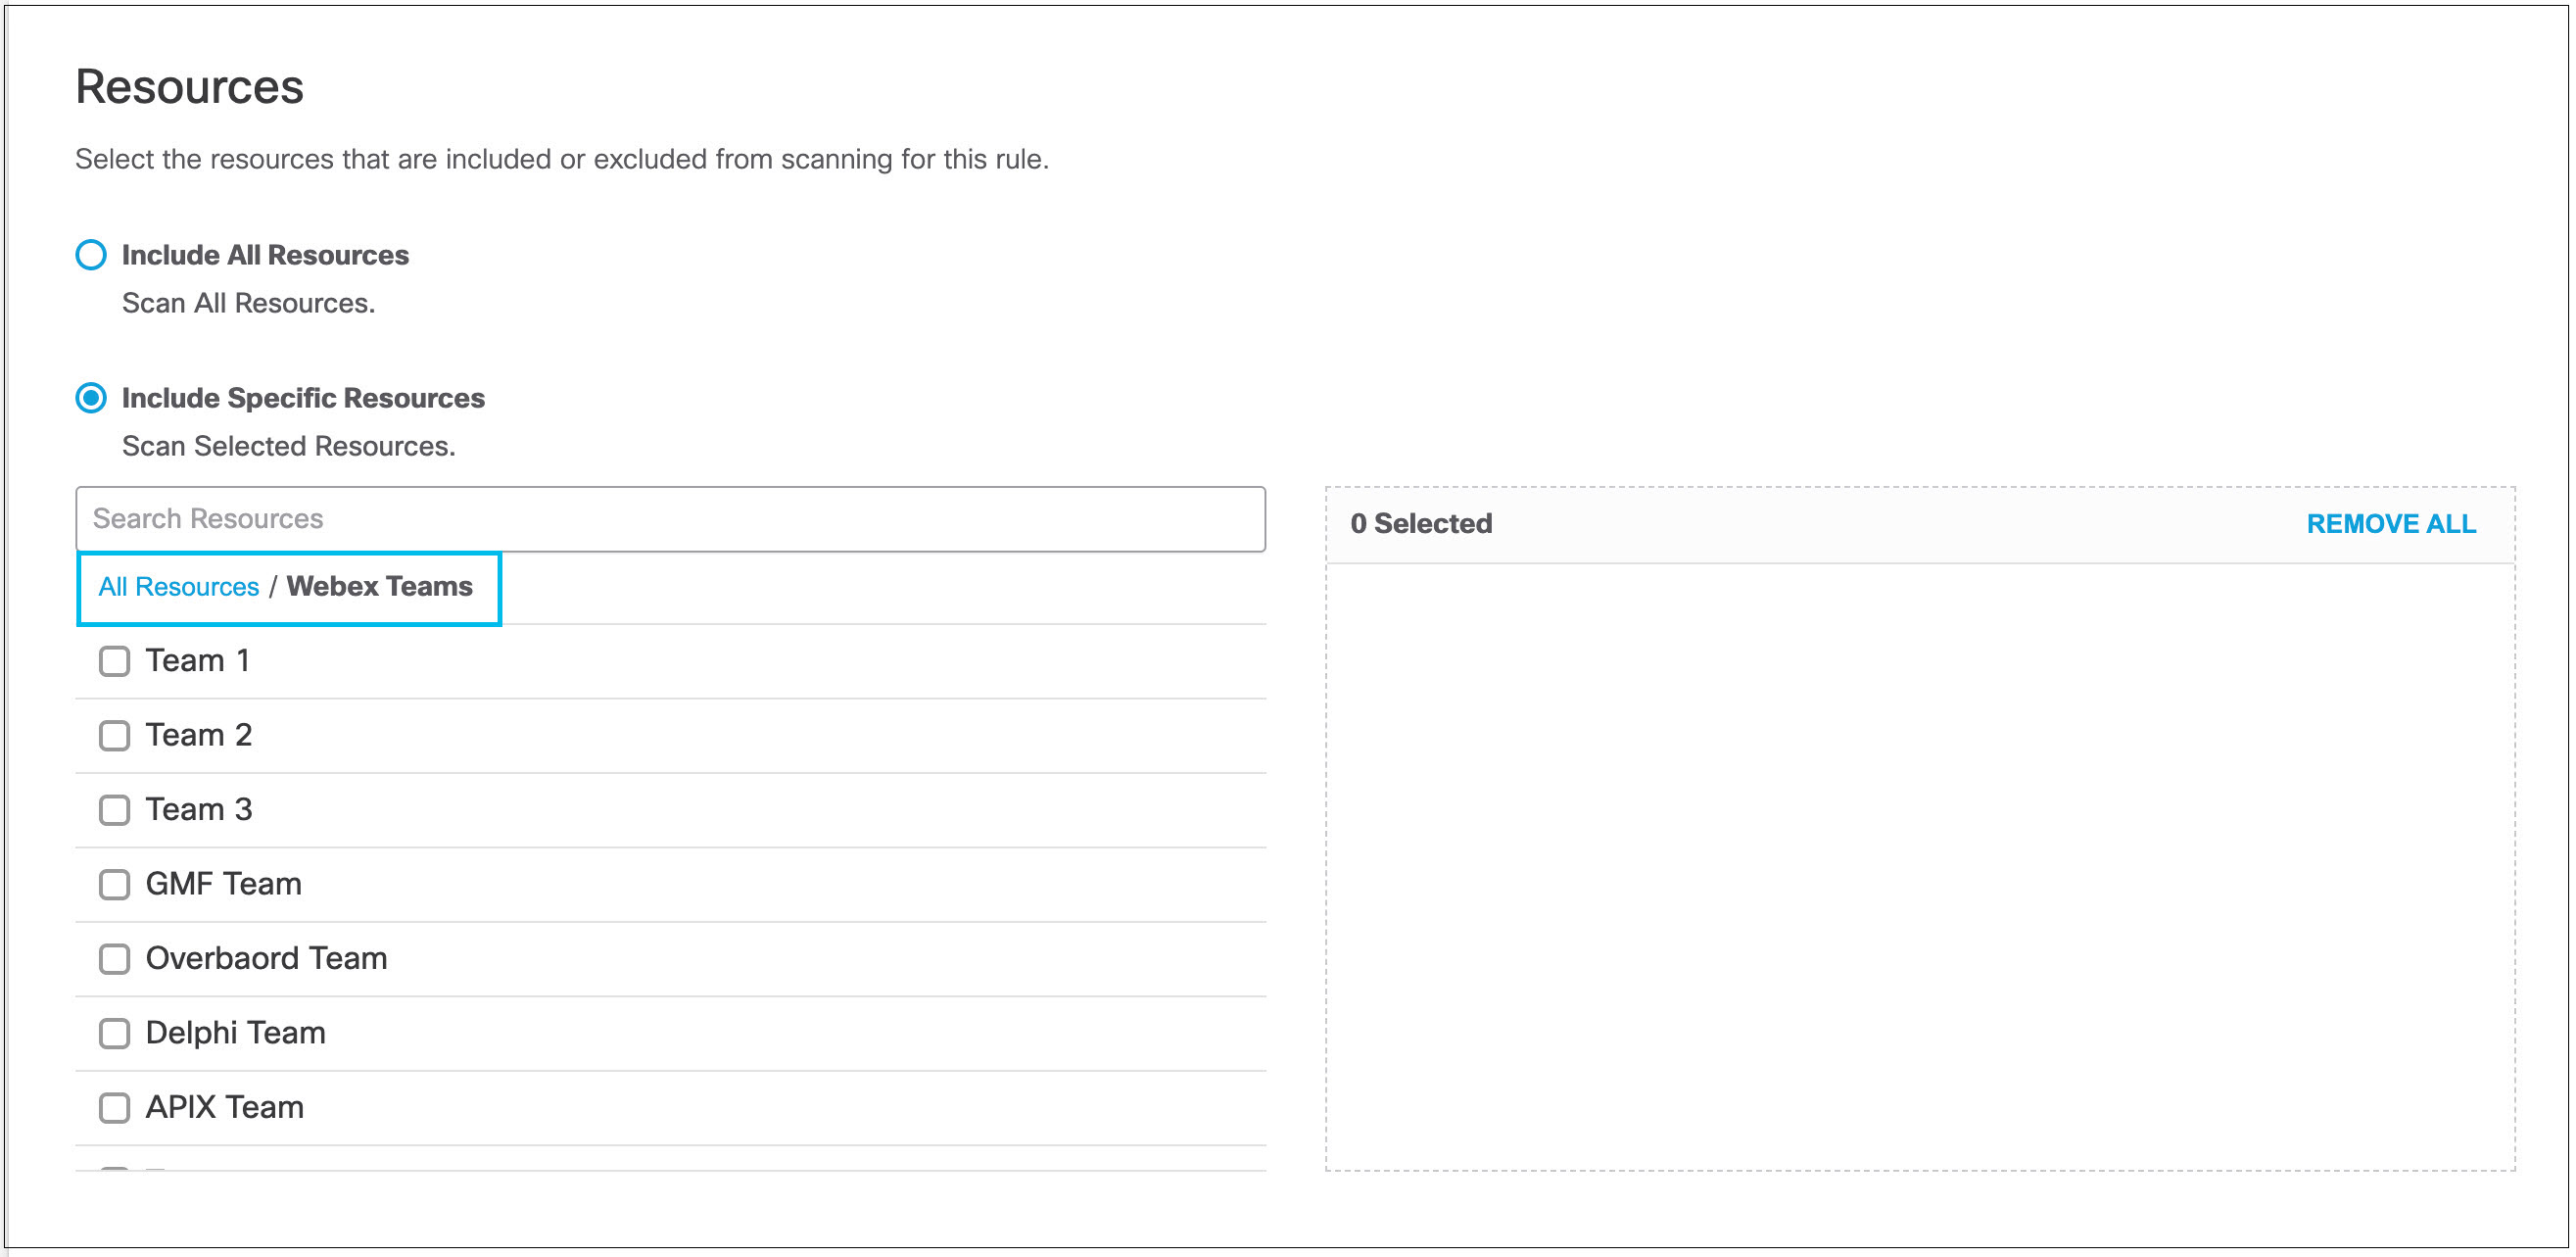
- The Resources area appears only if you have selected AWS S3, Azure Storage, or Webex for Platform.
- Click the Include All Resources radio button (the default) to include all resources available on your platform for scanning.
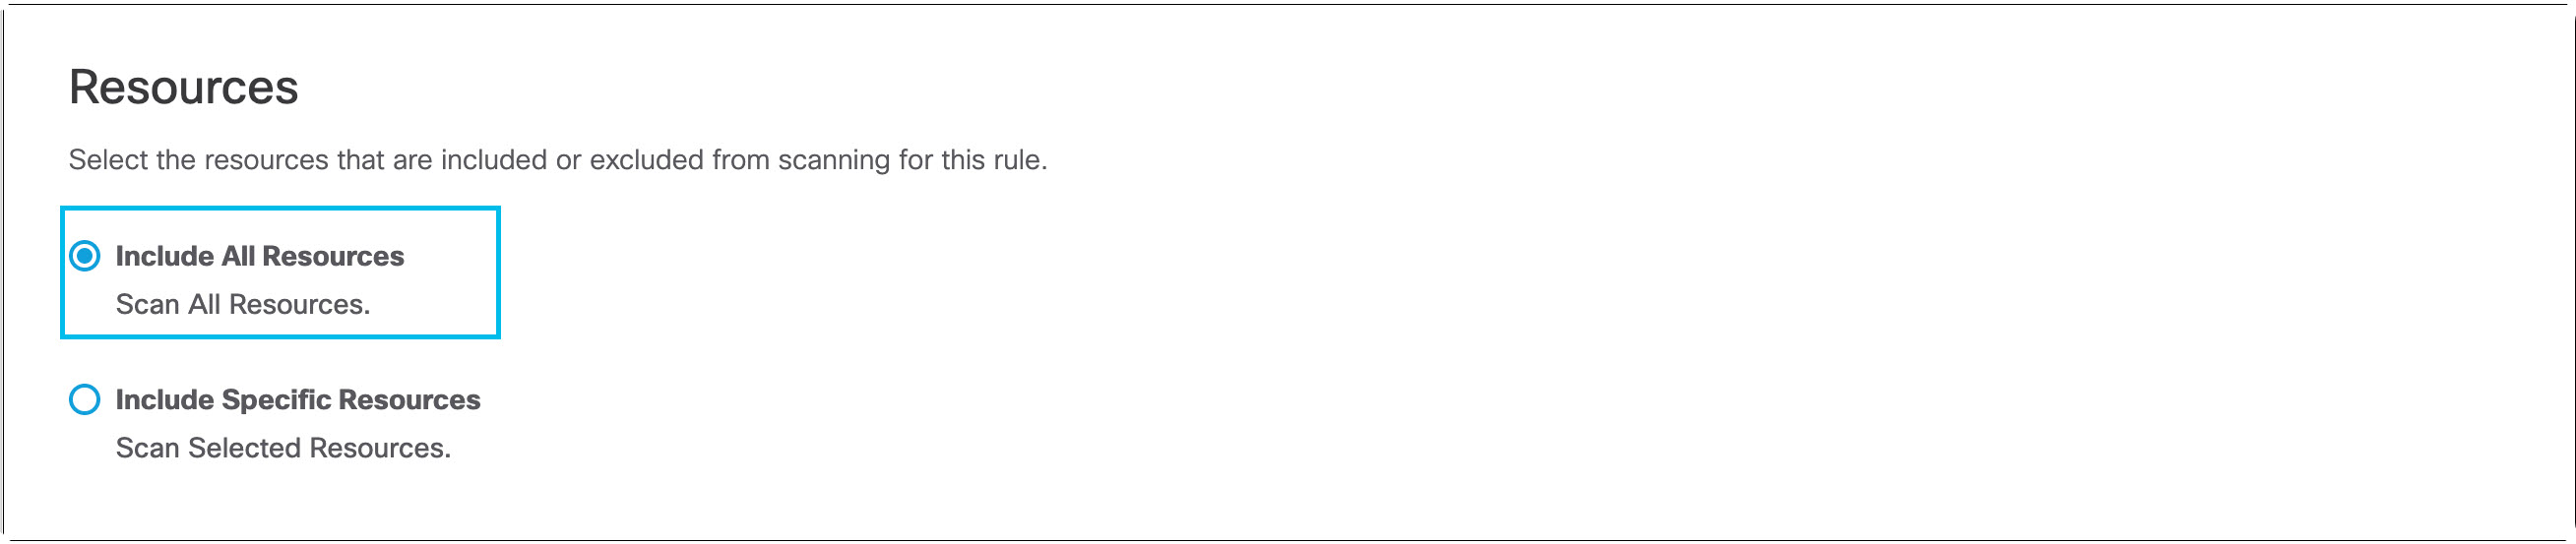
- Click the Include Specific Resources radio button to display a list of resources available and select the ones you want to include for matching.
- For AWS, you can select S3 buckets
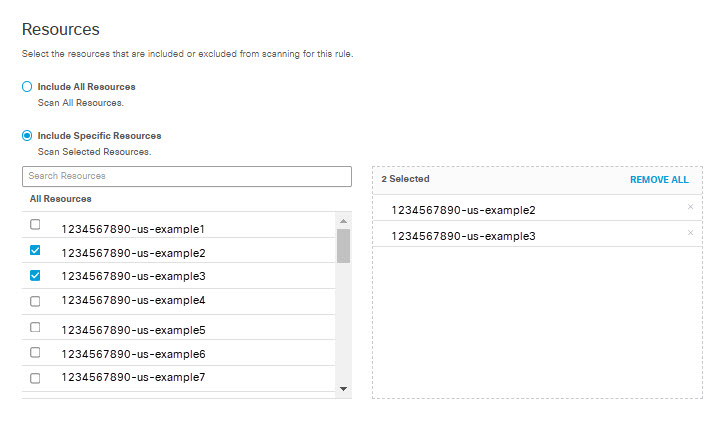
- For Azure, you can select containers
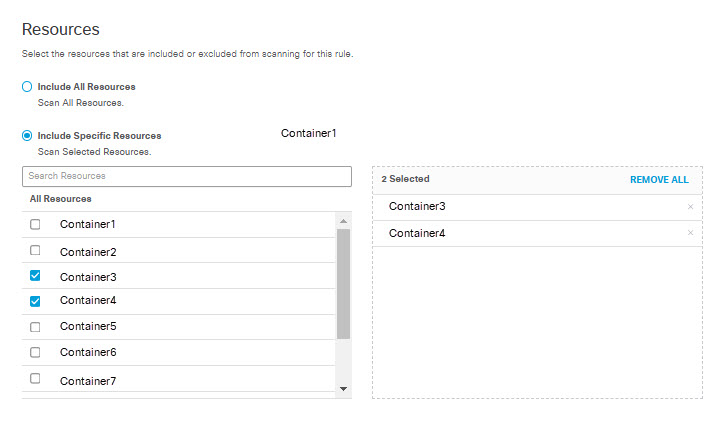
- For Webex, you can select Webex Teams and Webex Spaces.

- Under Exposure, optionally select the file sharing permissions to consider when processing files to search for data violations:
- Shared Publicly- Accessible to all users with the link to the file.
- Domain-wide Share- Shared with all users in a domain.
- Shared with Internal Users- Shared with users who belong to the authorized domains.
- Shared with External Users- Shared with users who do not belong to the authorized domains.
- Shared with Specific Users- Shared with specific users by their email addresses.
The table below indicates which Exposure settings are available for each platform:
| Shared Publicly | Domain-wide share | Shared with internal users | Shared with external users | Shared with specific users | |
|---|---|---|---|---|---|
| AWS S3 | ✓ | — | ✓ | — | — |
| Azure Storage | ✓ | — | ✓ | — | — |
| Box | ✓ | — | — | ✓ | ✓ |
| Dropbox | ✓ | ✓ | ✓ | ✓ | ✓ |
| ✓ | ✓ | ✓ | ✓ | ✓ | |
| Microsoft Office 365 SharePoint Online | ✓ | ✓ | ✓ | ✓ | ✓ |
| Microsoft Office 365 OneDrive | ✓ | ✓ | ✓ | ✓ | ✓ |
| Microsoft Office 365 Outlook | — | — | ✓ | ✓ | ✓ |
| Service Now | ✓ | ✓ | — | ✓ | ✓ |
| Slack | — | ✓ | ✓ | ✓ | ✓ |
| Webex Teams | — | — | ✓ | ✓ | ✓ |
- A DLP rule can be configured with either Data Classifications, File Labels or both. Exposure is an optional criterion.
- When a DLP rule is configured with all 3 criteria, then a DLP event is raised when any of the selected Data Classifications and when any of the configured file labels are detected in the inspected file and when the file’s permissions match any of the selected exposure settings.
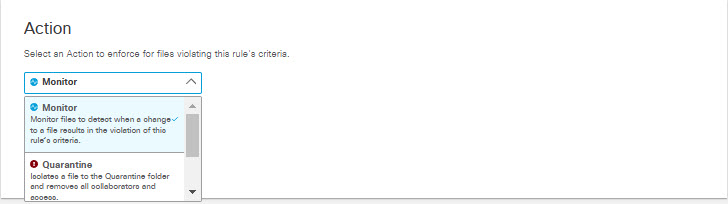
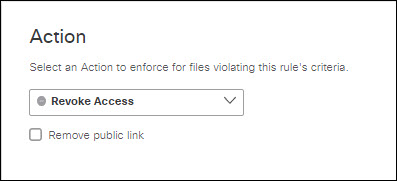
- From the Action drop-down list, choose Monitor, Quarantine, Delete or Revoke Access.
- Monitor- Detects and logs a DLP event for every modified file violating this rule’s criteria
- Quarantine- Isolates a file that violates the rule criteria to the quarantine folder and revokes all shares
- Delete- Permanently deletes when a change is detected that violates the rule criteria (This option is available only for Webex Teams, and applies for a violation within a post, as well as a violation within a file attached to a post.)
- Revoke Access- Removes public link, all external or internal users, and any share permission within the entire organization. This action also removes the file owner and transfers the ownership to the selected user.
The table below indicates which Actions settings are available for each platform:
| Monitor | Quarantine | Delete | Revoke Access | |
|---|---|---|---|---|
| AWS S3 | ✓ | — | — | — |
| Azure Storage | ✓ | — | — | — |
| Box | ✓ | ✓ | — | ✓ |
| Dropbox | ✓ | ✓ | — | ✓ |
| ✓ | ✓ | — | ✓ | |
| Microsoft Office 365 Sharepoint Online | ✓ | ✓ | — | ✓ |
| Microsoft Office 365 OneDrive | ✓ | ✓ | — | ✓ |
| Microsoft Office 365 Outlook | ✓ | — | — | — |
| Service Now | ✓ | ✓ | — | — |
| Slack | ✓ | — | ✓ | — |
| Webex Teams | ✓ | — | ✓ |
If you choose Quarantine for Microsoft OneDrive, Sharepoint Online, Box, Dropbox, or Google Drive:
- The file identified as exposing sensitive data is moved to the Cisco_Quarantine/DLP folder Umbrella created in the root path of the Global Admin who authorized the tenant.
- In lieu of the quarantined file, a text file is left in the original location with the name filename.ppt_Unique-Event-ID_Cisco_Quarantined.txt explaining to the original File Owner that the file is identified as exposing sensitive data and for more information to contact their organization administrator.
- The user who authorizes access to Umbrella will have access to the quarantine folder. All other accesses and collaborators are removed.
- Thus, we recommend that the admin add the relevant DLP Admins as additional collaborators to the folder.
If you choose Quarantine for ServiceNow:
- The file identified as exposing sensitive data is moved to a table named Cisco_Quarantine_Malware which can be access only by the admin user who authorized the ServiceNow tenant.
- A footprint is attached to the notes\activities area of the table the file is attached to. This footprint will notify users that the file has been identified as malware, and for more information they should contact their administrator.
- Note: Quarantine attempts may fail if the files have been locked or blocked by settings within their native platforms. Settings local to the platform where a file resides take precedence over Umbrella’s ability to detect or remediate DLP violations or malware.
- Note: If your DLP rules process files from Microsoft OneDrive, SharePoint Online, Box, Dropbox, ServiceNow, or Google Drive and you restore a quarantined file that still violates rule criteria, the system will quarantine that file again. To prevent the system from quarantining the file again, remove the file's violation, or update the rule's criteria.”
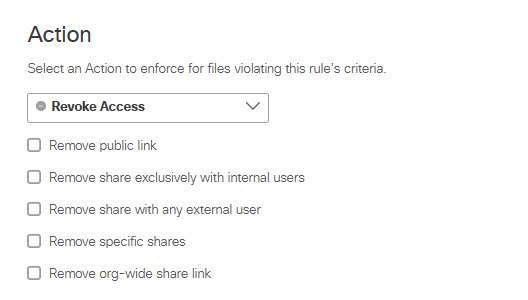
- If you chose Revoke Access FOR Action:
- If you chose Google Drive for the Platform, select from the following options:
- Remove public link: Removes any file link that has public exposure.
- Remove share exclusively with internal users: Removes all internal users of files that were shared with few specific internal users.
- Remove share with any external user: Removes all external users. (External users are not part of the organization domain)
- Remove specific shares: Entered email addresses or group email addresses are removed.
- Remove org-wide share link: Removes any share permission with the entire organization.
- Remove owner: Removes the file owner and transfers ownership to a new email address.

- If you chose Microsoft 365 SharePoint Online or Microsoft 365 OneDrive for the platform, select from the following options:
- Remove public link: Removes any file link that has public exposure.
- Remove org-wide share link: Removes any share permission with the entire organization.

- If you chose Box for the platform, select the following option:
- Remove public link: Removes any file link that has public exposure.
- If you chose Dropbox for the platform, select from the following options:
- Remove public link: Removes any file link that has public exposure.
- Remove share exclusively with internal users: Removes all internal users of files that were shared with few specific internal users.
- Remove share with any external user: Removes all external users. (External users are not part of the organization domain.)
- Remove specific shares: Entered email addresses or group email addresses are removed.
- Remove org-wide share link: Removes any share permission with the entire organization.
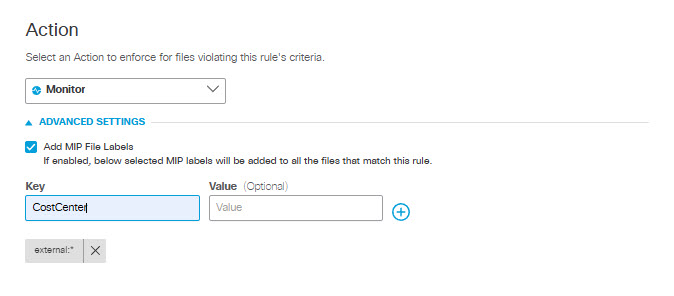
- If you chose Box, Microsoft Office 365 Sharepoint Online, or Microsoft Office 365 OneDrive for Platform, you can choose from Advanced Settings under Action.
- For Microsoft Office 365 Sharepoint Online or Microsoft Office 365 OneDrive, you can specify MIP file labels that Umbrella will apply to files that match the rule. Enter the key (and optionally the value) for each label to apply.
- For Box:
- You can specify MIP file labels that Umbrella will apply to files that match the rule. Enter the key (and optionally the value) for each label to be applied.
- You can also select from the list of sensitivity labels that have been created for your Box tenant. You may select any one of the labels displayed.
Note: If you create new sensitivity labels for your Box tenant, it may take up to four hours for them to appear in the Secure Access interface. Also be aware that within the Box application, these labels are referred to as classification labels.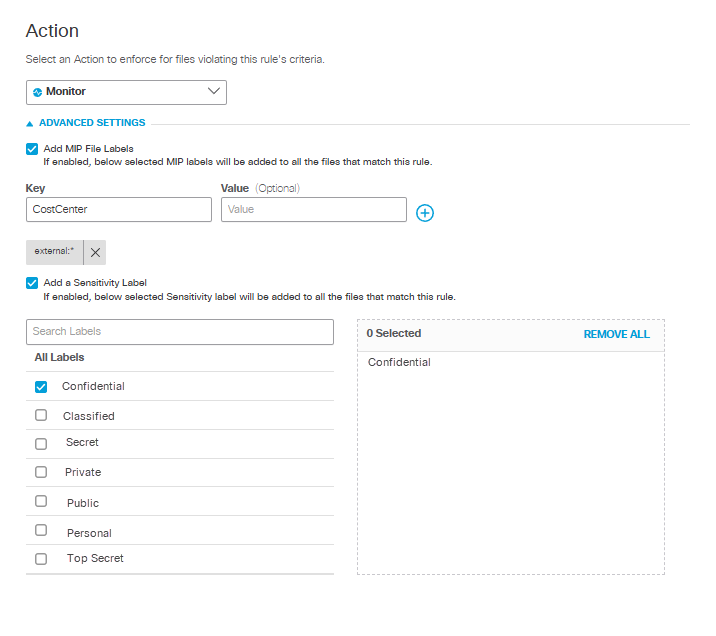
- In the User Notifications area, click the User Notifications toggle button to enable and configure an email notification to be sent to one or both of the following users:
- The owner of the file associated with a rule violation (for Outlook, this is the sender of the email).
- The user who performs an action that triggers a rule violation (for Outlook, this is the sender of the email).
You can use a default email template provided by the system or create your own custom template.
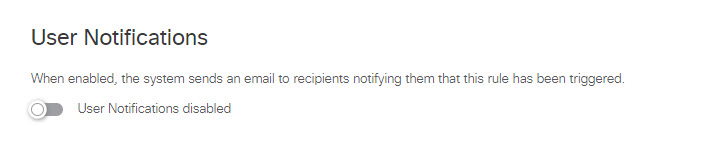
a. Click User Notifications toggle button.
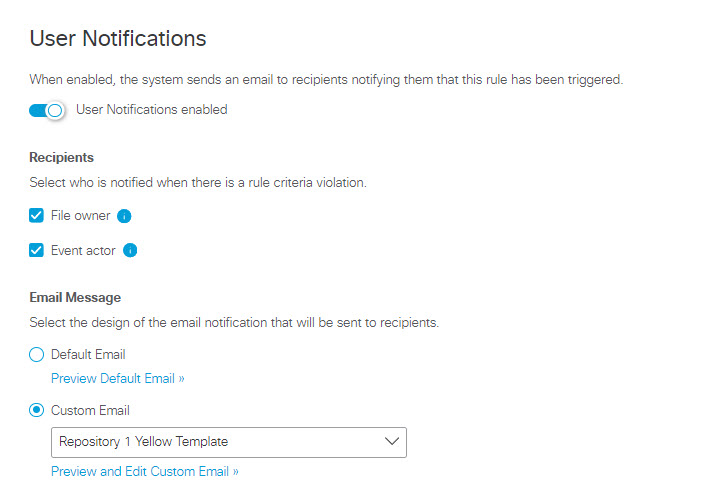
b. Select one or both of the following email recipients:
- File owner - The owner of the file associated with the rule violation.
- Event actor - The user who performs an action that triggers the rule violation.
c. Choose the email template:
To Use the Default Email Template:
a. Click the Default Email radio button.
b. To preview the content of the email that will be sent to users, click Preview Default Email. You can review the email subject line and text, but you cannot change it.
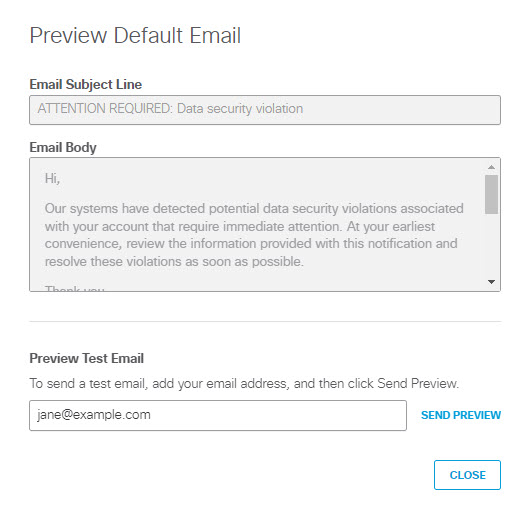
c. (Optional) To send a test copy of the email to an address of your choosing, enter an address in Preview Test Email and click SEND PREVIEW to send the message. (By default, the system uses the email address of the logged in user.)
d. Click CLOSE to return to the Data Loss Prevention Policy page.
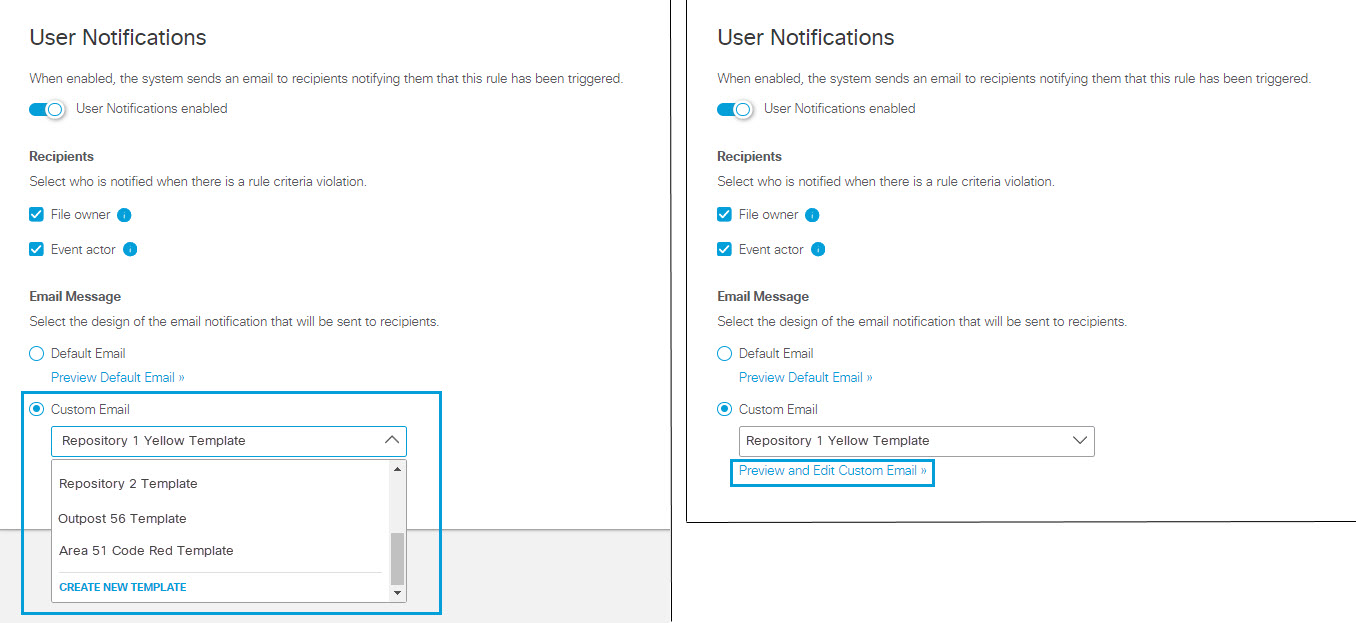
To Use a Custom Email Template:
a. Click the Custom Email radio button.
b. From the drop-down list, choose an existing custom template, or choose CREATE CUSTOM TEMPLATE. If you select an existing custom template, you can click Preview and Edit Custom Email to review and change the template.
c. When you choose to create or edit a custom template for email notifications of policy violations you will see one of these two dialogs, which are almost identical:
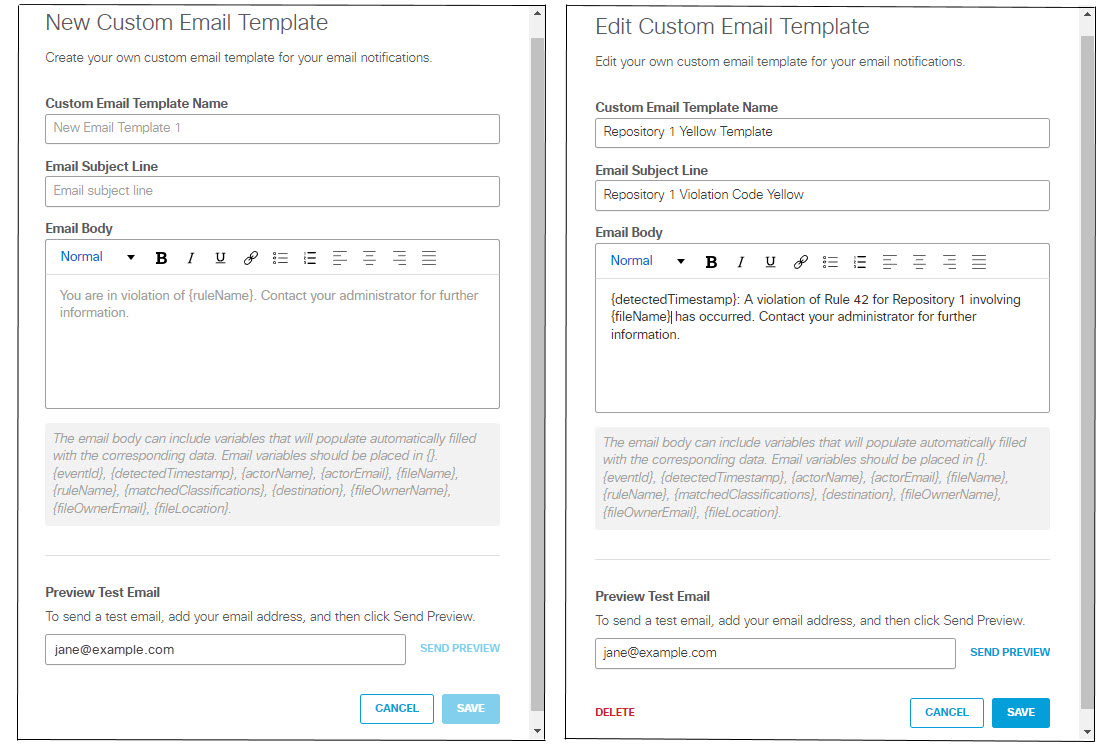
The Edit Custom Email Template includes a DELETE link which you can use to delete a custom template that is no longer needed. You may not delete a template that is in use by any rule.
To create a new template or change an existing template:
a. Enter a unique Custom Email Template Name.
b. Enter an Email Subject Line.
c. Enter the text of the email in the Email Body text box.
The email text can include the following variables, which you must enclose in braces ( {} ):
- {eventId} - The unique identifier the system generates for the policy violation event.
- (detectedTimestamp} - The date and time the violation was detected, formatted as shown in this example: "Oct 1, 2023 at 14:04 UTC"
- (actorName} - Name of the user whose action triggered the violation. (The system gets this from the tenant associated with the violation. Depending on application and file settings, this information may not be available, in which case the the system replaces this variable with blank text.)
- {actorEmail} - Email address of the user whose action triggered the violation. (The system gets this from the tenant associated with the violation. Depending on application and file settings, this information may not be available, in which case the the system replaces this variable with blank text.)
- {fileName} - Name of the data file that triggered the violation.
- {ruleName} - Name of the rule that was triggered.
- {matchedClassifications} - The data classifications associated with the violation. (See Manage Data Classifications.)
- {destination} - The application or platform type of the tenant associated with the violation. (E.g., Google Drive or One Drive; see Manage Tenant Controls.)
- {fileOwnerName} - Name of the file owner. (The system gets this from the tenant associated with the violation. Depending on application and file settings, this information may not be available, in which case the the system replaces this variable with blank text.)
- {fileOwnerEmail} - Email address of the file owner. (The system gets this from the tenant associated with the violation. Depending on application and file settings, this information may not be available, in which case the the system replaces this variable with blank text.)
- {fileLocation} - The file URL.
Note: The system replaces a variable with blank text if there is no value assigned to the variable or if an invalid variable name appears within the braces.
d. (Optional) To send a test copy of the email to an address of your choosing, enter an address in Preview Test Email and click SEND PREVIEW to send the message. (By default, the system uses the email address of the logged in user.)
e. Click SAVE to return to return to the Data Loss Prevention Policy page.
- Click Save. All fields must have options selected to save.
Supported Applications < Add a SaaS API Rule to the Data Loss Prevention Policy > Discovery Scan
Updated about 1 month ago