Configure Tunnels with Palo Alto IPsec
Palo Alto VPN IPsec connection enables you to connect two Networks to a site-to-site VPN. You can configure route-based VPNs to connect Palo Alto Networks firewalls with a third-party security device at another location. The firewall can also interoperate with third-party policy-based VPN devices; the Palo Alto Networks firewall supports route-based VPN.
Note: This document is based on Palo Alto version 10.1. While we expect that IPsec tunnels will continue to work with devices as each vendor updates their device, Umbrella cannot guarantee connectivity for versions not explicitly listed as tested in this document.
Table of Contents
- Palo Alto IPsec Functionality
- Prerequisites
- Configure Tunnels in Umbrella
- Configure Palo Alto IPsec EC VPN
- Configure Palo Alto IKE Profile
- Configure Palo Alto IPsec SEC Crypto Profile
- Configure Palo Alto VPN Tunnel
- Apply Palo Alto IKE Gateway and IPsec Crypto Profile to Umbrella IPsec Tunnel
- Palo Alto VPN Static Routing
Palo Alto IPsec Functionality
In order to set up the VPN tunnel, first the peers need to be authenticated. After successful authentication, the peers negotiate the encryption mechanism and algorithms to secure the communication. The Internet Key Exchange (IKE) process is used to authenticate the VPN peers, and IPsec Security Associations (SAs) are defined at each end of the tunnel to secure the VPN communication. IKE uses digital certificates or preshared keys, and the Diffie Hellman (DH) keys to set up the SAs for the IPsec tunnel. The SAs specify all of the parameters that are required for secure transmission— including the security parameter index (SPI), security protocol, cryptographic keys, and the destination IP address— encryption, data authentication, data integrity, and endpoint authentication.
The following figure shows a VPN tunnel between two sites. When a client that is secured by VPN Peer A needs content from a server located at the other site, VPN Peer A initiates a connection request to VPN Peer B. If the security policy permits the connection, VPN Peer A uses the IKE Crypto profile parameters (IKE phase 1) to establish a secure connection and authenticate VPN Peer B. Then, VPN Peer A establishes the VPN tunnel using the IPsec Crypto profile, which defines the IKE phase 2 parameters to allow the secure transfer of data between the two sites.

Prerequisites
- You must select an Umbrella SIG Data Center IP address to use when creating the IPsec tunnel.
- In the sample commands,
\<umbrella_dc_ip>refers to this IP address. We recommend choosing the IP address based on the data center located closest to your device.
Configure Tunnels in Umbrella
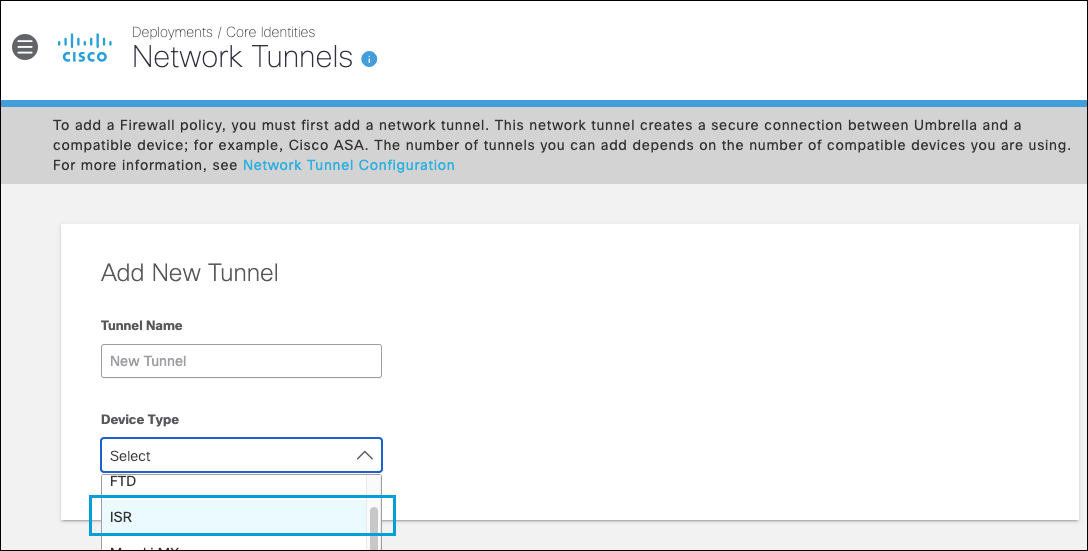
- In the Umbrella dashboard, navigate to Deployments > Core Identities > Network Tunnels, then click Add.
- Give your tunnel a meaningful name, choose ISR from the Device Type drop-down list , then click Save.
Note: Use ISR because the ISR profile defaults to FQDN IKE identity.
- Enter your Tunnel ID and the Pre-Shared-Key (PSK) Passphrase.
- Choose an appropriate site from the Associate Tunnel with Site drop-down list and optionally, enter an IP address to the IP Address Ranges field which you would like to send to Umbrella SIG.
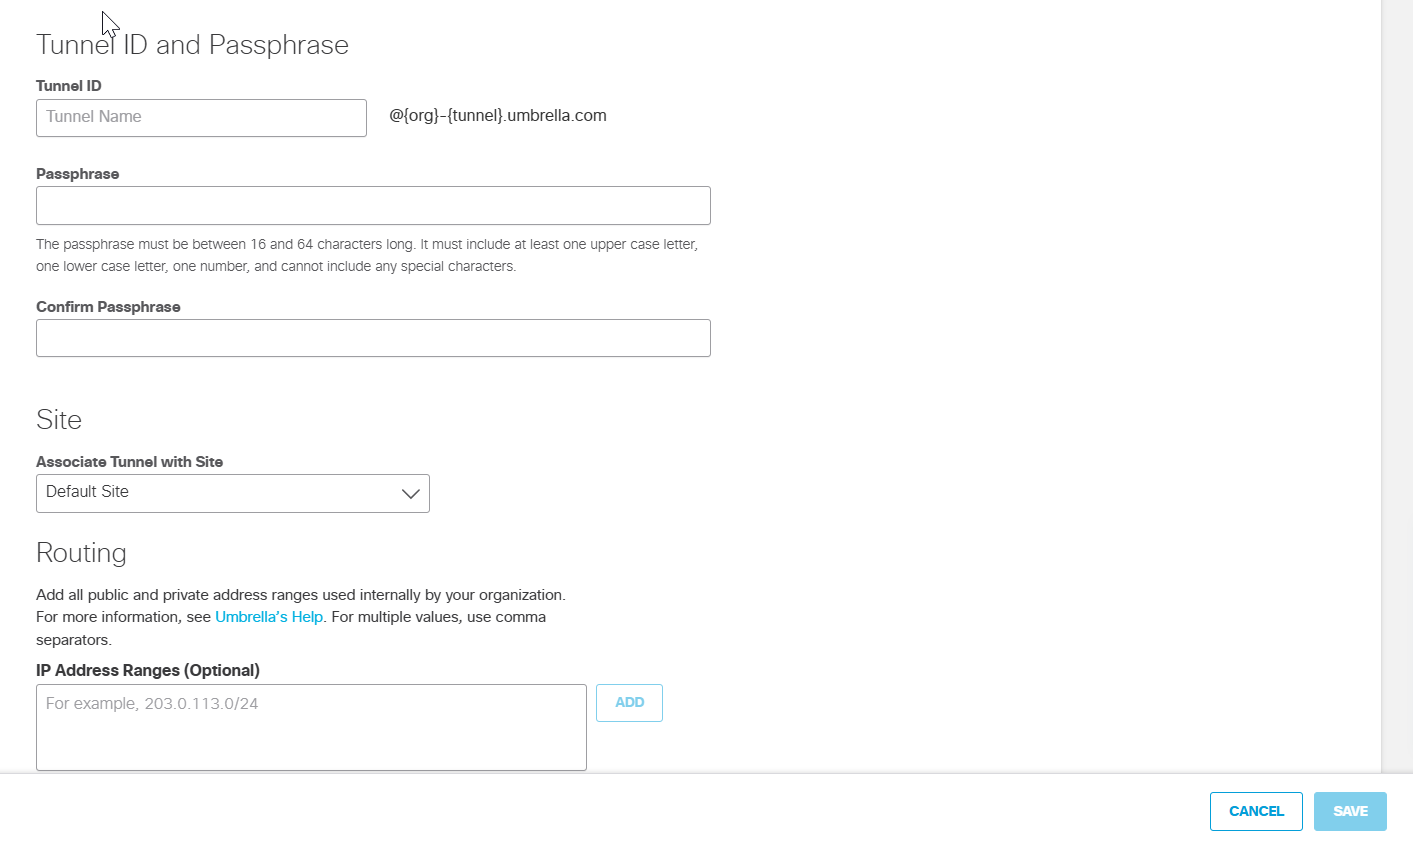
- Click Save and then copy the Tunnel ID and Passphrase.
The new tunnel appears in the Umbrella dashboard with a status of Not Established. The tunnel status is updated once it is fully configured and connected with the Palo Alto Firewall.
Configure Palo Alto IPsec EC VPN
To set up a VPN tunnel, the Layer 3 interface at each end must have a logical tunnel interface for the firewall to connect to and establish a VPN tunnel. A tunnel interface is a logical (virtual) interface that is used to deliver traffic between two endpoints.
- In the Palo Alto application, navigate to Network > IPsec Tunnels and then click Add .
- From the General tab, give your tunnel a meaningful name.
- Select the Tunnel interface that will be used to set up the IPsec tunnel.
Create a New Tunnel Interface
- Select Tunnel Interface > New Tunnel Interface.
- In the Interface Name field, specify a numeric suffix, such as
2. - In the Config tab, select default for the Virtual Router and INSIDE for the the Security Zone.
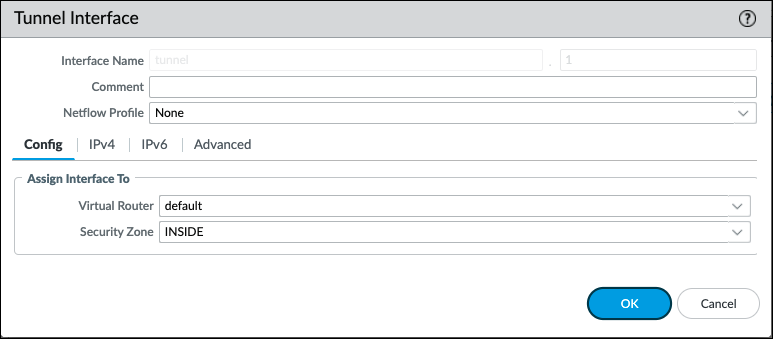
- Click OK.
Use your trust zone as the termination point for the tunnel—select the zone from the drop-down. Associating the tunnel interface with the same zone (and virtual router) as the external-facing interface on which the packets enter the firewall mitigates the need to create inter-zone routing.
Configure Palo Alto IKE Profile
- In the Palo Alto application, navigate to Network > Network Profiles > IKE Crypto and then click Add.
- Create a meaningful name for the new profile.
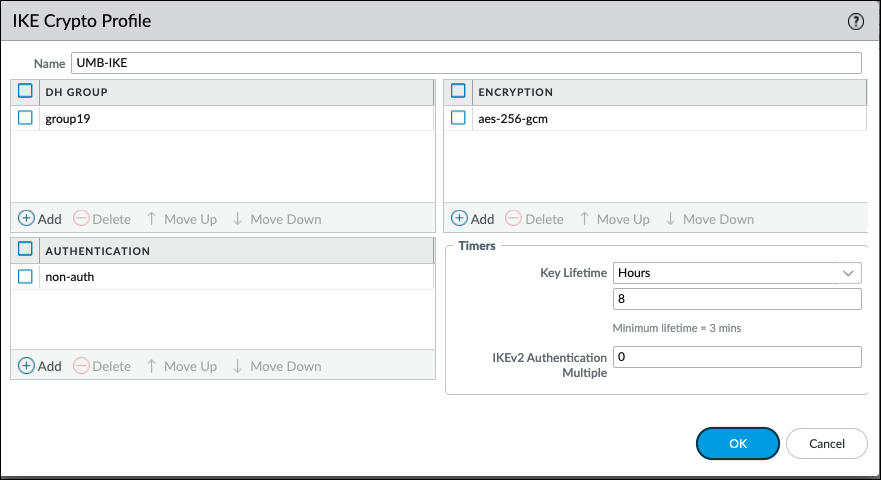
- Specify the DH Group for key exchange and the Authentication and Encryption algorithms.
Click Add in the corresponding sections (DH Group, Authentication, and Encryption), and then choose the following values from the drop-downs:
- DH Group—group19
- Authentication—non-auth
- Encryption—aes-256-gcm
- Timers
- Key Lifetime—Hours; 8
- IKEv2 Authentication Multiple—0
- Click OK and then click Commit.
Configure Palo Alto IPsec SEC Crypto Profile
The IPsec crypto profile is invoked in IKE Phase 2. It specifies how the data is secured within the tunnel when Auto Key IKE is used to automatically generate keys for the IKE SAs.
Create a New IPsec Profile
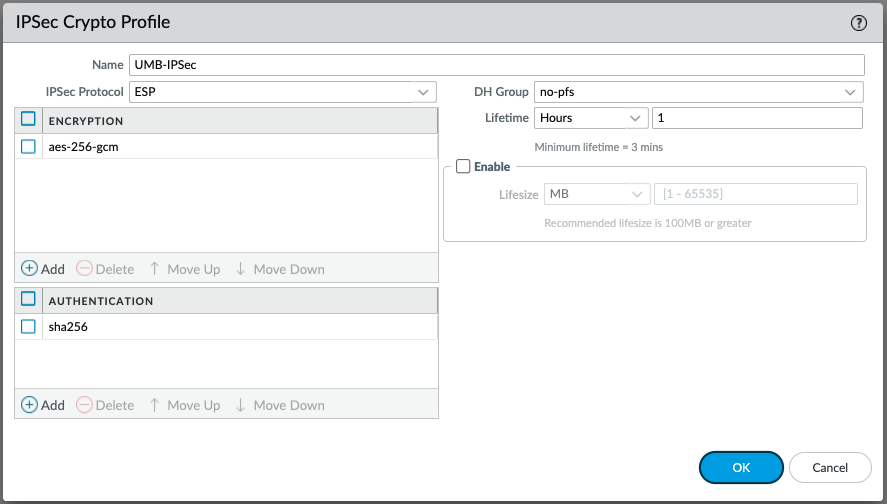
- Navigate to Network > Network Profiles > IPsec Crypto and then click Add.
- Enter a meaningful name for the new profile.
- Select ESP for the IPsec Protocol.
- Click Addand fill out the fields as follows:
- Encryption—aes-256-gcm
- Authentication—sha256
- DH Group—no-pfs
- Lifetime—Hours; 1
- Click OK and then click Commit.
Configure Palo Alto VPN Tunnel
To set up a VPN tunnel, the VPN peers or gateways must authenticate each other—using pre-shared keys and establish a secure channel in which to negotiate the IPsec security association (SA) that will be used to secure traffic between the hosts on each side.
Define the IKE Gateway
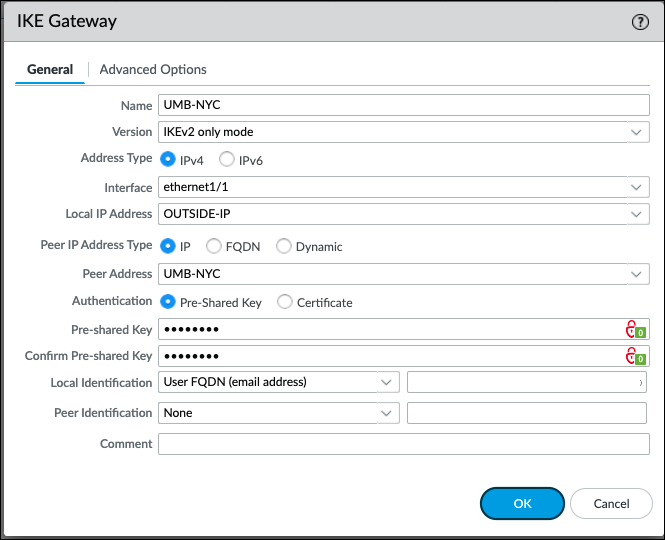
- Navigate to Network > Network Profiles > IKE Gateways and click Add.
- Create a meaningful name for the gateway. Set the Version to IKEv2 only mode and the Address Type to IPv4.
- Select the physical, outgoing Interface on the firewall where the local gateway resides.
- From the Local IP Address drop-down, select the IP address that the VPN connection will use as the endpoint. This is the external-facing interface with a publicly routable IP address on the firewall.
- Select IPv4 for Peer IP Address Type.
Note: Select the closest Umbrella Data Center location and use a created Palo Alto Host Object with that IP address. - Enter the peer address of the object which is the IP address of closest Umbrella data center. For example, UMB-NYC which is the Umbrella NYC datacenter IP 146.112.83.8. For more information, see Connect to Cisco Umbrella Through Tunnel.
- Select Pre-Shared Key as the authentication and enter the pre-shared key from Umbrella.
- Select User FQDN (email address) for Local Identification and None for Peer Identification.
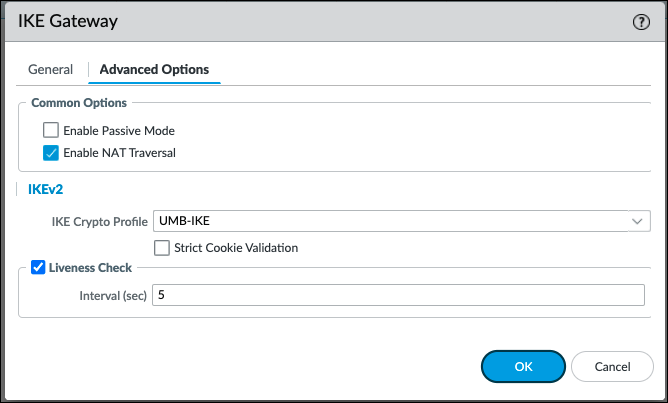
- Select Advanced Options and check the box for Enable NAT Traversal.
- In IKEv2 section, select the previous IKE Crypto profile you created in IKE Crypto Profile drop-down.
- Enable Liveness Check and enter 5.
- Click OK and then click Commit.
Apply Palo Alto IKE Gateway and IPsec Crypto Profile to Umbrella IPsec Tunnel
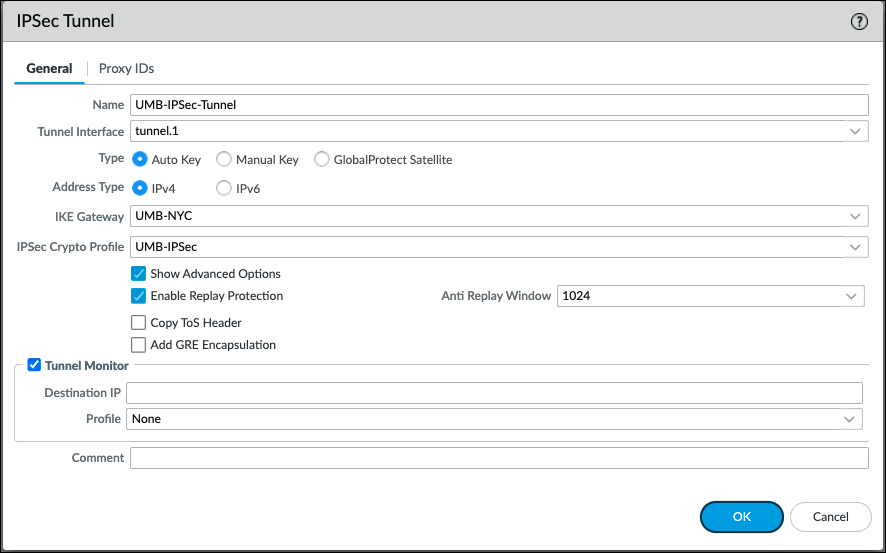
The IPsec tunnel configuration allows you to authenticate and encrypt the data (IP packet) as it traverses across the tunnel.
Set Up Key Exchange
- Select the IKE Gateway you previously created.
- Select the IPsec Crypto Profile previously created.
- Click OK and then click Commit.
Palo Alto VPN Static Routing
Use the routing table under Network > Virtual Routers > Default.
- Virtual Router.
Assign an IP address to the tunnel interface, select the IPv4 tab, click Add in the IP section, and enter the IP address and network mask to assign to the interface. With static routes, the tunnel interface does not require an IP address. For traffic that is destined to a specified subnet/IP address, the tunnel interface automatically becomes the next hop. Consider adding an IP address if you want to enable tunnel monitoring.
Configure a static route, on the virtual router, to the destination subnet.
- Select Network > Virtual Router and click the router you defined in the prior step.
Select Static Route, click Add, and enter a new route to access the subnet that is at the other end of the tunnel:
- Destination – 172.16.0.1/24
- Interface – Tunnel-IP
The configuration for VPN Peer B is:
- Destination – 146.112.83.8
- Interface – Tunnel 2-Address

Configure Tunnels with Cisco Secure Firewall < Configure Tunnels with Palo Alto IPsec > Configure Tunnels with Alibaba Cloud IPsec
Updated about 2 months ago
