
Data Loss Prevention Report
Data violations detected through the Real Time and SaaS API rules are logged as part of the unified Events view of the Data Loss Prevention Report.
The Data Loss Prevention reports window has two tabs:
Users with De-identification Enabled
Full administrators with De-identification enabled will continue to see identifiable information in the Data Loss Prevention Report.
View Events
- Navigate to Reporting > Additional Reports > Data Loss Prevention.
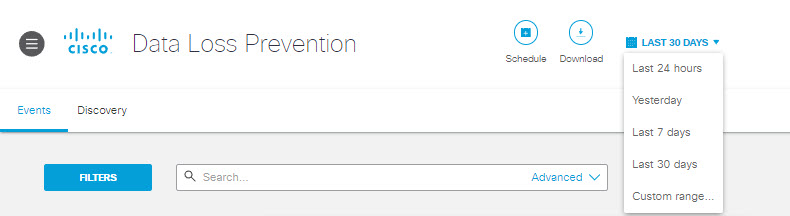
- On the Events tab, select a time frame to view reports generated in a specific date range. You can also choose a custom date range.
- Use the available Filters for better search results; choose from those listed below:
Event Type—Whether the event is Real Time or SaaS API.
Action—The action the system has applied to the content: blocked, deleted, monitored, quarantined, restored from quarantine, revoked access.
Severity—The severity of the rule that triggered the event.
Application—Application for which an SaaS API rule is applied.
Exposure—Exposure of the content scanned.
Identity Type—The type of identity involved in the event.
Application Categories—The category of the application involved in the event. This filter displays only events that occurred after this filter was added to Umbrella, in January of 2024.
- Click the gear icon to customize and sort the columns of your report.
Event Type— Whether the event is Real Time or SaaS API.
Severity—The severity of the rule that triggered the event.
Identity —The identity that made the request.
File Owner—The owner of the file that created the violation in the vendor.
Event Actor— The user who performs an action that triggers a rule violation.
File Name—The name of the file or attachment where a classification match was found. (This include attachments to Outlook email messages.) When content is found in a message, a post, or form data, the File name displays Message, Content, or Form.
Destination—The destination where the content was scanned.
Rule—The rule that triggered the event.
Resource Name—For AWS S3 this displays the S3 bucket associated with the content that triggered the violation. For Azure Storage this displays the storage account or container associated with the content that triggered the violation. For other applications, this displays "N/A."
Action—The action triggered by the rule on detecting a violation.
Detected—The date and time of detection.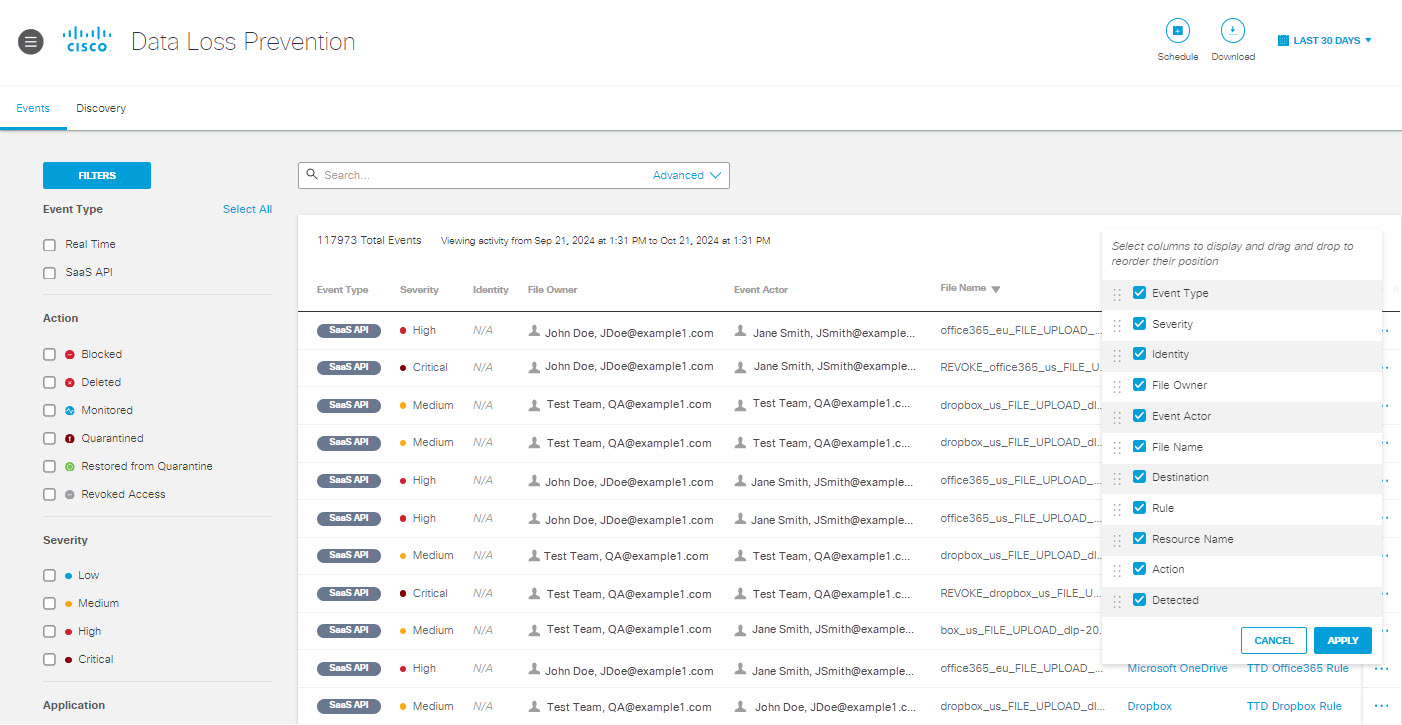
- Click the action menu icon (three dots) to view further details of an event. See View Details
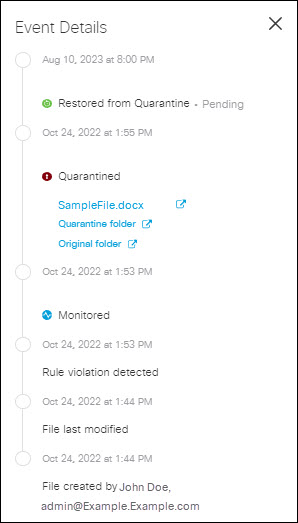
View Details
- Click the action menu icon (three dots) for any event to view a menu of options. Click View details.

- The Event Details window displays some of the same content as the report table, with additional information which varies depending upon the Event Type:
Real Time Events
Detected—The date and time the content was detected.
Action—The action triggered by the rule on detecting a violation.
File Name—The name of the file where a classification match was found. When content is found in a message or a post, the File name displays Content.
Identity—The identity that made the request.
Application—The application where the file was uploaded or posted.
Application Category—The category for the application where the file was uploaded or posted.
Destination URL—The URL of the destination for the event.
Rule—The rule that triggered the event.
Severity—The severity of the rule that triggered the event.
File Label—File label names in the file's document properties. This includes Microsoft Office Document Properties and AdobePDF Document Properties.
Direction—Direction of traffic.
Classification—The classification that matched the content found in the event. Clicking the caret displays the excerpts where the matches were found. It also displays the threshold type and severity.Note: The match count displayed for Threshold classification denotes the total number of matches and the match count displayed for Unique Threshold classification denotes the number of unique matches.
Total Size in Bytes—The size of the file that triggered the event.
SHA256 Hash—The unique SHA256 hash for the file. (You may copy this using the Copy icon.)
Event ID—A unique identifier for the event. (You may copy this using the Copy icon.)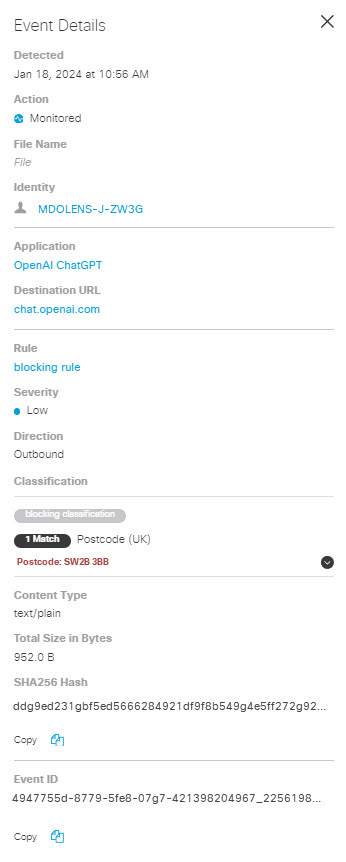
SaaS API Events
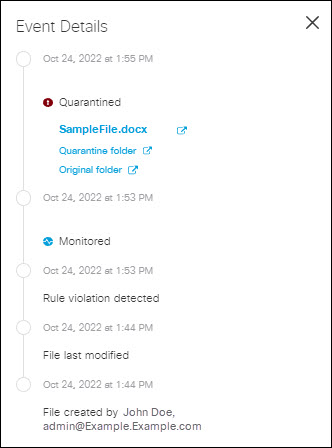
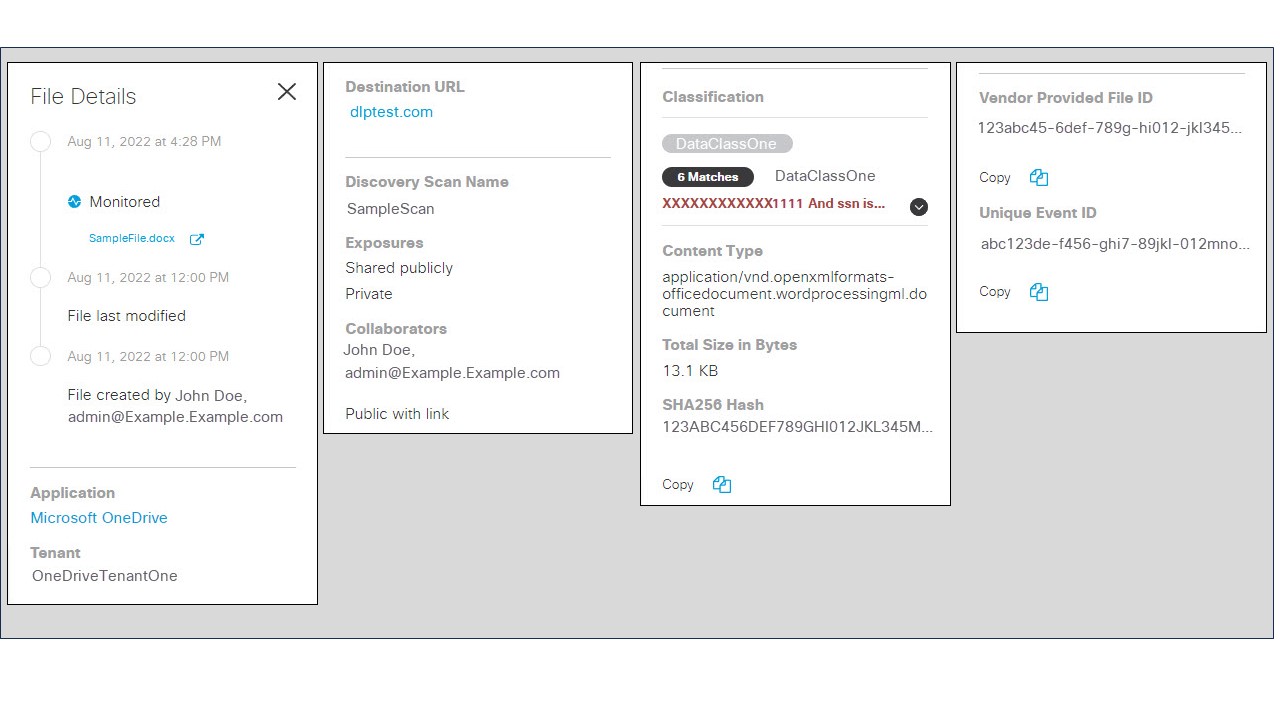
A timeline of events associated with the file.
Application—The application where the file was uploaded or posted.
Tenant—The Umbrella tenant associated with the event.
Resource ID— The URL for the resource associated with the content that triggered the violation. For Azure S3 the resource is an S3 bucket. For Azure Storage the resource is a storage account or container. For other applications, this does not apply.
Resource Name—For AWS S3 this displays the S3 bucket associated with the content that triggered the violation. For Azure Storage this displays the storage account or container associated with the content that triggered the violation. For other applications, this does not apply.
Destination URL—The URL of the destination for the event. (Note: For some platforms, a single file or message can trigger multiple events that show the same Destination URL for each event.)
File/Message Direction—The direction of the message or file that triggered the event: Incoming or Outgoing. Note: For Outlook, this will always be Outgoing.
Rule—The rule that triggered the event.
Severity—The severity of the rule that triggered the event.
File Label—File label names in the file's document properties. This includes:
- MIP and Titus labels in Microsoft Office Document Properties, and AdobePDF Document Properties.
- Microsoft Office Sensitivity Labels for Microsoft 365 or Box tenants. (Within the Box application these are referred to as Classification Labels.)
Exposure—An indication of who can see the file—internal or external users.
Classification—The classification that matched the content found in the event. Clicking the caret will display the excerpts where the matches were found.
Content Type—The type of data that triggered the event.
Total Size in Bytes—The size of the file that triggered the event.
SHA256 Hash—The unique SHA256 hash for the file.
Event ID—A unique identifier for the event.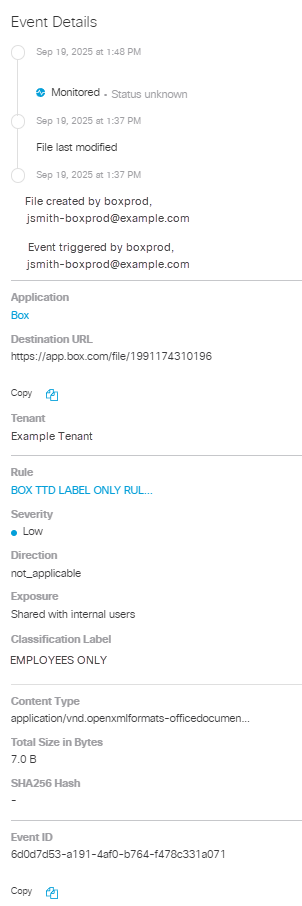
Delete File
For SaaS API events on Webex Teams and Slack, when a message is monitored and a rule violation is detected, you can manually delete the message or file.
- Click the action menu (three dots) for any Webex Teams event that is not marked Deleted to view a menu of options. Click Delete Message and Files.
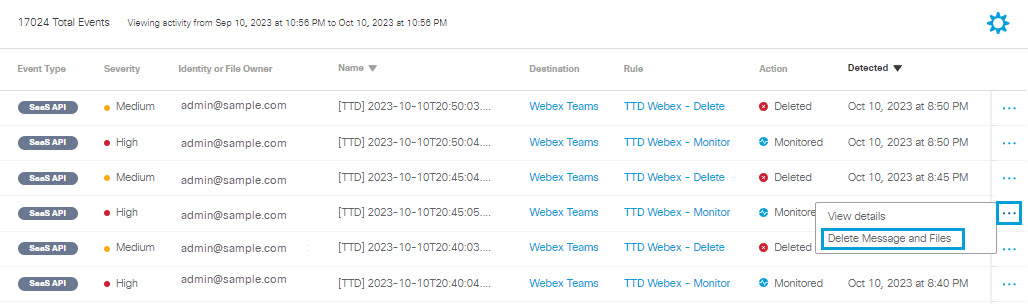
- Click Delete to confirm.
Quarantine File
For SaaS API events on Microsoft OneDrive, SharePoint Online, Box, Dropbox, ServiceNow, or Google Drive, when a file is monitored and a rule violation is detected, you can manually quarantine the file.
- Click the action menu icon (three dots) for any event to view a menu of options. Click Quarantine file.
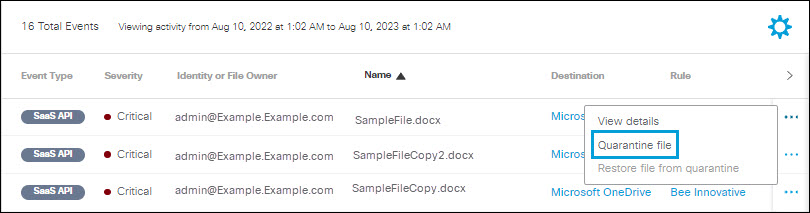
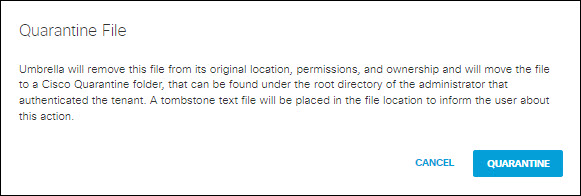
- Click Quarantine.
Note:
- For Microsoft OneDrive, SharePoint Online, Box, Dropbox, or Google Drive:
- The file identified as exposing sensitive data is moved to the Cisco_Quarantine/DLP folder Umbrella created in the root path of the Global Admin who authorised the tenant.
- The user who authorizes access to Umbrella will have access to the quarantine folder. All other accesses and collaborators are removed. Thus, we recommend that the admin add the relevant DLP Admins as additional collaborators to the folder.
- For ServiceNow:
- The file identified as exposing sensitive data is moved to a table named Cisco_Quarantine_Malware which can be access only by the admin user who authorized the ServiceNow tenant.
- A footprint is attached to the notes\activities area of the table the file is attached to. This footprint will notify users that the file has been identified as malware, and for more information they should contact their administrator.
- The file is now quarantined. Under Events Details, click Quarantine Folder to navigate to the quarantined folder.
Restore File from Quarantine
When a quarantined file is restored, the original location of the file, ownership and permissions are also restored.
- Click the action menu icon (three dots) for any event to view a menu of options. Click Restore file from quarantine.
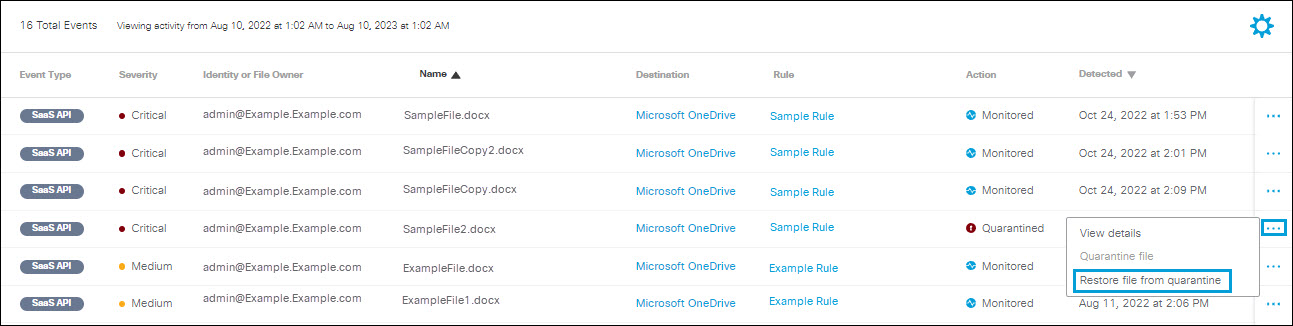
- Click Restore to proceed.

- The file is now restored. You can access the file in its original location under Event Details.
Note: If your DLP rules process files from Microsoft OneDrive, SharePoint Online, Box, Dropbox, ServiceNow, or Google Drive and you restore a quarantined file that still violates rule criteria, the system will quarantine that file again. To prevent the system from quarantining the file again, remove the file's violation, or update the rule's criteria.
Use Advanced Search
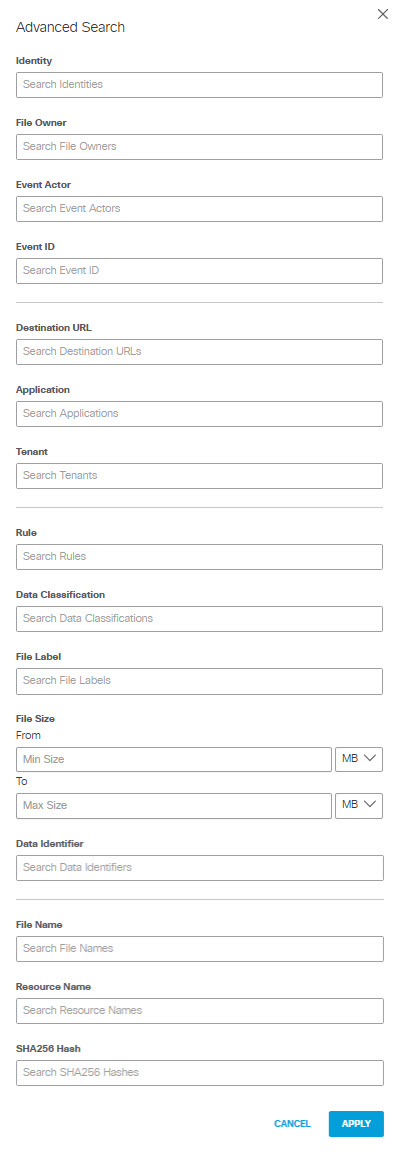
- You can search the Data Loss Prevention Reports by keywords to find specific events.

- Alternatively, click Advanced in the search bar to bring up the advanced search. You can apply filters to the report choosing any of the following event criteria:
- Identity
- File Owner
- Event Actor
- Event ID
- Destination URL
- Application
- Direction (Applies only to some applications, such as OpenAI API and OpenAI ChatGPT.)
- Tenant
- Rule
- Data Classification
- File Label
You can search for file label names in the file's document properties. This includes:
- MIP and Titus labels in Microsoft Office Document Properties, and AdobePDF Document Properties.
- Microsoft Office Sensitivity Labels for Microsoft 365 or Box tenants. (Within the Box application these are referred to as Classification Labels.)
- File Size
When searching for files meeting size criteria, You can choose to include only files that are greater than a minimum size you specify, or include files that are within a range of sizes you specify. (If you specify a maximum size without specifying a minimum size, the minimum size defaults to 0.) You can specify file sizes in KB or MB. The system scans only up to the first 50 MB of plain text for any file; if you specify a minimum file size > 50 MB, Secure Access does not scan for other criteria.
- Data Identifier
- File Name
- Resource Name (applies to AWS S3 or Azure Storage tenants only)
- SHA256 Hash
Click Apply to apply the filters to the report.
Discovery
Prerequisite
- You must initiate a discovery scan as described in Discovery Scan.
View a Discovery Scan
- Navigate to Reporting > Additional Reports > Data Loss Prevention. Click the Discovery tab.
- Use Filters to filter the data by Application , Last Modified, and Exposure.
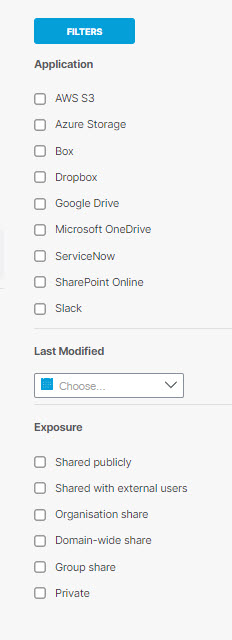
- Choose a Scan from the drop-down. Click Apply to view the details.
Note: Up to 10 recent scans are displayed. The next triggered Discovery Scan removes the oldest scan results in the list.
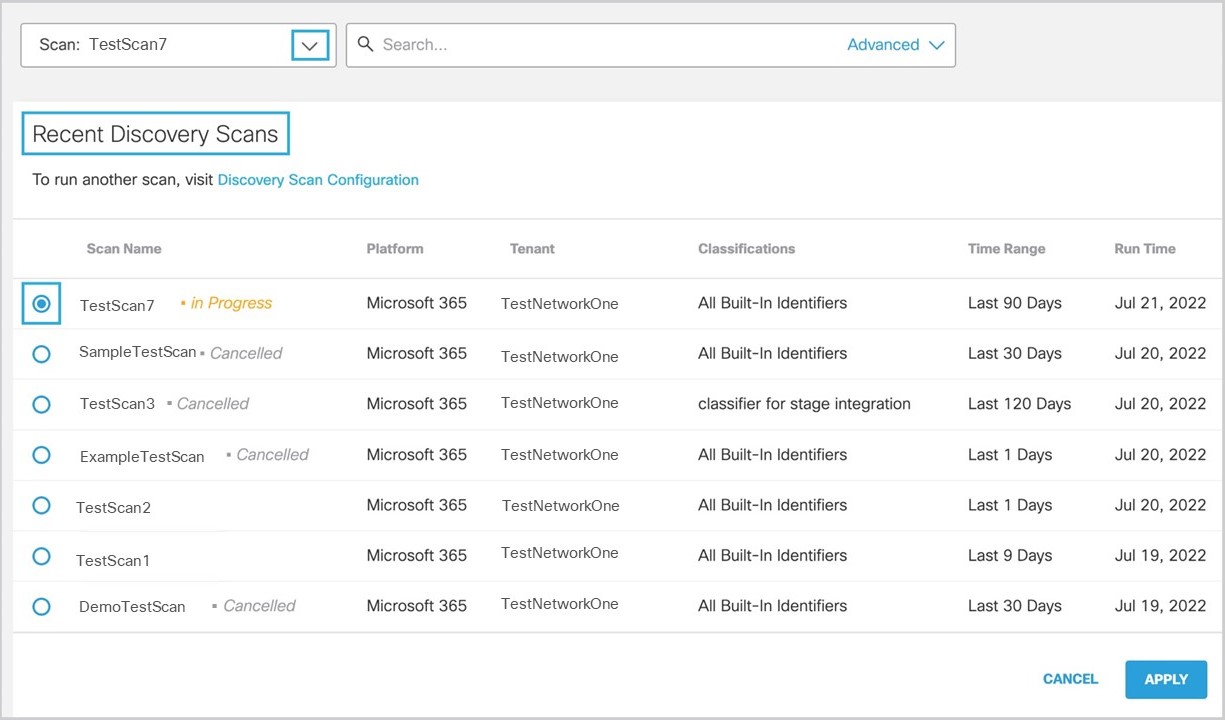
- If there is an ongoing scan, the results are displayed. Click Cancel Scan to stop the ongoing scan. (You can only run one scan at a time.)
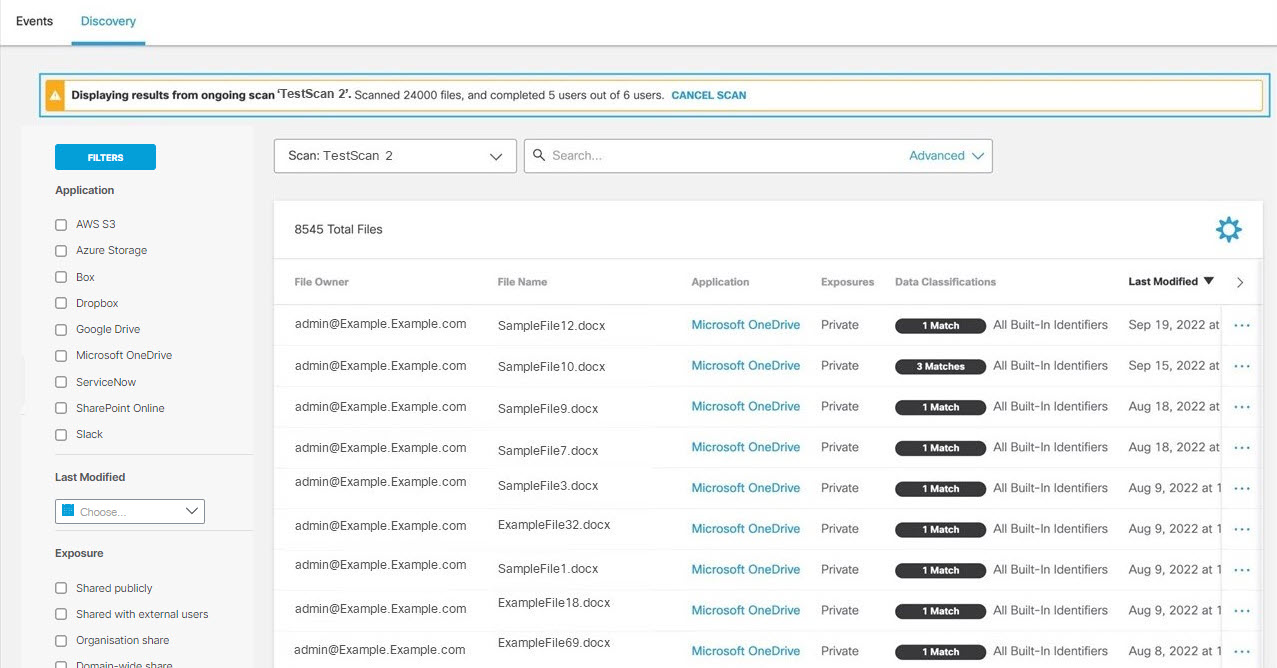
- Click the action menu icon (three dots) to view further details of a file.
Cloud Malware Report < Data Loss Prevention Report>Third-Party Apps Report
Updated 1 day ago