Configure Tunnels with Sophos XG IPsec
This document provide information about how to setup IPsec tunnels between a Sophos XG Firewall and Cisco Umbrella to provide protection for endpoints that are routed to Umbrella through an IPsec tunnel. This document will cover routed IPsec tunnels.
Note: This document is based on Sophos XG version 18.05.586. While we expect that IPsec tunnels will continue to work with devices as each vendor updates their device, we cannot guarantee connectivity for versions not explicitly listed as tested in this document.
Table of Contents
- Configure Tunnels in Umbrella
- Configure Sophos XG – IPsec Policy
- Configure IPsec Connections
- Tunnel Interface and Gateway
- SD-WAN Policy Routing
- Test the Configuration
- Other Resources
Configure Tunnels in Umbrella
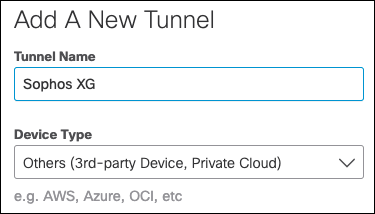
- Navigate to Deployments Network Tunnels and click Add.
- Give the Tunnel a name and choose Other as Device Type.

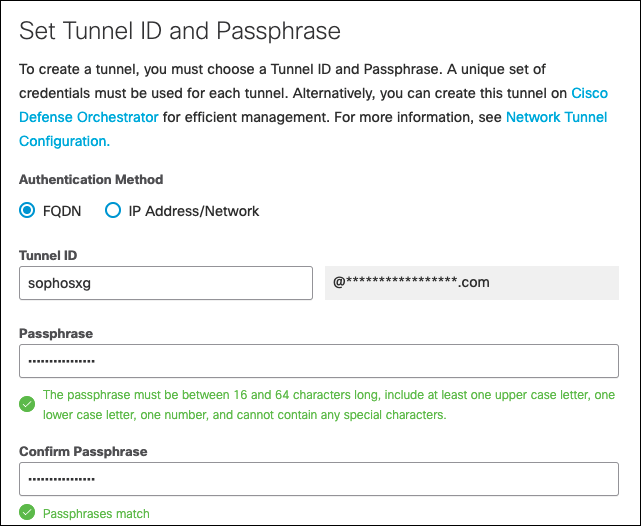
- Choose FQDN as the Authentication Method.
- Choose a Tunnel ID and a Passphrase.

- Click Save.
Note: Copy the Tunnel ID and Passphrase as this information is required to configure the tunnel in Sophos XG.
Configure Sophos XG – IPsec Policy
Use SD-WAN Policy Routing to direct traffic down the tunnel to Umbrella.
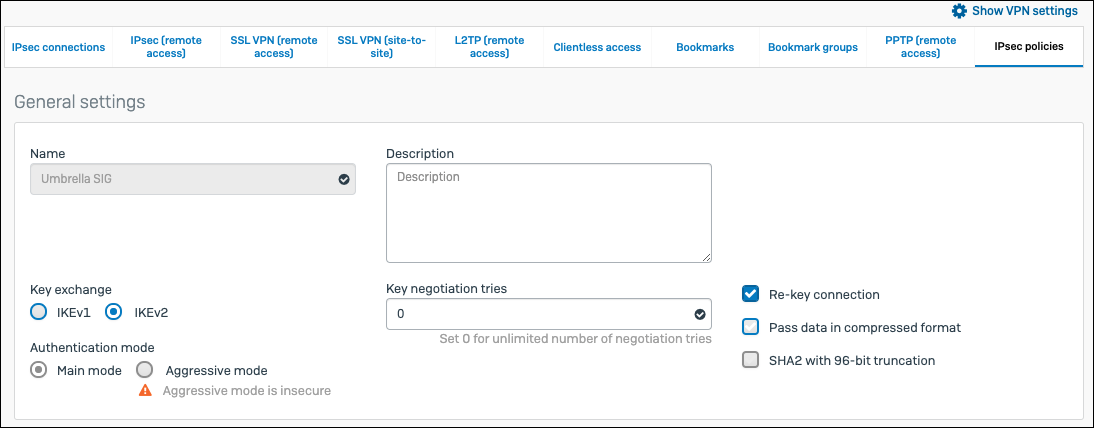
- In Sophos XG, navigate to Configure VPN IPsec policies and click Add.
- Give it a meaningful name so you can easily find it when attaching it to the IPsec Tunnel.
- Leave Key Exchange and Authentication Mode set to IKEv2 and Main mode respectively.

- Add values for Phase 1 and Phase 2.
Note: If a field is not listed, in the following table use the default value.
Phase 1 Value Key Life 28800 DH group (key group) 19 & 20 Encryption AES256 Authentication SHA2 256

Phase 2 Value PFS group (DH group) Same as phase-1 Key life 3600 Encryption AES256 Authentication SHA2 256

Dead Peer Detection Value Check peer after every 10 Seconds When peer unreachable Re-initiate

Configure IPsec Connections
- Navigate to IPsec connections.
- Give the tunnel a name.
- Add the following values for each section and enter the preshared key created in Umbrella:
General Settings & Encryption Value IP version IPv4 Connection typ Tunnel interface Gateway type Initiate the connection Policy IPsec Policy we created in the previous step Authentication Type Preshared key


Gateway settings Value Listening interface WAN interface Local ID type Local ID Tunnel ID created in the Umbella Dashboard Gateway address Umbrella DC IP Address. List located here Remote ID type IP address Remote ID Same IP address as Gateway address
- Click Save.
You should now see the tunnel.

Note: If the Active and Connection Status are not green, click each to manually activate it.
Now that the tunnel is built, create the tunnel interface and gateway.
Tunnel Interface and Gateway
- Navigate to Configure Network Interfaces.
- Click your WAN port which will show the VPN interface xfrm1.
- Click the icon with 3 lines and choose Edit interface.
- Leave Name (xfrm1) as it is and make sure IPv4 configuration is selected.
- Choose a RFC1918 address that does not exist in your environment. For the netmask, choose a /30 as you only need two addresses for this point-to-point connection and click Save.
- Navigate to Configure > Routing > Gateways and click Add with the following:
| Gateway host | Value |
|---|---|
| Name | Give it meaningful name (ie UmbrellaGW) |
| Gateway IP | Give it the second IP in the /30 from earlier. For example if you sed 10.20.20.254 for the Tunnel Interface then use 10.20.20.253 for the gateway |
| Interface | Choose the interface we created earlier (most likely xfrm1) |
| Zone | Choose None. If you wish to bind this to a particular zone then you will need to make sure you have the proper firewall rules in place which is beyond the scope of this document |
| Health check | OFF |
- Click Save.
SD-WAN Policy Routing
- Navigate to Configure Routing > SD-WAN > policy routing and click Add.
- Give it a meaningful Name then enter the following information:
| Traffic selector& Routing | Value |
|---|---|
| Incoming Interface | Choose the internal interface where the devices you wish to route to SIG will ingress the Sophos on |
| DSCP marking | Choose a value if you wish but ours will be off |
| Source Networks | Choose the networks or hosts you wish to route down the SIG Tunnel |
| Destination Networks | This will most likely be Any. You will want to make sure any other site to site tunnels for internal traffic is has priority over this tunnel. |
| Services | Choose which services you want to send down the tunnel. We’ll be using Any to send all traffic |
| Application Object | Leave as Any or if you only want to route specific applications, choose those applications here. |
| User or groups | If you wish to route based on Users or groups, do so here. Ours will be set to Any |
| Primary Gateway | The gateway we created earlier |
| Backup Gateway | This could be a backup tunnel to SIG or another GW. For the sake of this document, we will be selecting none but feel free to choose what will work best in your environment |
- Click Save.
Test the Configuration
Once the tunnel is up and the proper SD-WAN routing rules in place, test the tunnel with a device on the network you configured in the SDW-WAN policy.
To verify, navigate to a site such (for example, ifconfig.co). Run curl ifconfig.co if using CLI. You should receive an IP Address in either a 146.112.x.x, 151.186.x.x, or 155.190.x.x range.
Other Resources
Sophos Route Based VPN article
Umbrella Cloud Firewall
Configure Tunnels with Google Cloud Platform IPsec < Configure Tunnels with Sophos XG IPsec > Configure Tunnels with Silver Peak
Updated almost 2 years ago
