Configure Tunnels with Fortinet IPsec
The content provided here lists information about how to service chain traffic from Fortinet to Cisco Umbrella to enable threat protection and containment. Complete this task by setting up interoperable site-to-site IPsec tunnels between Fortinet and Umbrella.

Note: The information presented here is based on Fortinet version 7.0.1. While we expect that IPsec tunnels will continue to work with devices as each vendor updates their device, we cannot guarantee connectivity for versions not explicitly listed as tested in this document.
Table of Contents
- Configure Umbrella
- Configure Fortinet
- Verify the Tunnel Status
- Create a Static Route
- Test the Configuration
- Other Resources
Configure Umbrella
Before you can configure the Fortinet device, add a primary and secondary tunnel in the Umbrella dashboard.
- Navigate to Deployments > Core Identities > Network Tunnels and click Add.
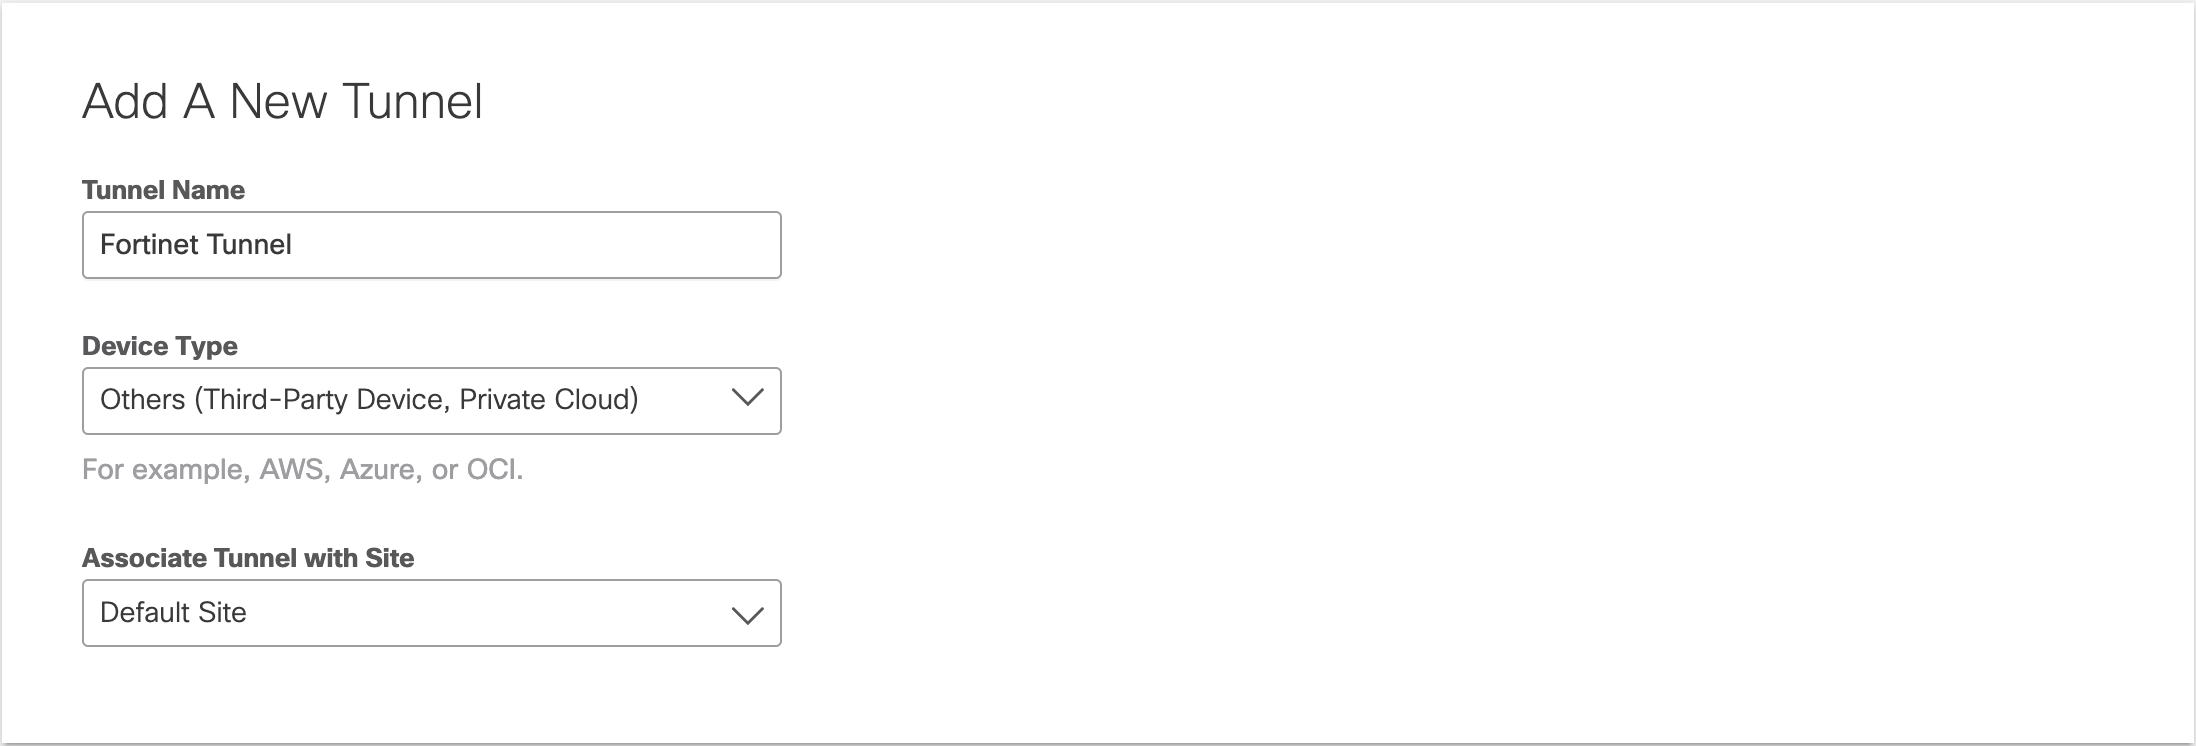
- Give the primary tunnel a name and select Others (Third-Party Device, Private Cloud) from the Device Type drop-down menu.
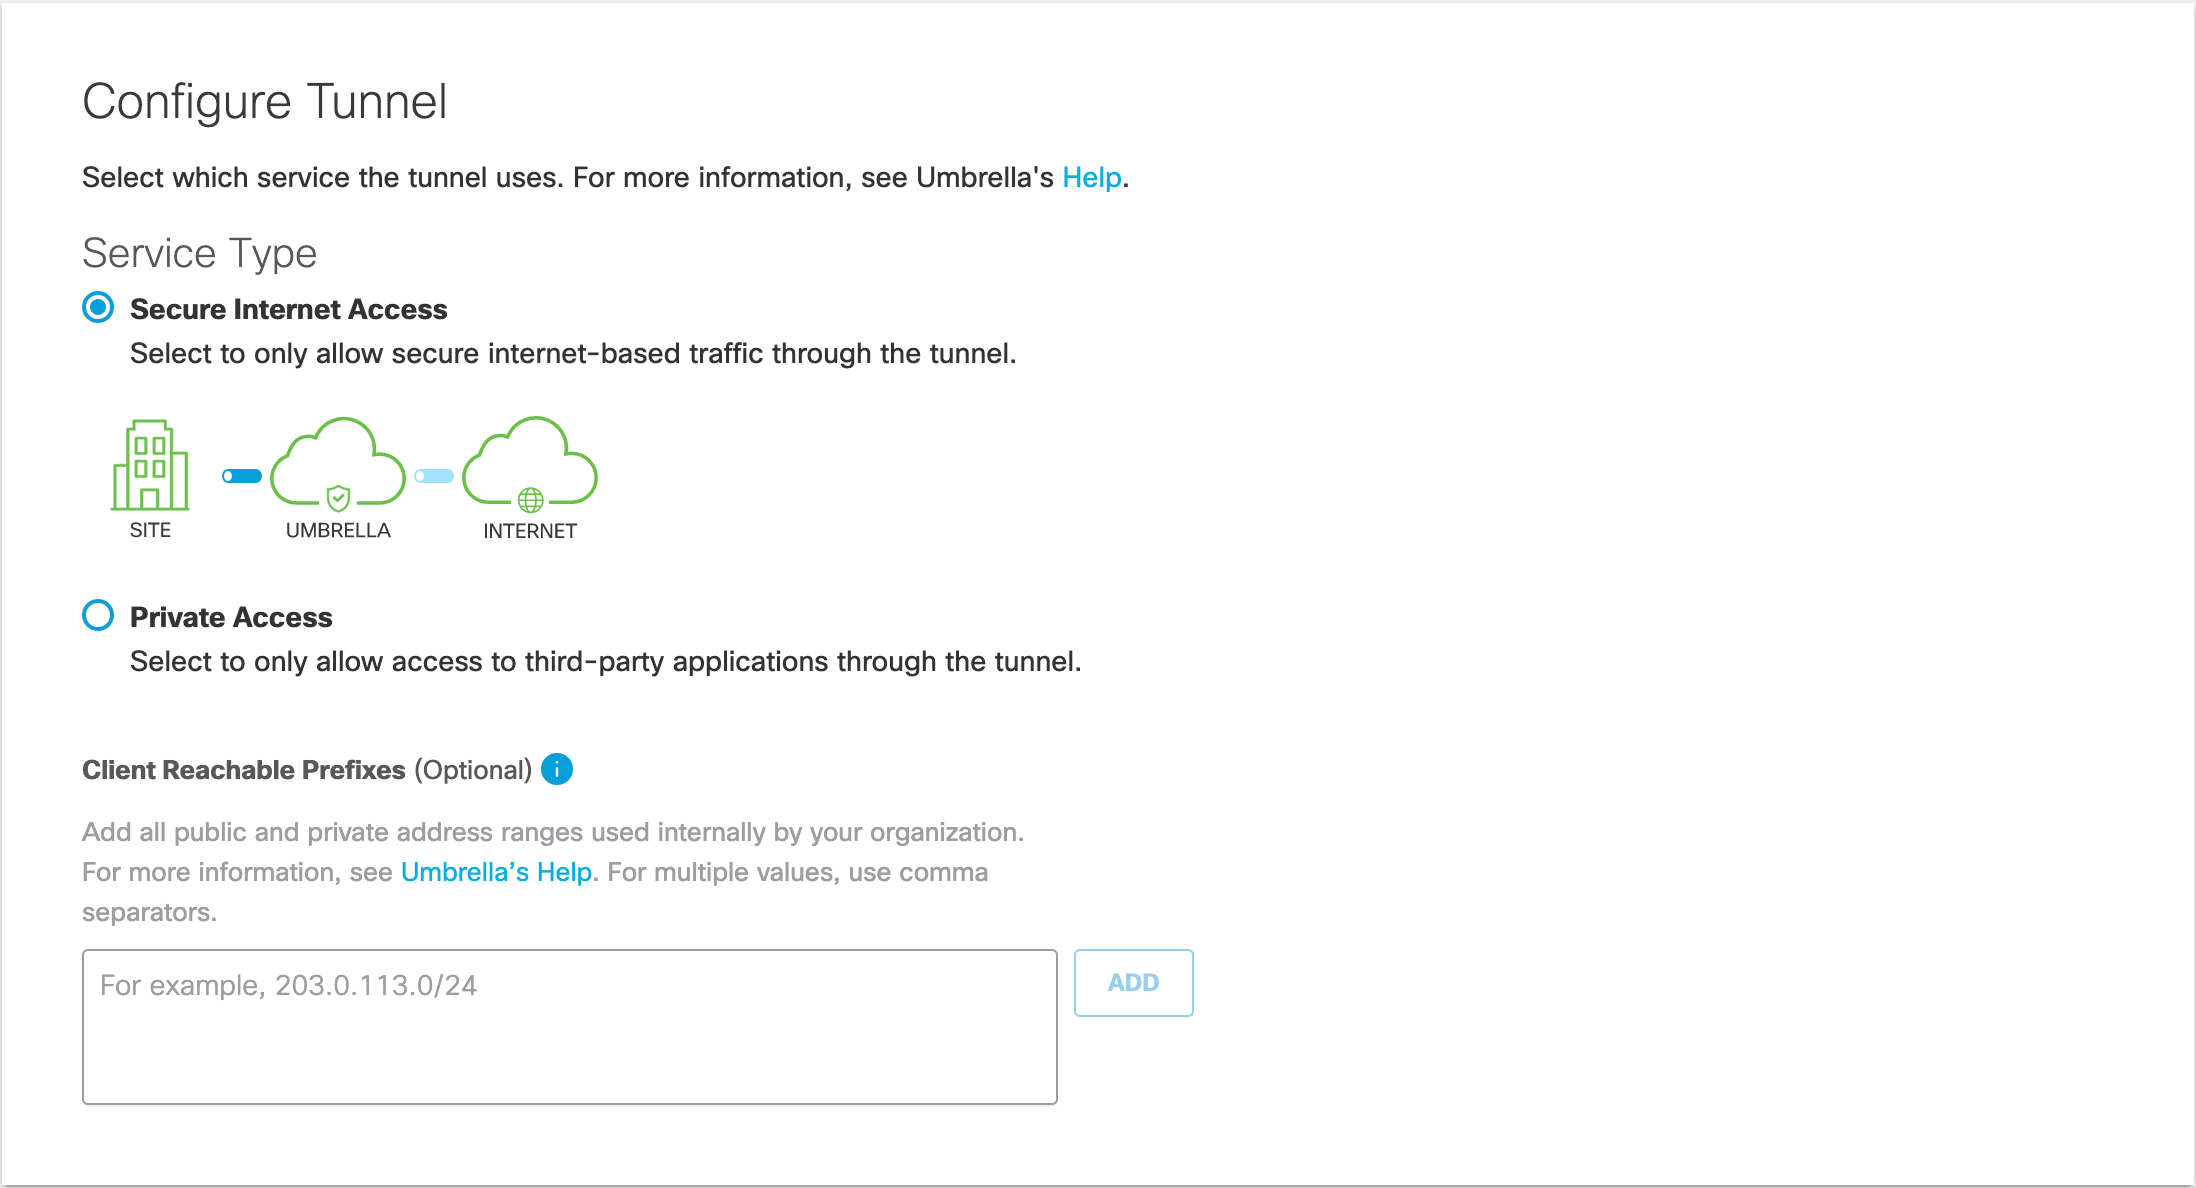
- For Service Type, select Secure Internet Access.
- In the Configure Tunnel ID and Passphrase section, select FQDN for the Authentication Method, name your Tunnel, and create a passphrase.
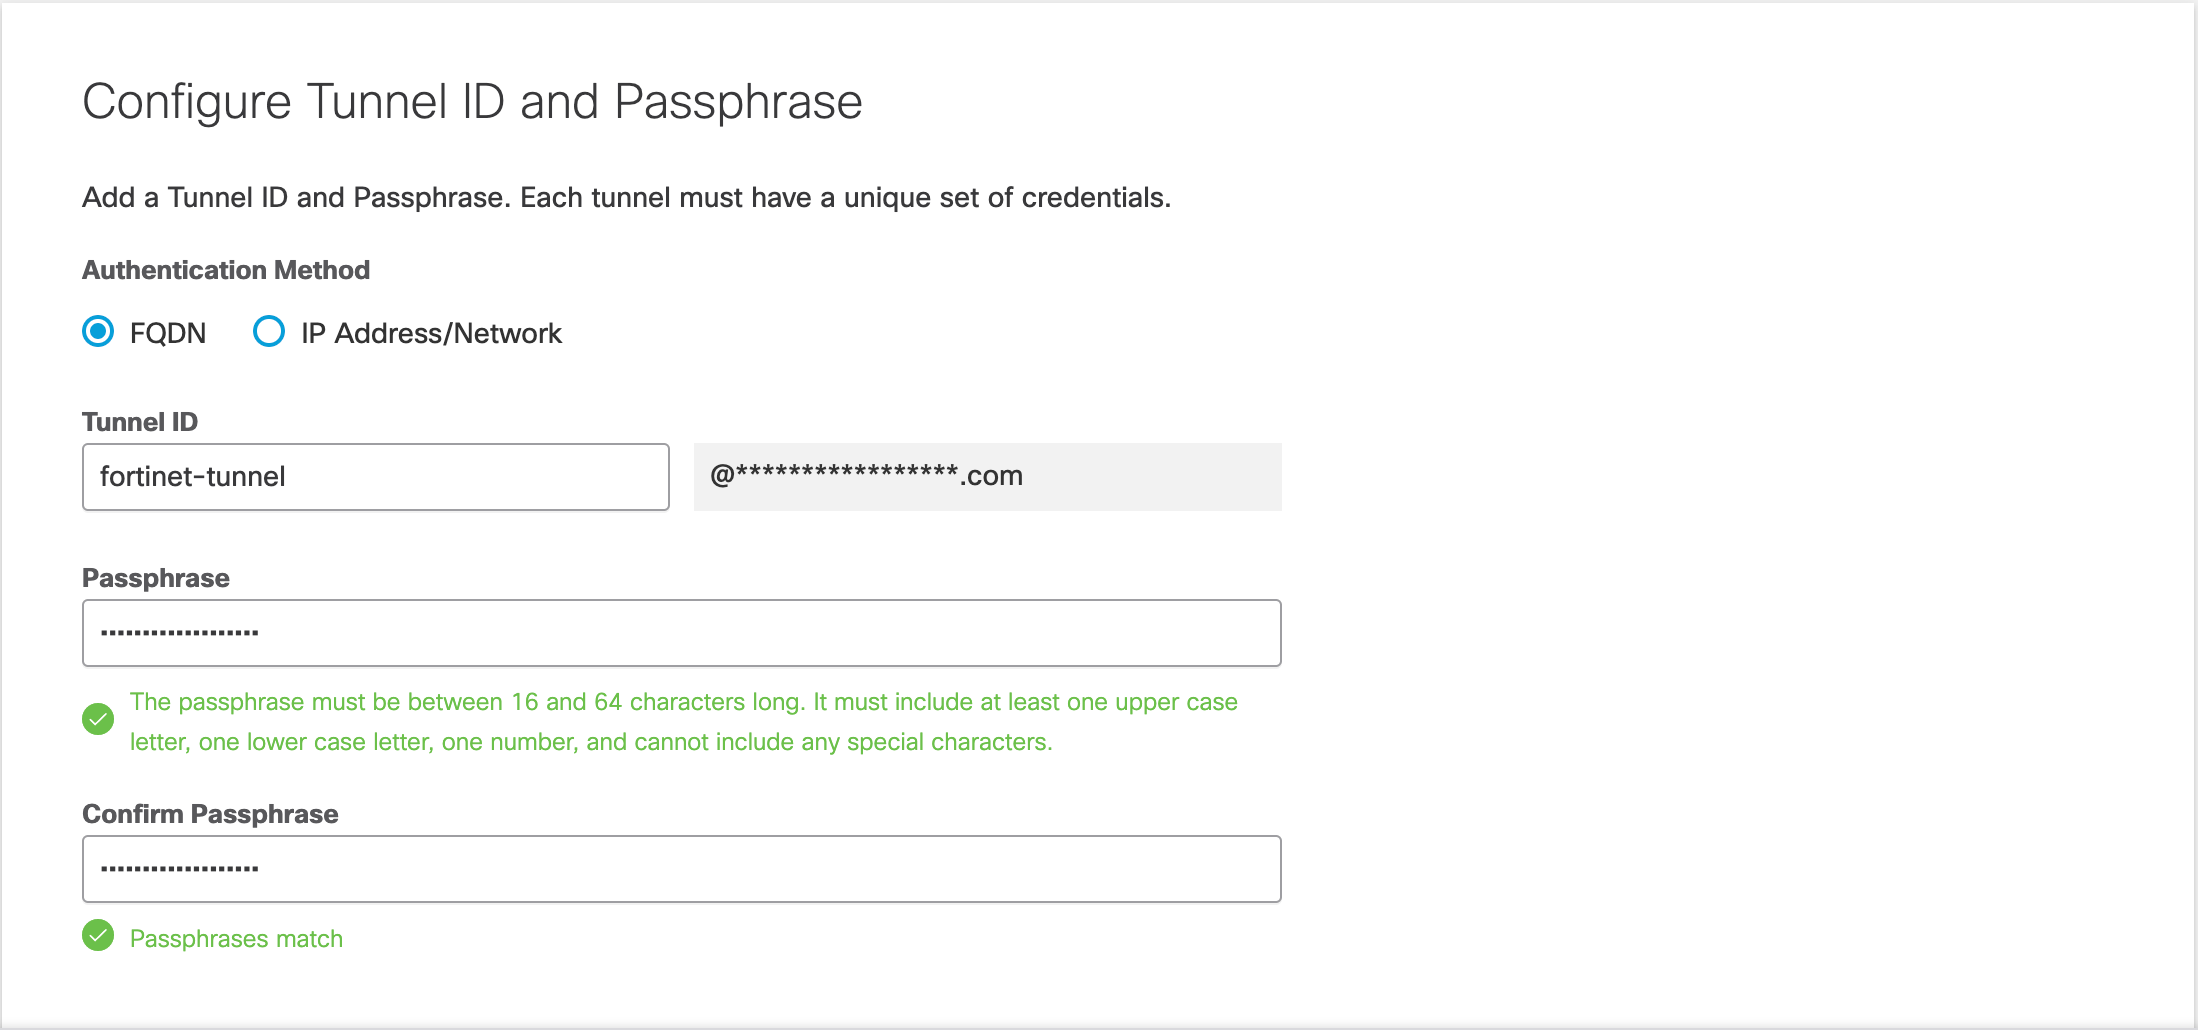
- Enter your passphrase again in Confirm Passphrase. After Umbrella confirms your passphrase, copy and save the Tunnel ID and Passphrase of your primary tunnel.
- Repeat steps 1 through 5 to add a secondary tunnel with a different Tunnel ID.
Configure Fortinet
Configure Fortinet to establish an IPsec tunnel and route traffic to Umbrella for threat protection and containment.
Configure the Primary IPsec Tunnel
Configure the first IPsec Tunnel from the Fortinet device to the Umbrella headend.
- Login into Fortinet and navigate to VPN > IPsec Tunnels.
- Click Create New > IPsec Tunnel, give the tunnel a name and select Template type, Custom.
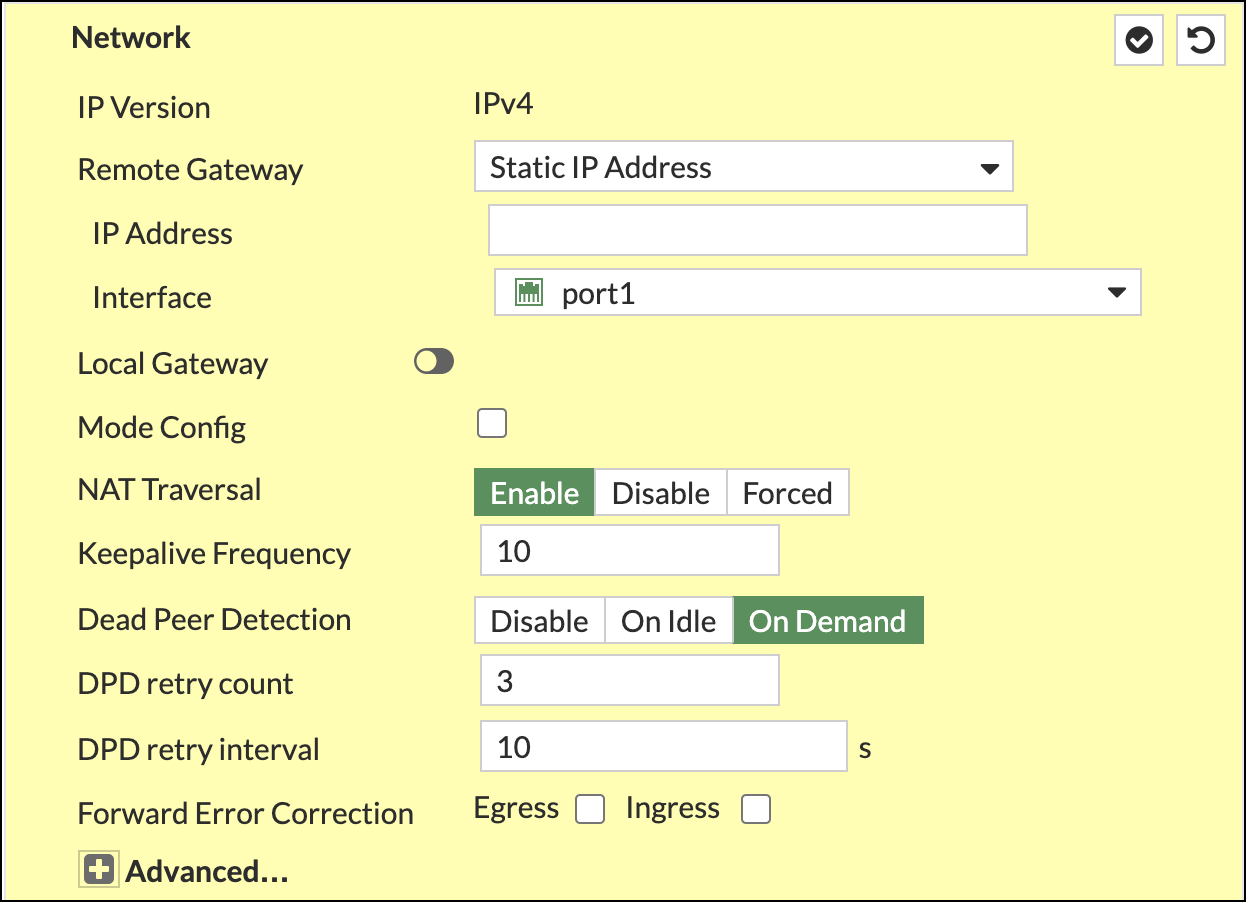
- Complete the Network section as follows:
- IP Verson—IPv4
- Remote Gateway—Static IP Address
- IP Address—(Umbrella SIG data center IP address)
- Interface—port10
- NAT Traversal—Enable
- Keepalive Frequency—10
- Dead Peer Detection–On Demand
- DPD retry count—3
- DPD retry interval—10
- In the Authentication section, choose Pre-shared Key as the Method and add the key. Select IKE Version 2.

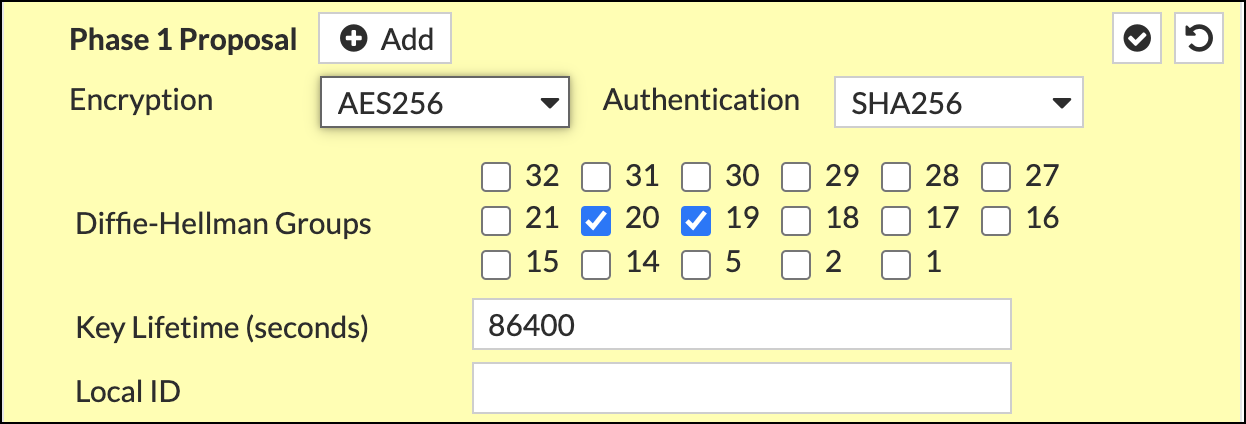
- Complete the Phase 1 Proposal section as follows:
- Encryption—AES256
- Authentication—SHA256
- Diffie-Hellman Groups—20 and 19
- Key Lifetime (seconds)—86400
- Local ID—The full FQDN of the primary Tunnel ID from step 5 of Configure Umbrella.
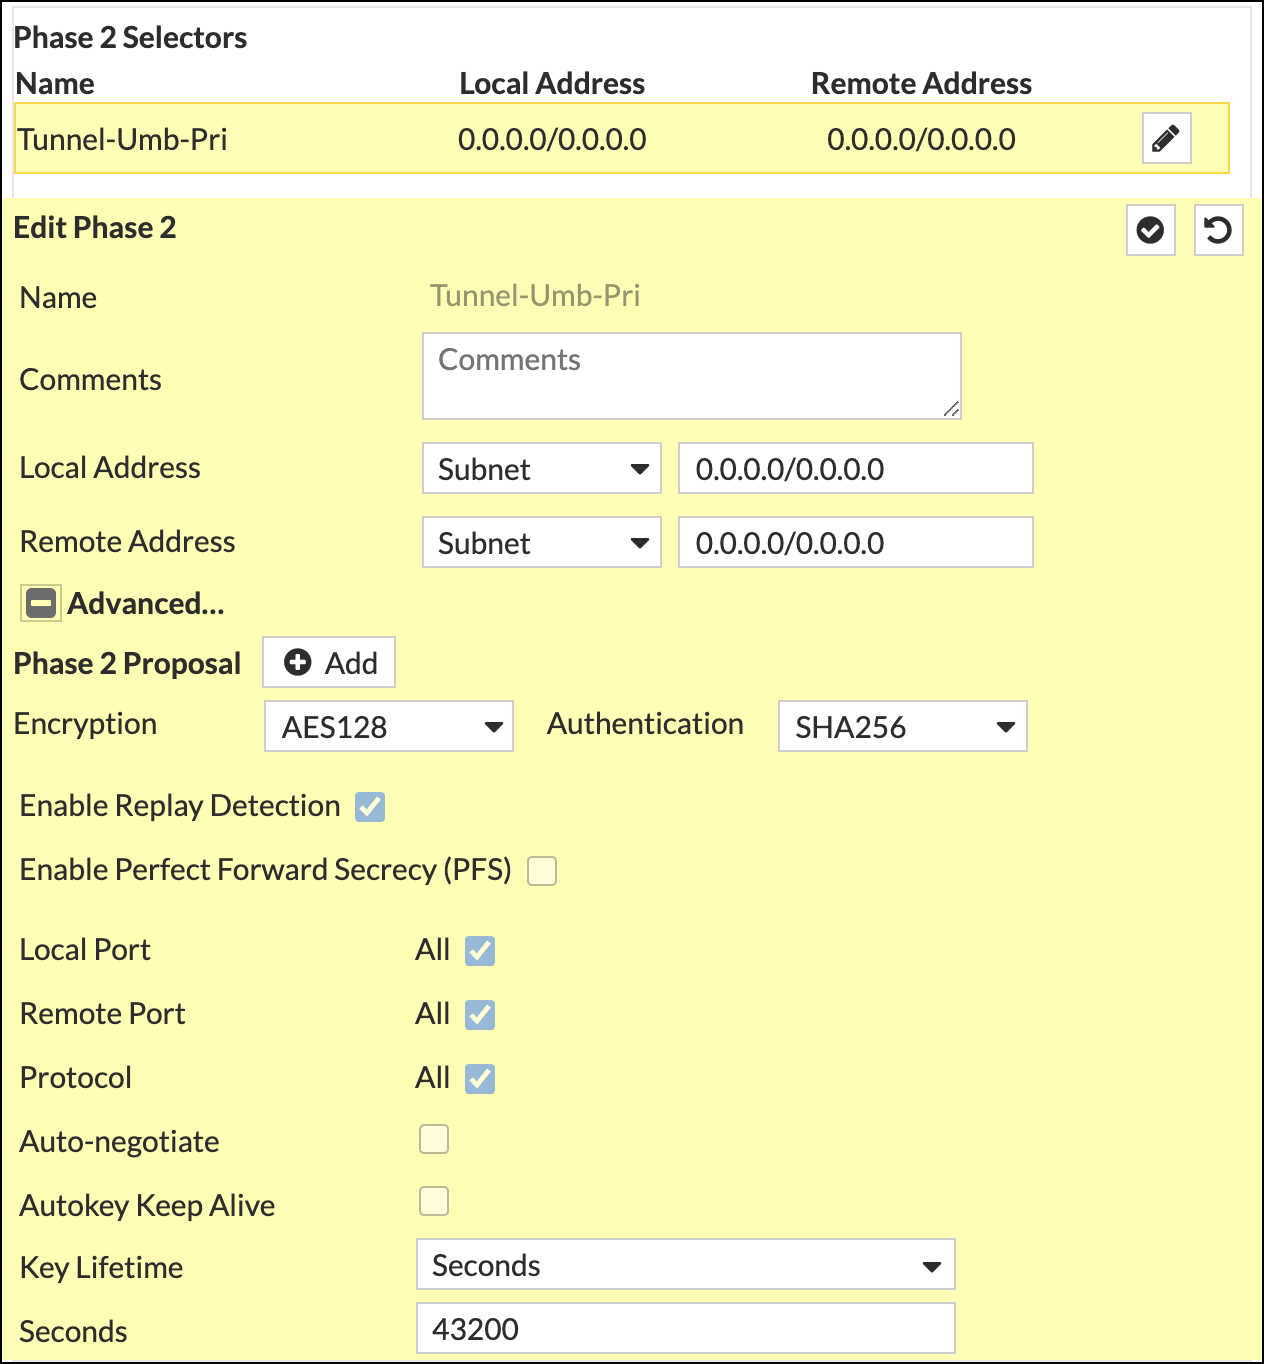
- Complete the Phase 2 Selectors section as follows:
Name—The name you gave to the tunnel.
Comments—Any notes or comments you want to add.
Local Address—Subnet; local network to be routed to Umbrella
Remote Address—Subnet; the remote network accessed through Umbrella (usually 0.0.0.0/0.)
Encryption—AES2128
Authentication—SHA256
Enable Replay Detection—Check
Enable Perfect Forward Secrecy (PFS)—Uncheck
Local Port—Check
Remote Port—Check
Protocol—Check
Auto-negotiate—Uncheck
Autokey Keep Alive—Uncheck
Key Lifetime—Seconds
Seconds—43200
- Click OK
Configure the Secondary IPSec Tunnel
Configure a second IPsec Tunnel from the Fortinet device to the Umbrella headend.
- Login into Fortinet and navigate to VPN > IPsec Tunnels.
- Click Create New > IPsec Tunnel, give the tunnel a name and select Template type, Custom.
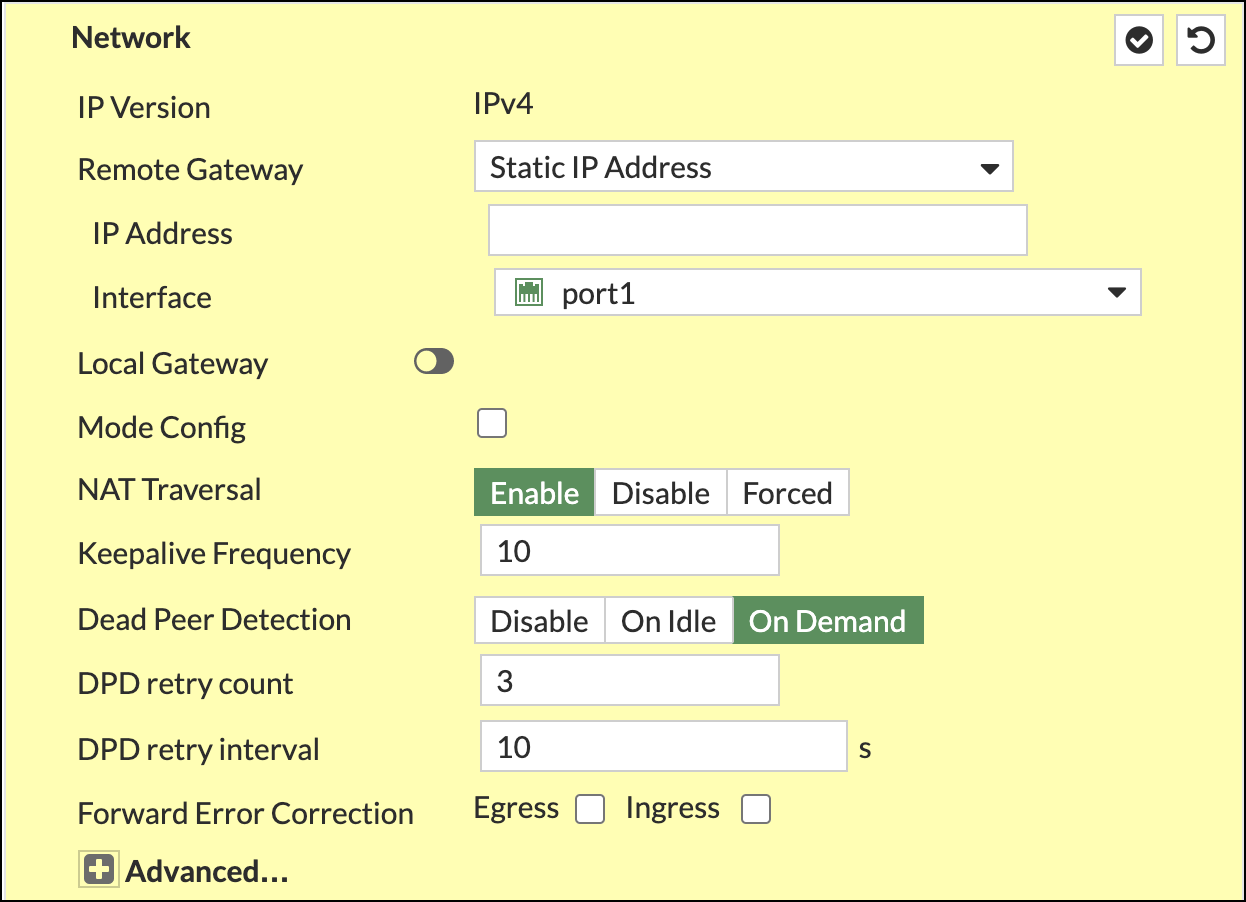
- Complete the Network section as follows:
- IP Verson—IPv4
- Remote Gateway—Static IP Address
- IP Address—(Umbrella SIG data center IP address)
- Interface—port10
- NAT Traversal—Enable
- Keepalive Frequency—10
- Dead Peer Detection–On Demand
- DPD retry count—3
- DPD retry interval—10
- In the Authentication section, choose Pre-shared Key as the Method and enter the key. Choose IKE Version 2.

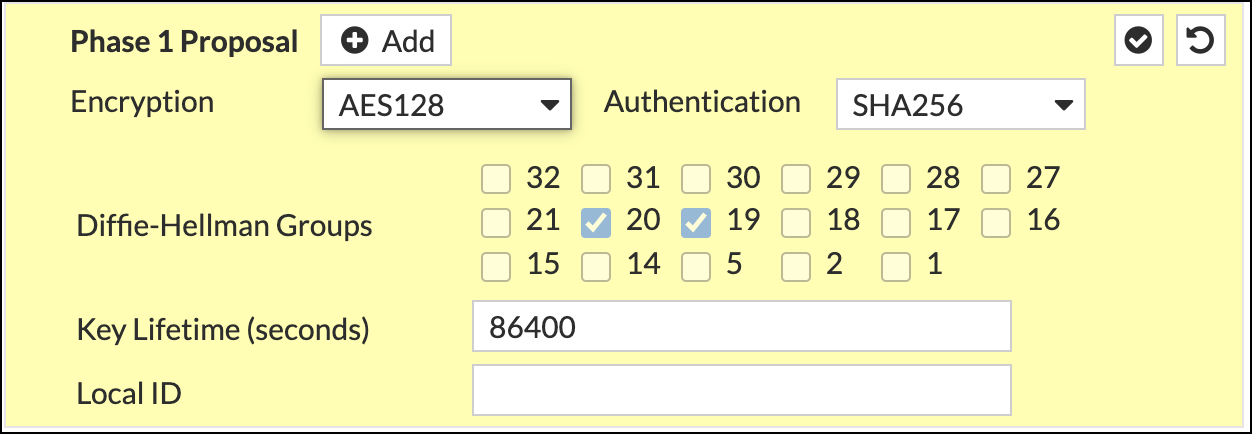
- Fill out the Phase 1 Proposal as follows:
- Encryption—AES128
- Authentication—SHA256
- Diffie-Hellman Groups—20 and 19
- Key Lifetime (seconds)—86400
- Local ID—The full FQDN of the secondary Tunnel ID from step 6 of Configure Umbrella.
- Fill out the Phase 2 Selectors as follows and click Ok to save:
Name—The name you gave to the tunnel.
Comments—Any notes or comments you want to add.
Local Address—Subnet; local network to be routed to Umbrella
Remote Address—Subnet; the remote network accessed through Umbrella (usually 0.0.0.0/0.)
Encryption—AES2128
Authentication— SHA256
Enable Replay Detection—Check
Enable Perfect Forward Secrecy (PFS)—Uncheck
Local Port—Check
Remote Port—Check
Protocol—Check
Auto-negotiate—Uncheck
Autokey Keep Alive—Uncheck
Key Lifetime—Seconds
Seconds—43200

Create Policy and Objects
Configure the policy to allow traffic to and from Umbrella.
- In Fortinet, navigate to Policy & Objects > Firewall Policy, click create new and complete the following fields:
- Incoming Interface—Tunnel Interface
- Outgoing Interface—WAN Interface
- Source—All
- Destination—All
- Service—All
- Action—Accept
- NAT—Uncheck
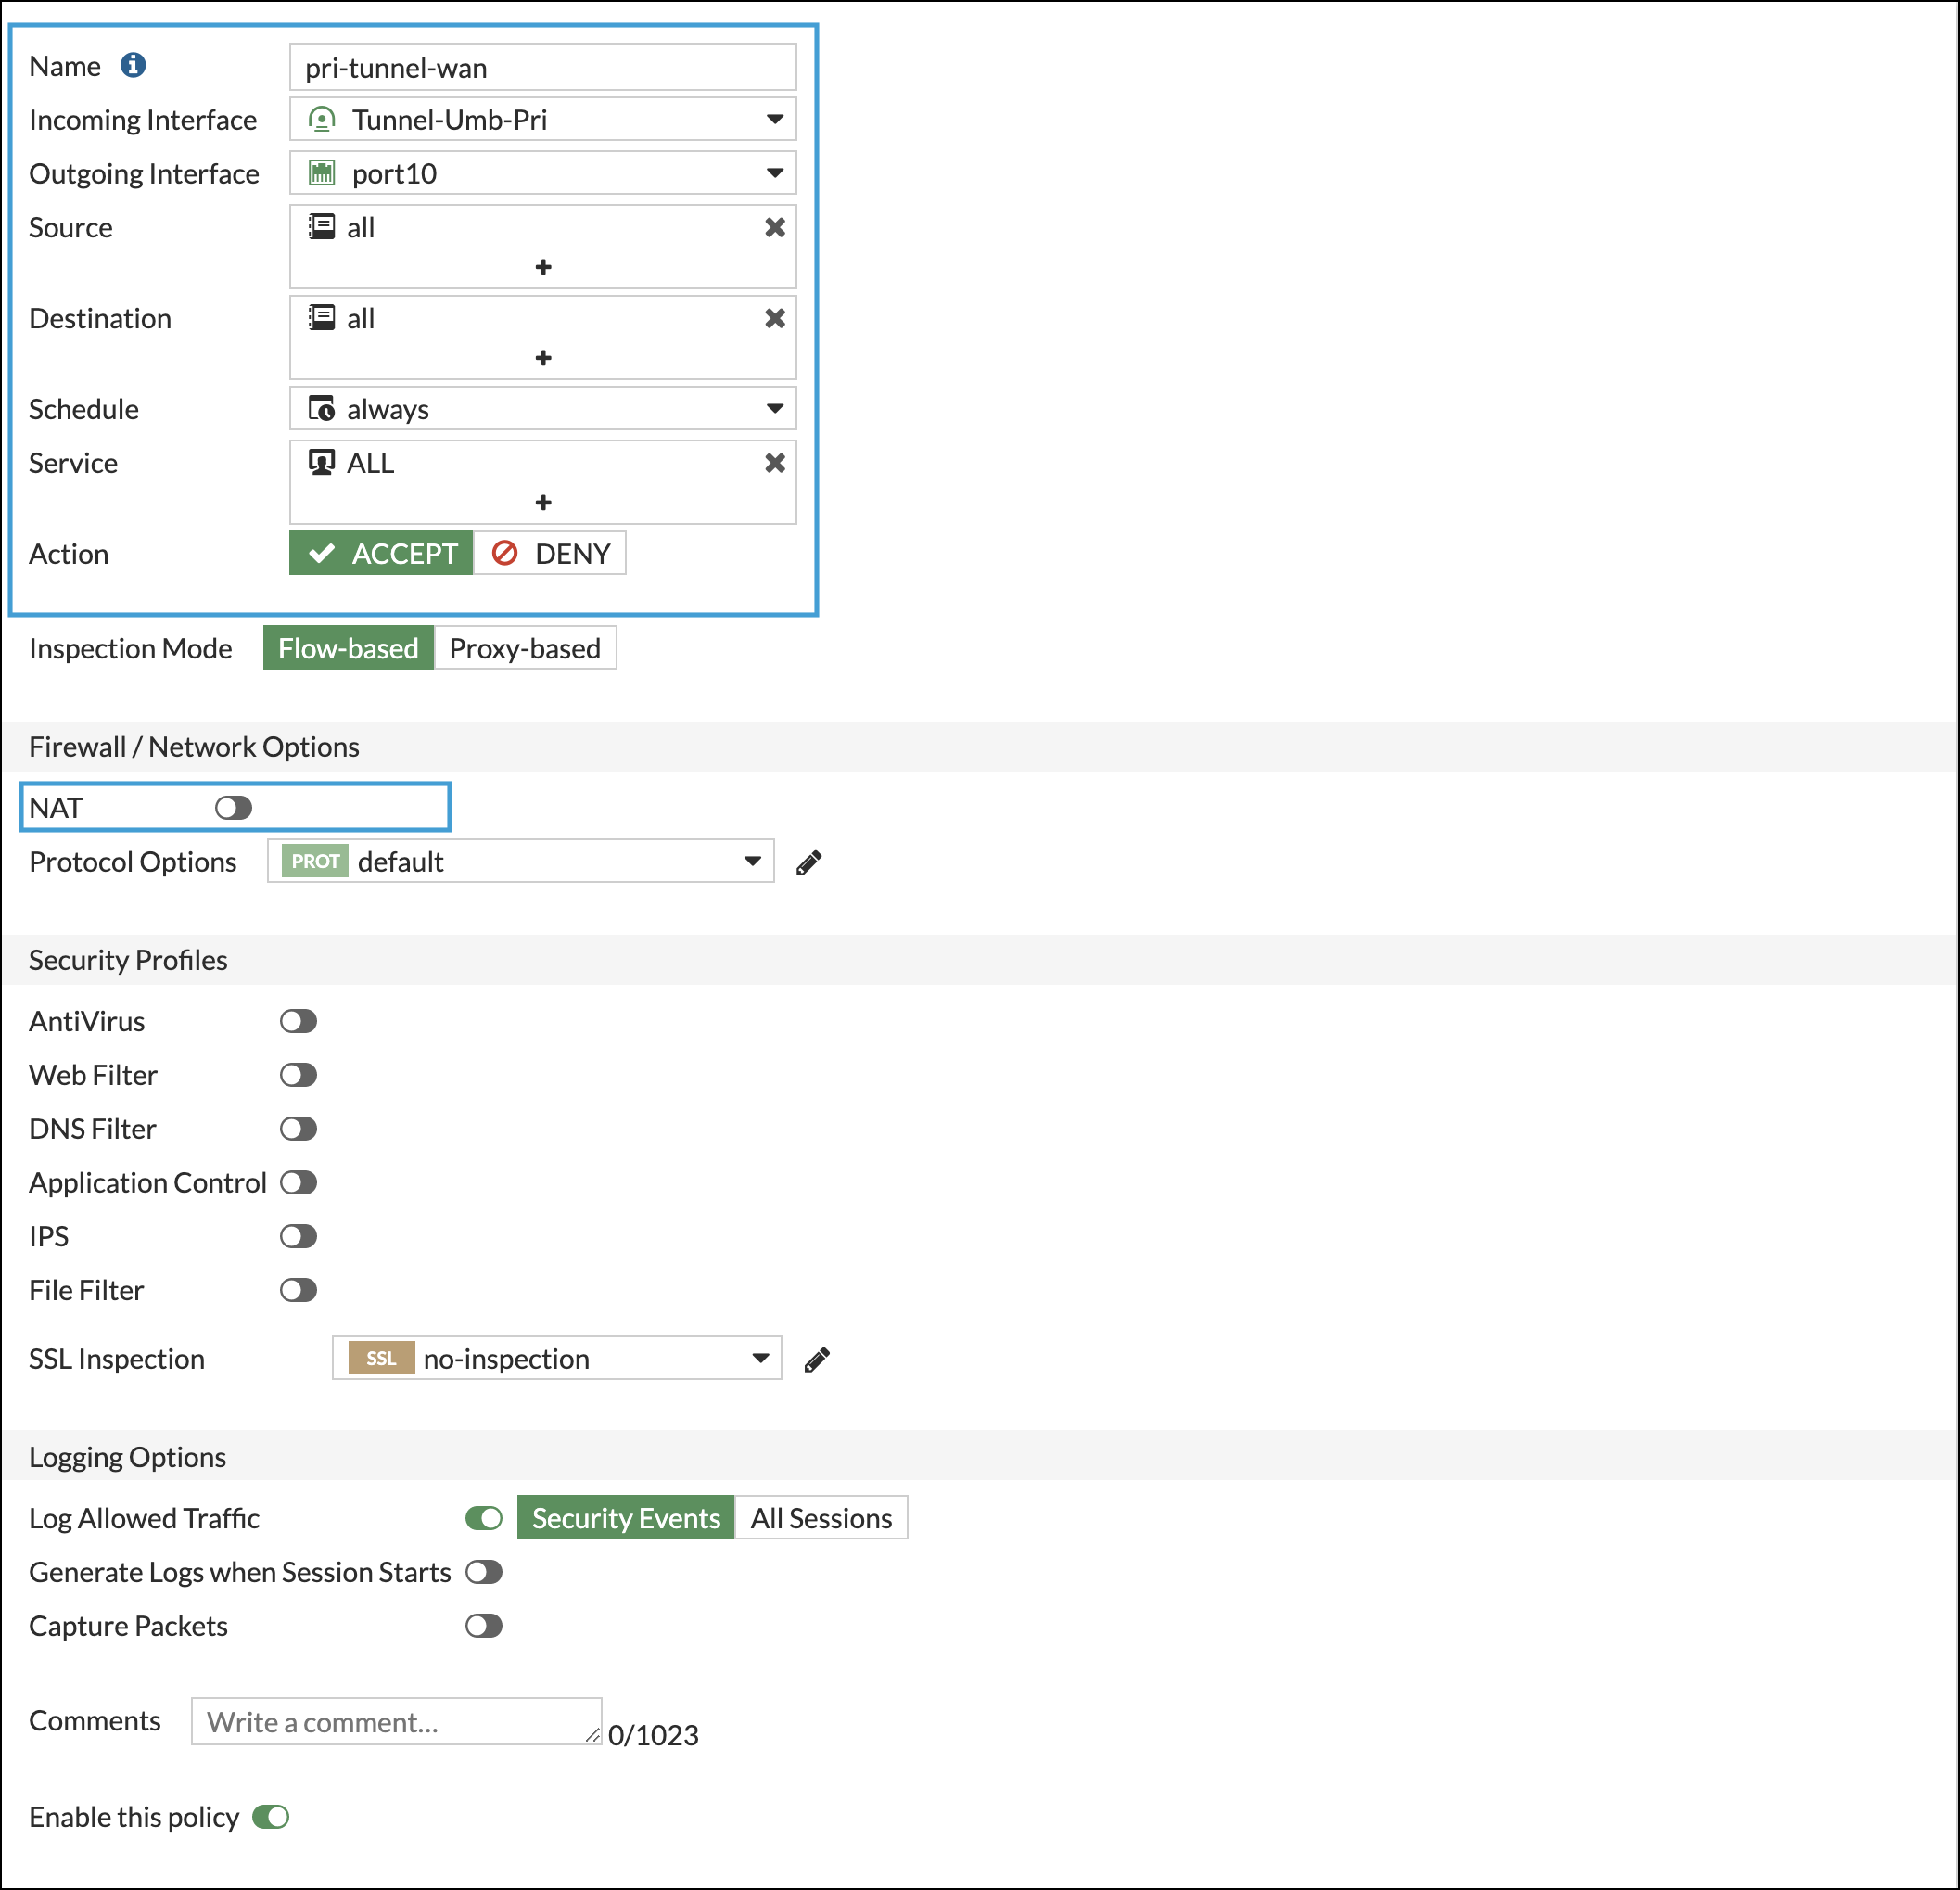
- Repeat Step 1 for the secondary tunnel.
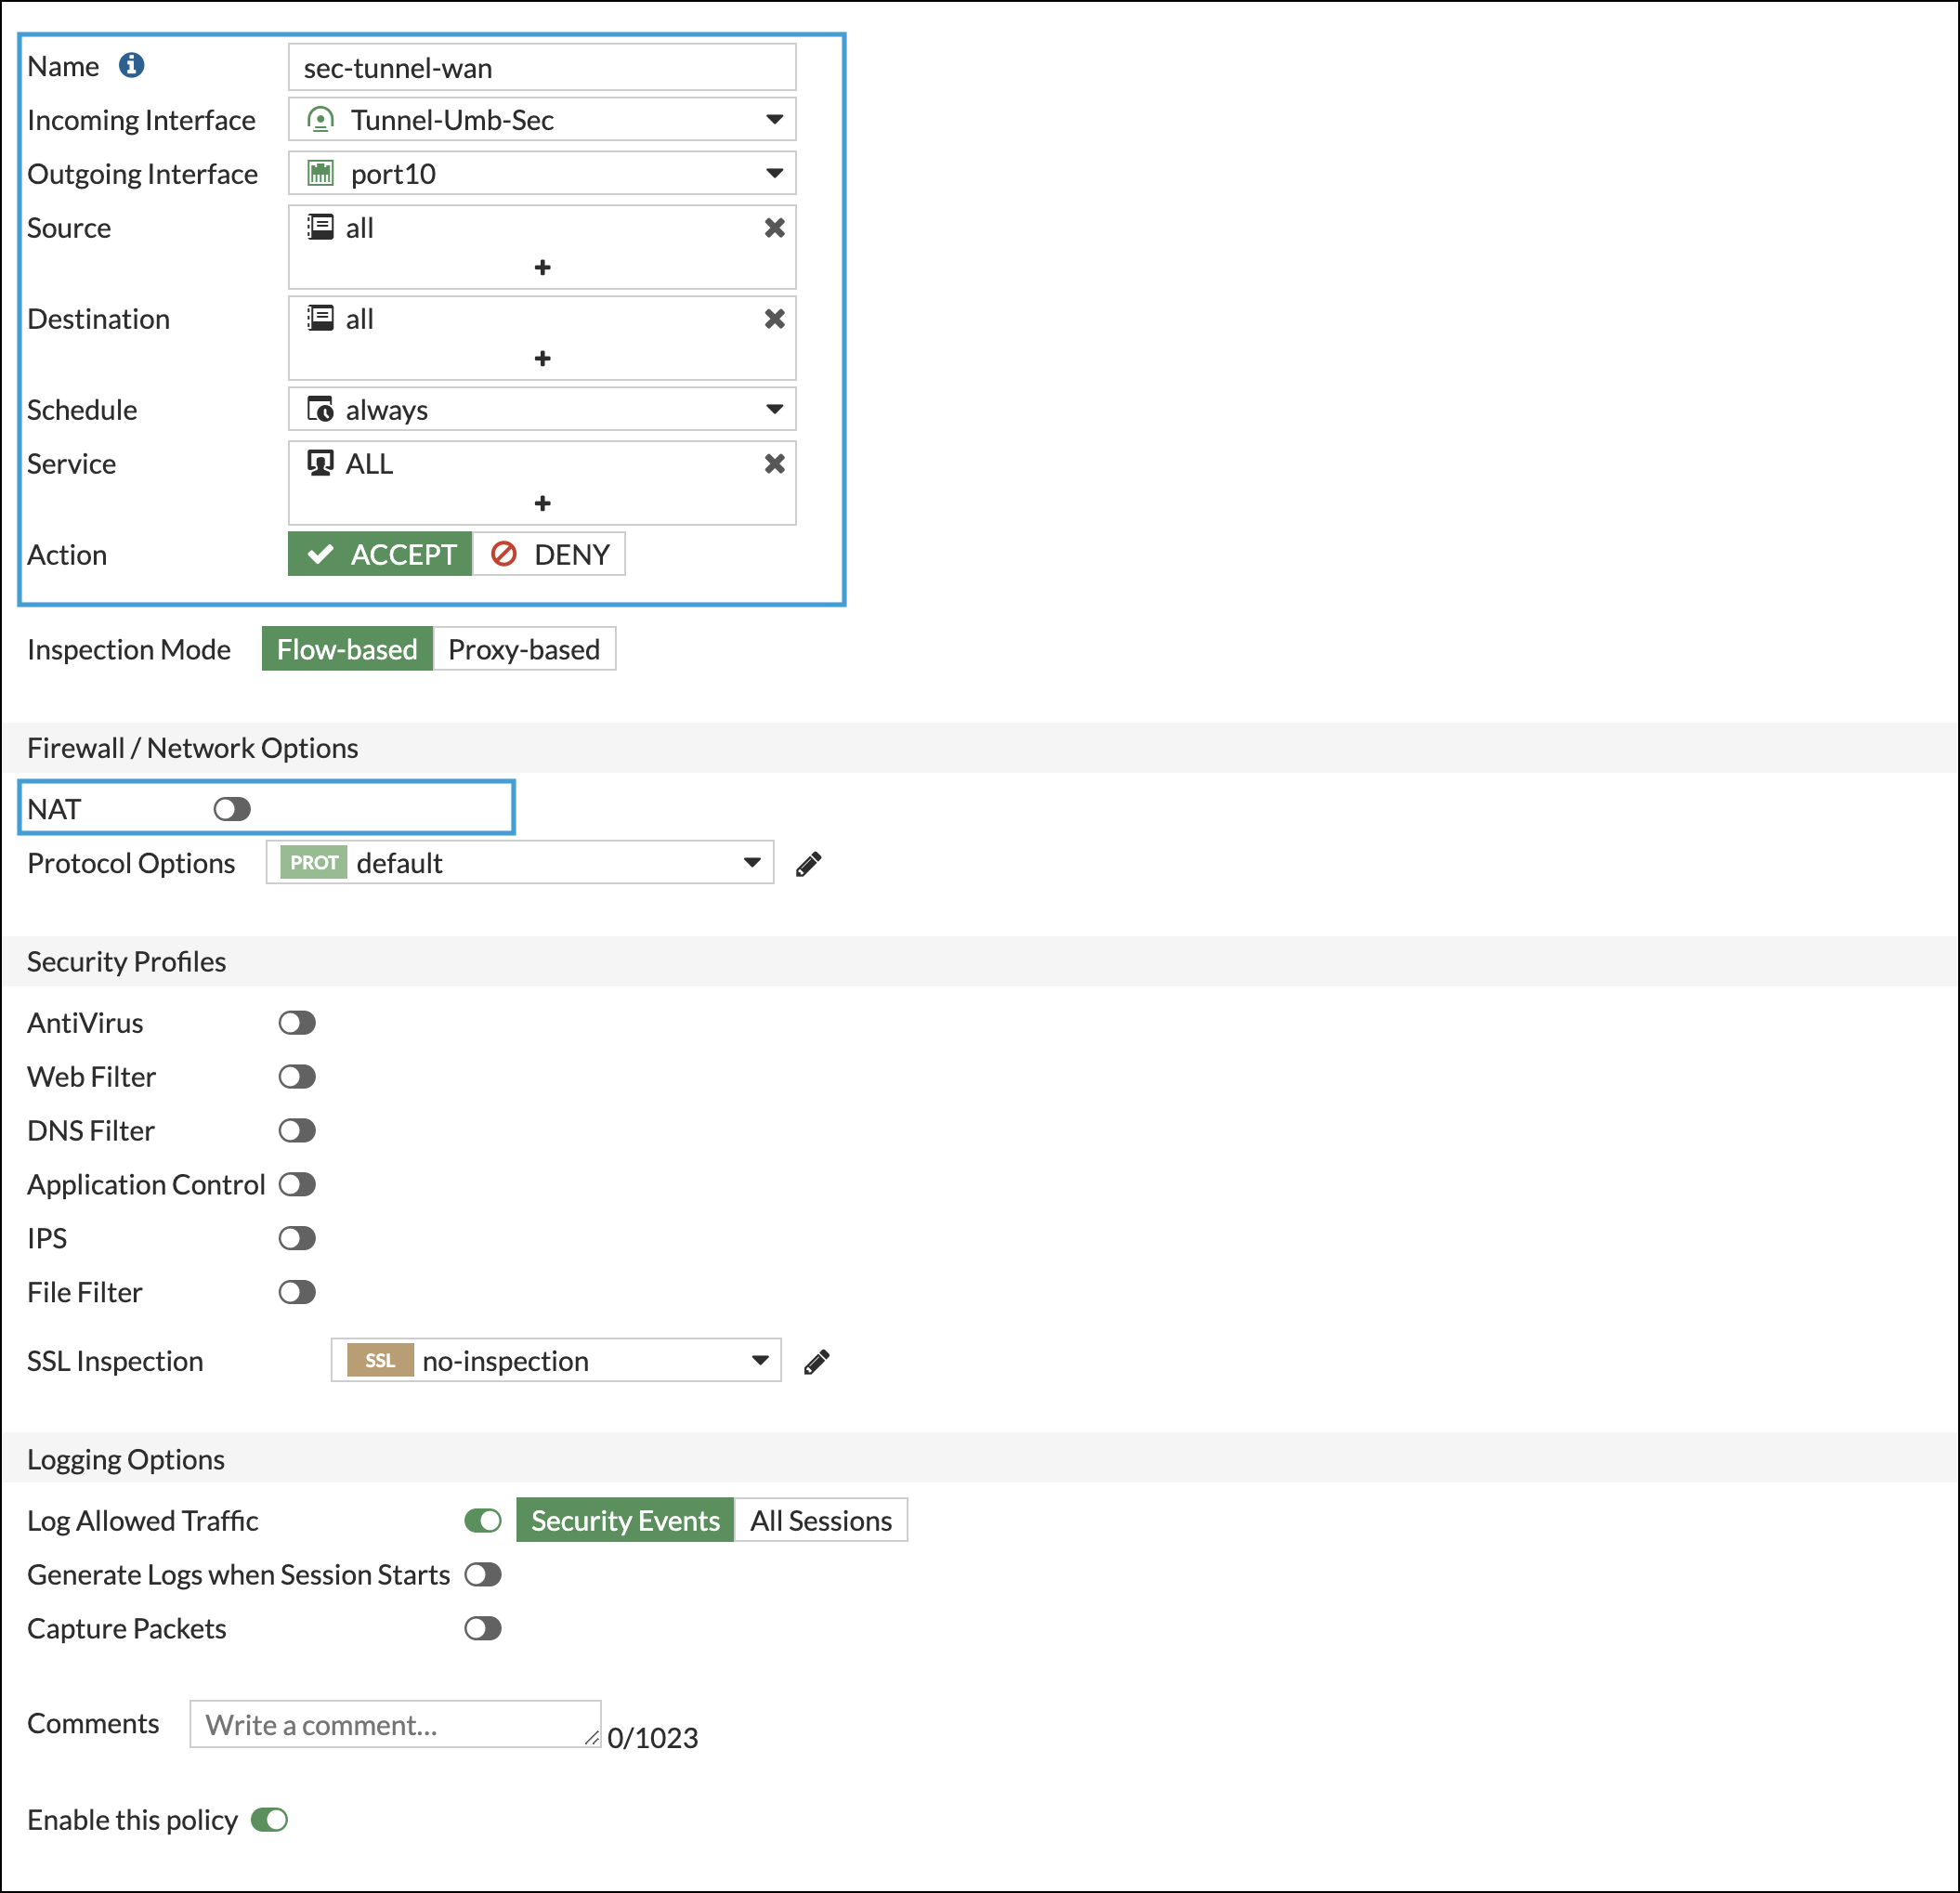
- Navigate again to Policy & Objects > Firewall Policy, click create new and complete the following fields:
- Incoming Interface—LAN Interface
- Outgoing Interface—Tunnel Interface
- Source—All
- Destination—All
- Service—All
- Action—Accept
- NAT—Uncheck
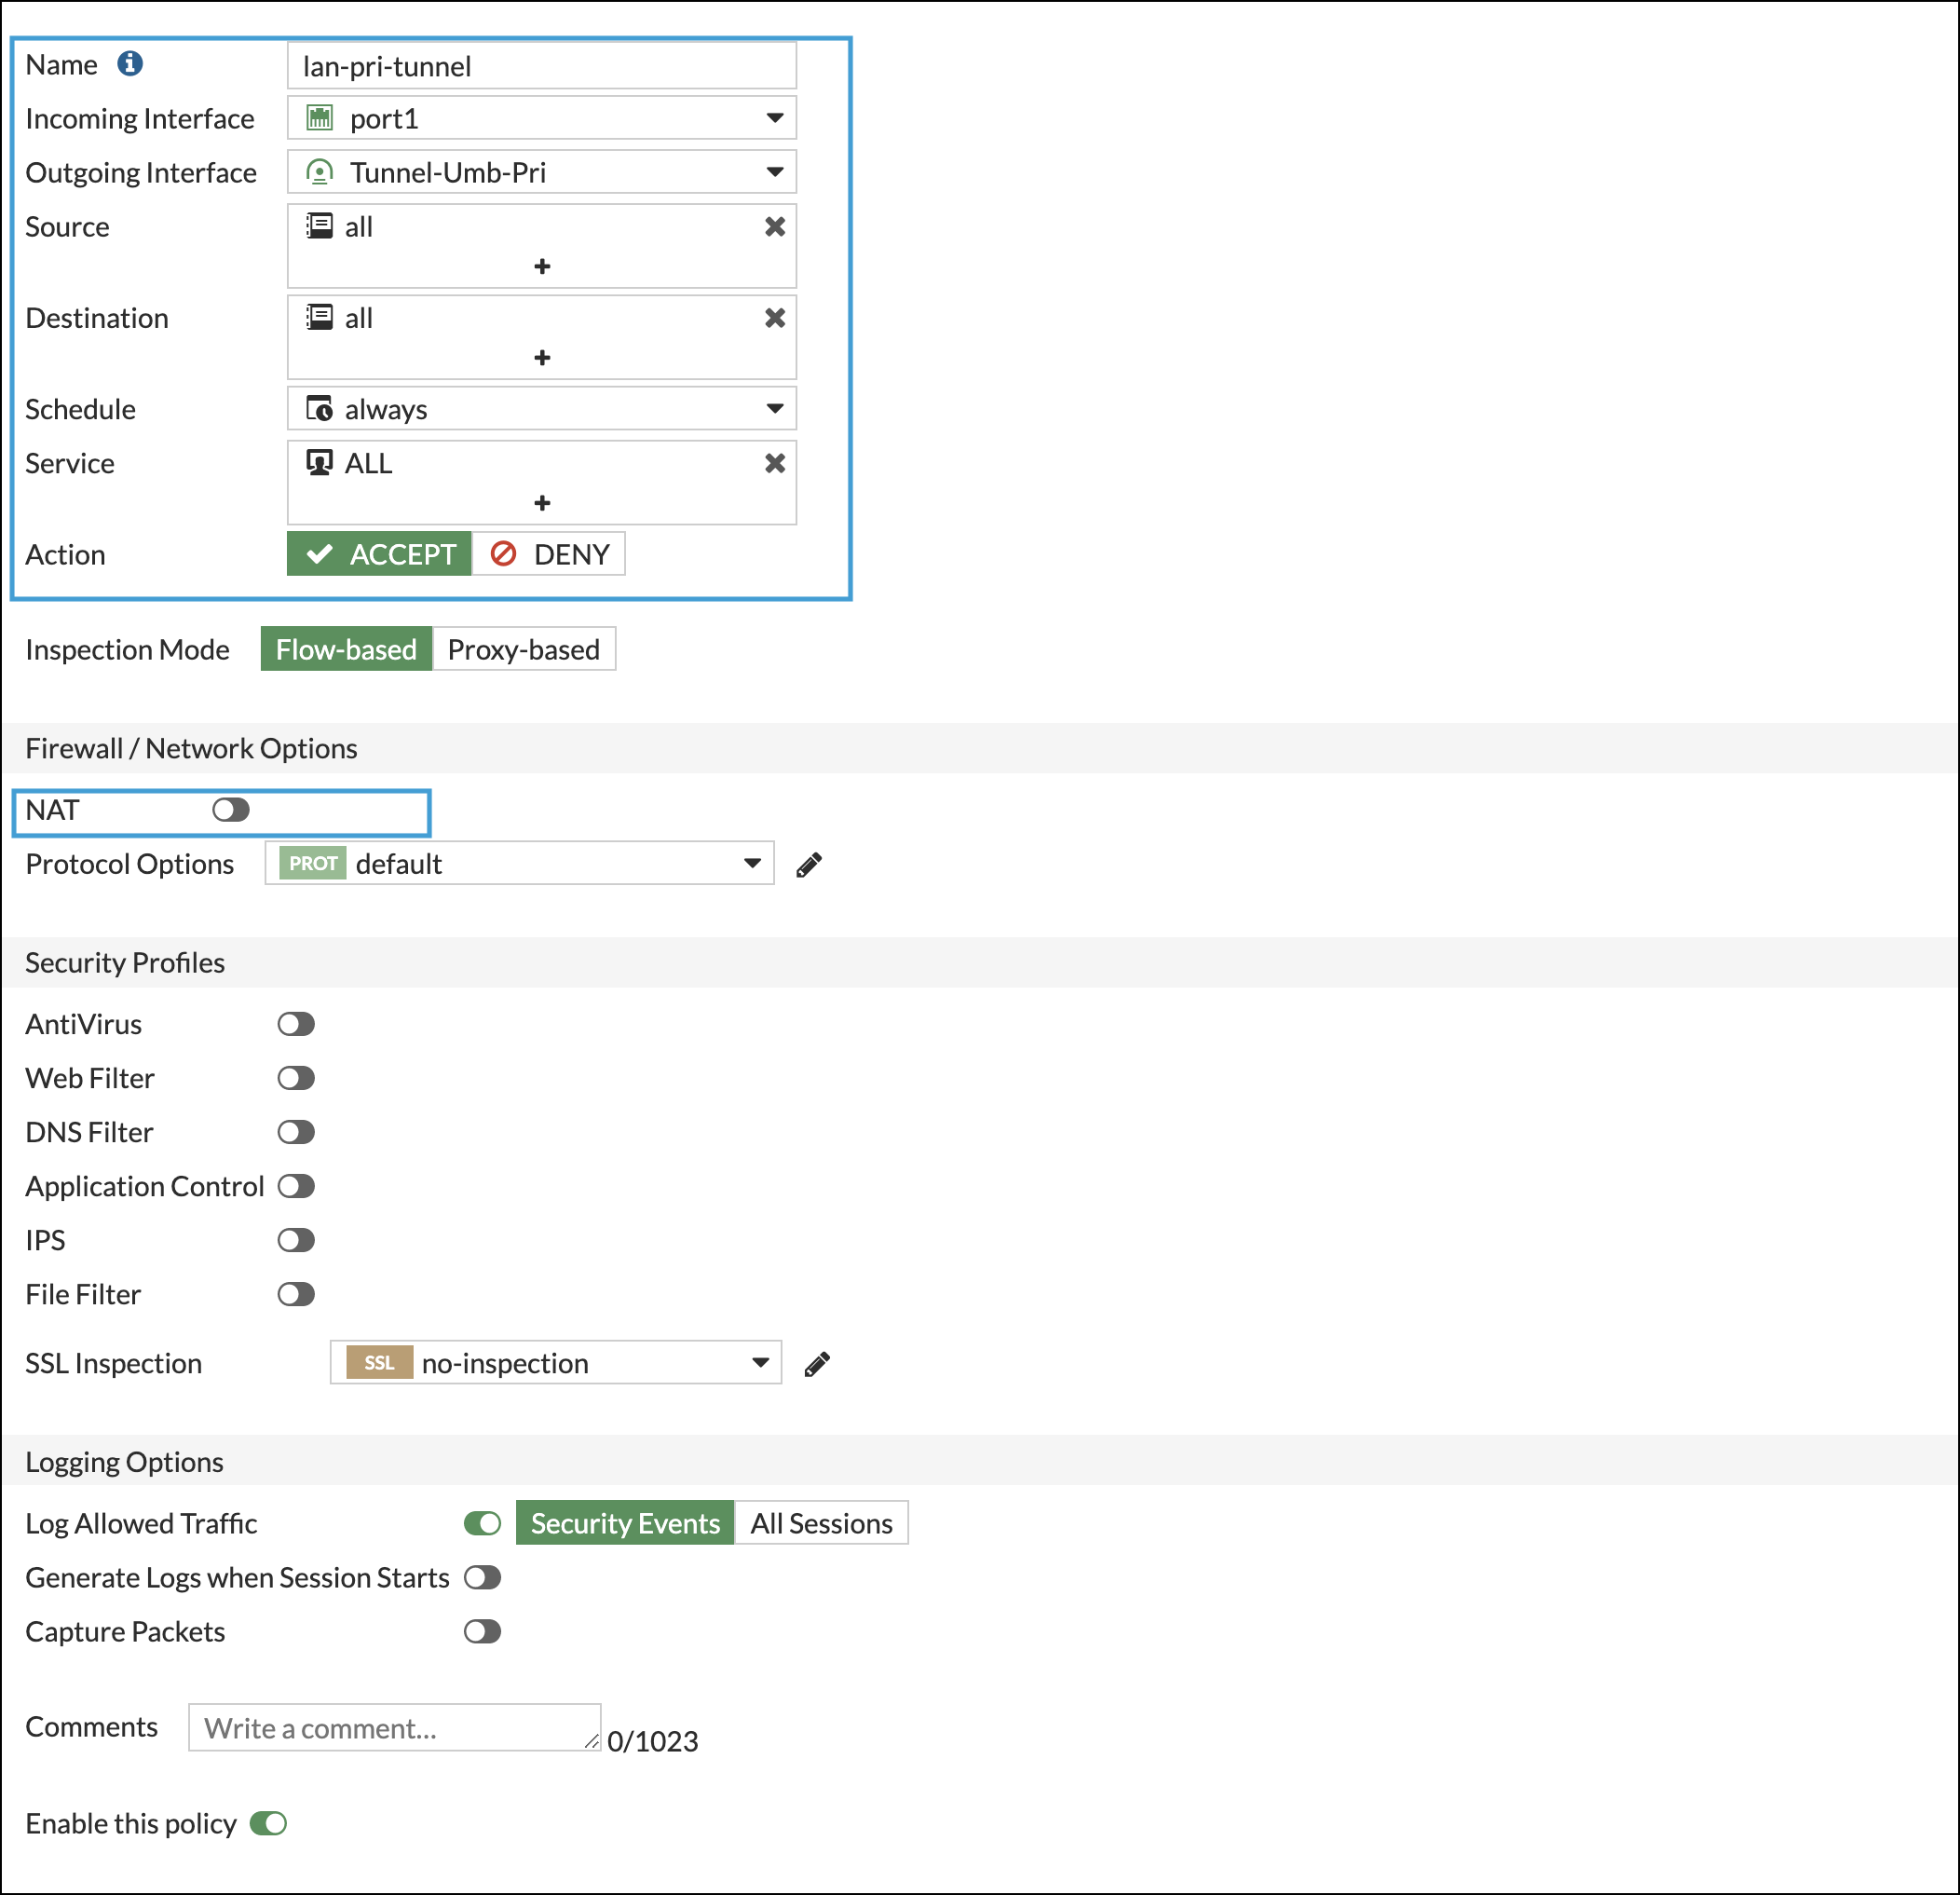
- Repeat step 3 for the secondary tunnel.
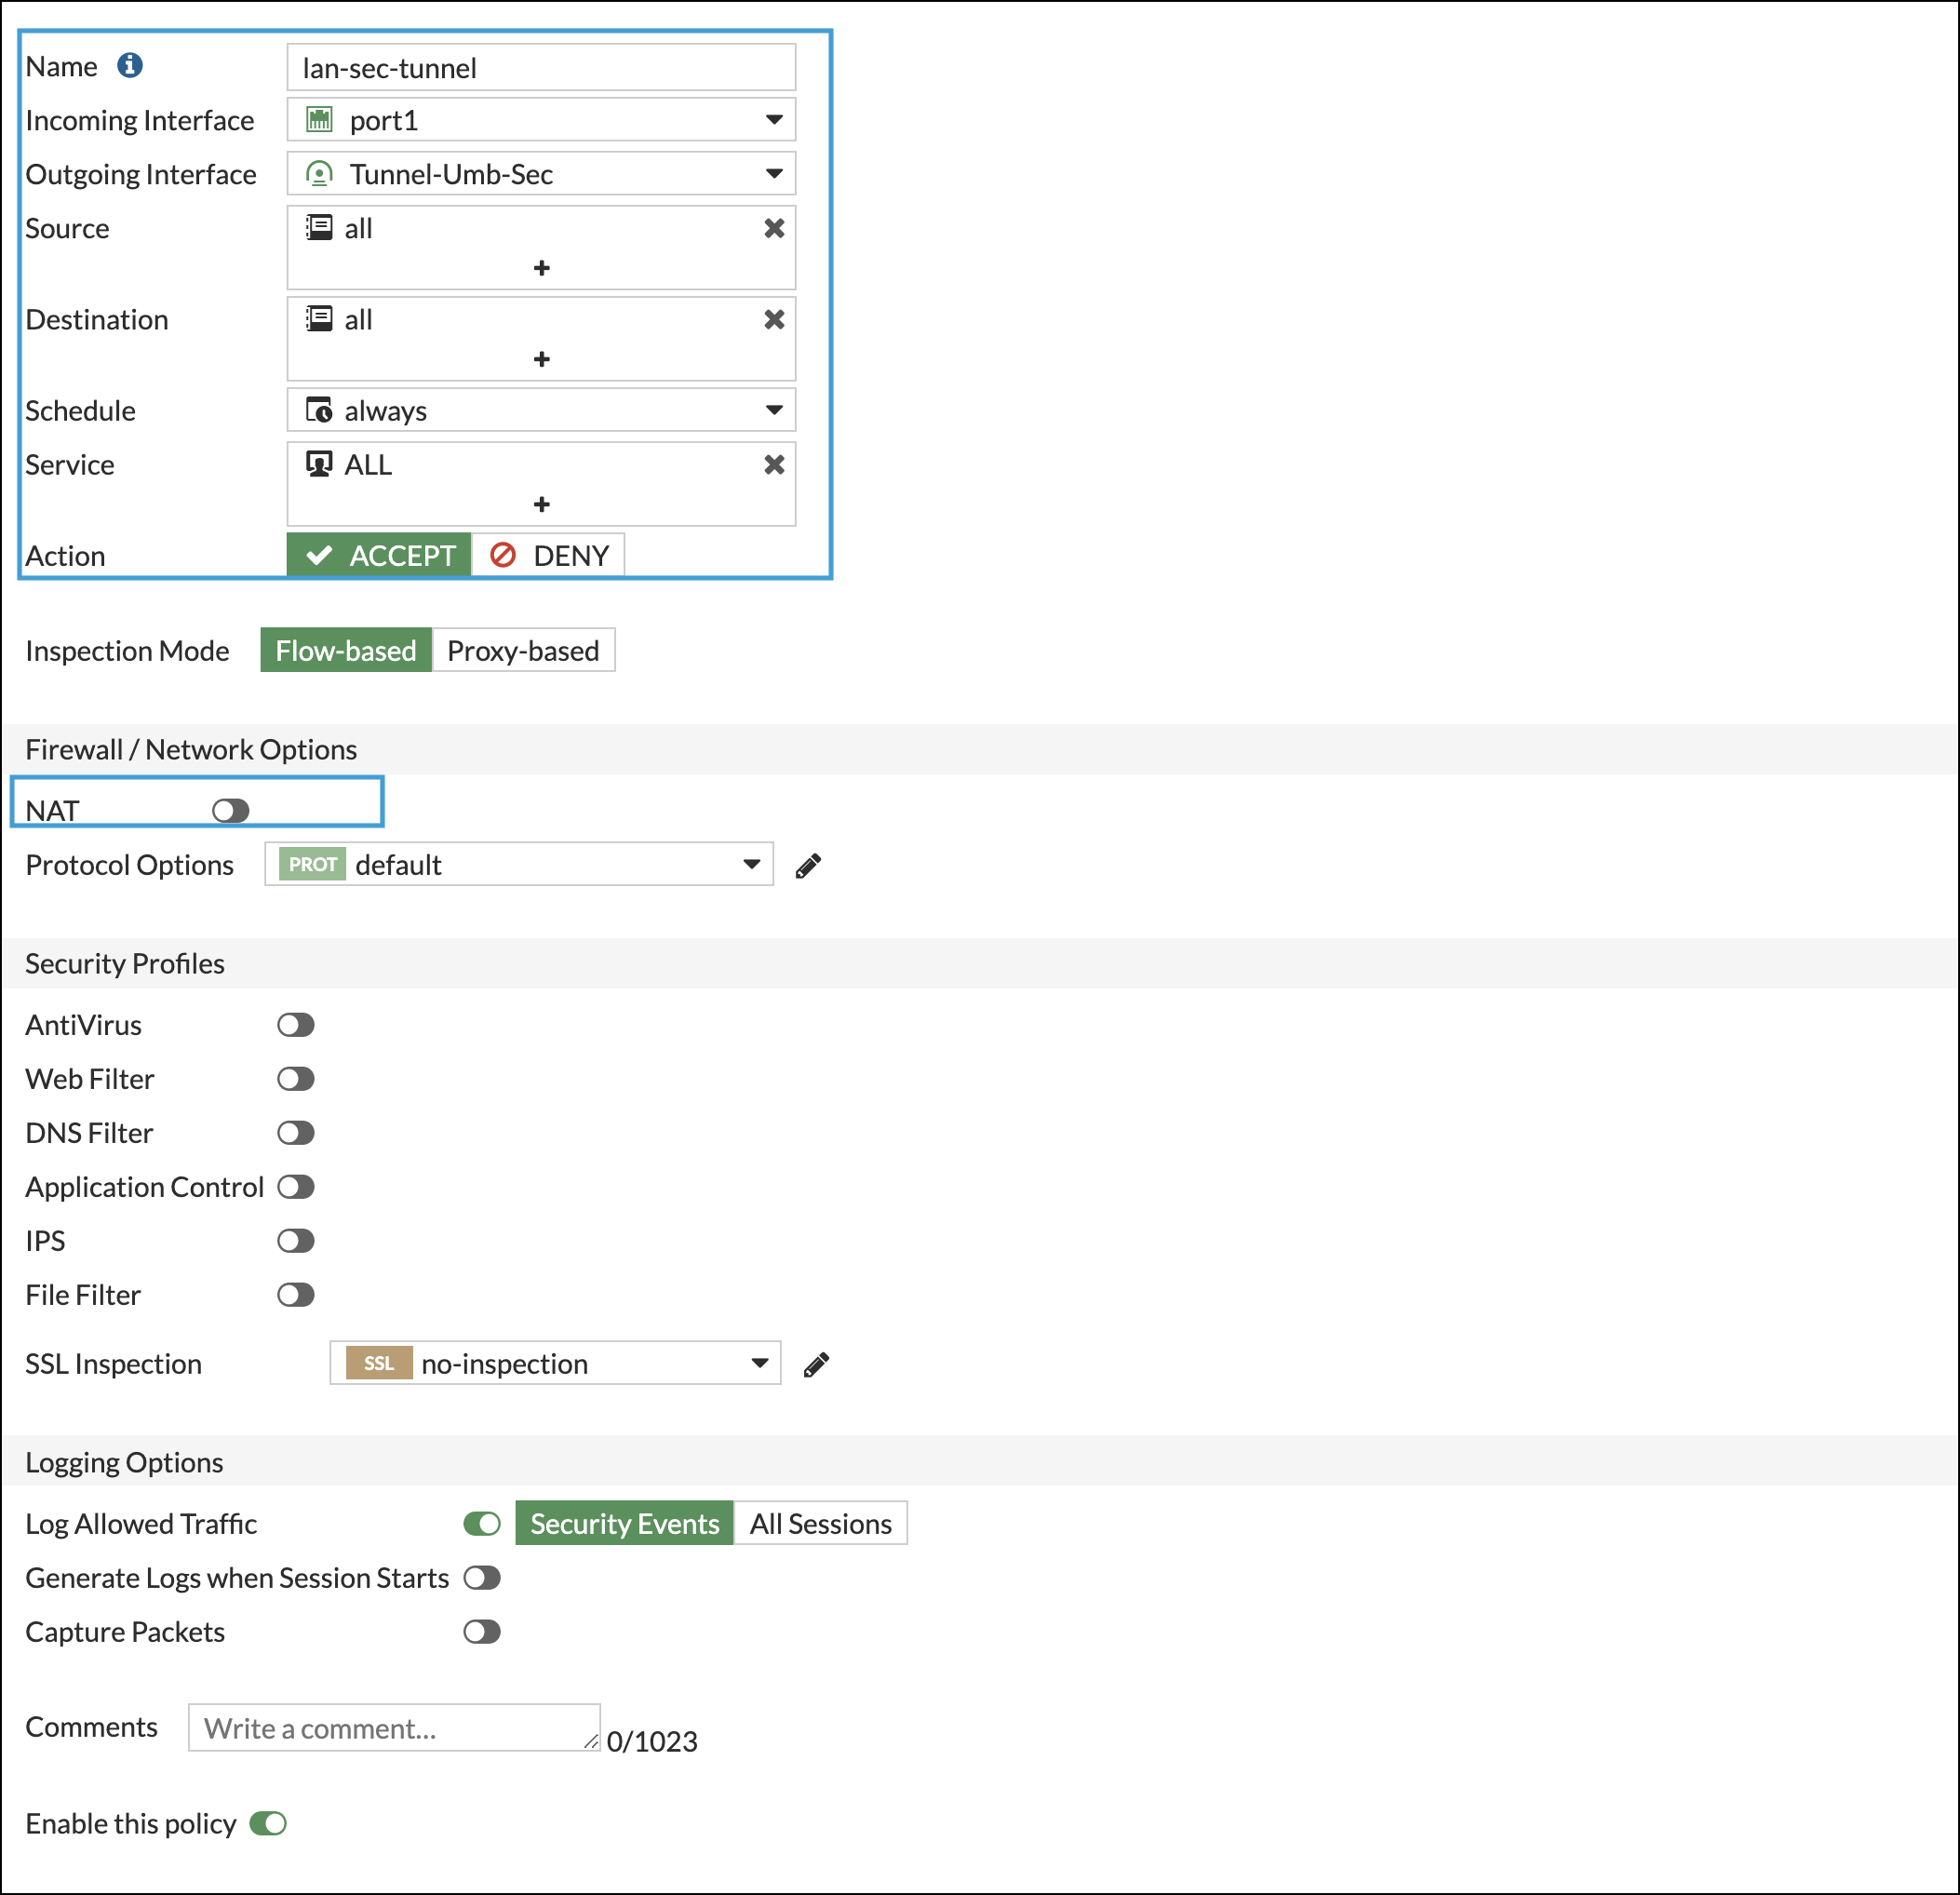
Verify the Tunnel Status
- In Fortinet, navigate to the device tunnel status page and confirm the tunnel is listed as Up.

- In Umbrella, confirm that the tunnel is listed as Active.

Create a Static Route
In Fortinet, create a static route to send traffic to Umbrella through the IPsec Tunnel.
- In Fortinet, navigate to Network > Static Routes and click Create new.
- Complete the following fields as follows:
- Automatic gateway retrieval—disabled
- Destination—Subnet; 0.0.0.0/0
- Interface—The tunnel created in Configure the Primary IPSec Tunnel.
- Administrative Distance—10
- Comments—Any comments you want to add to the route.
- Status—Enabled
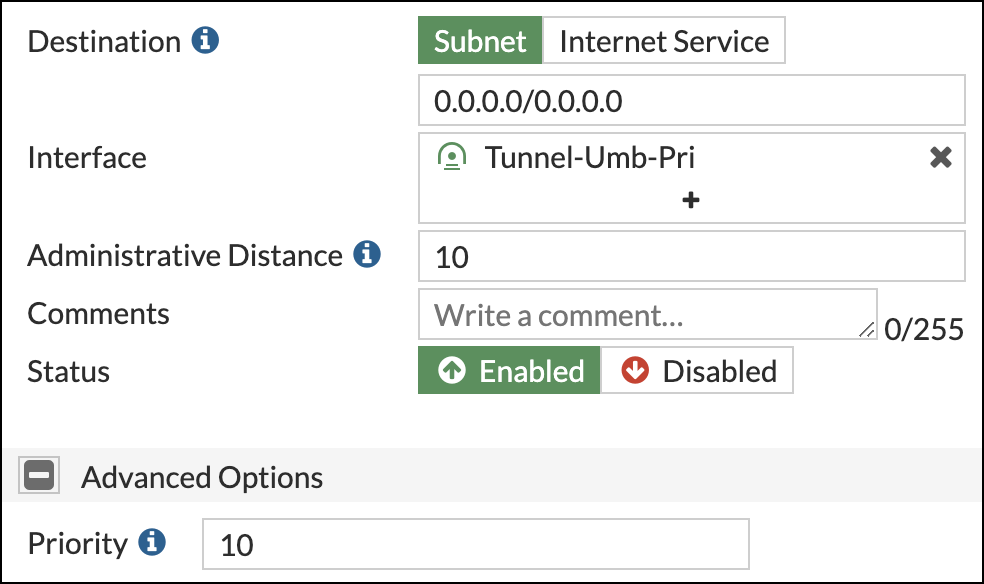
- Repeat steps 1 and 2 for the secondary tunnel.
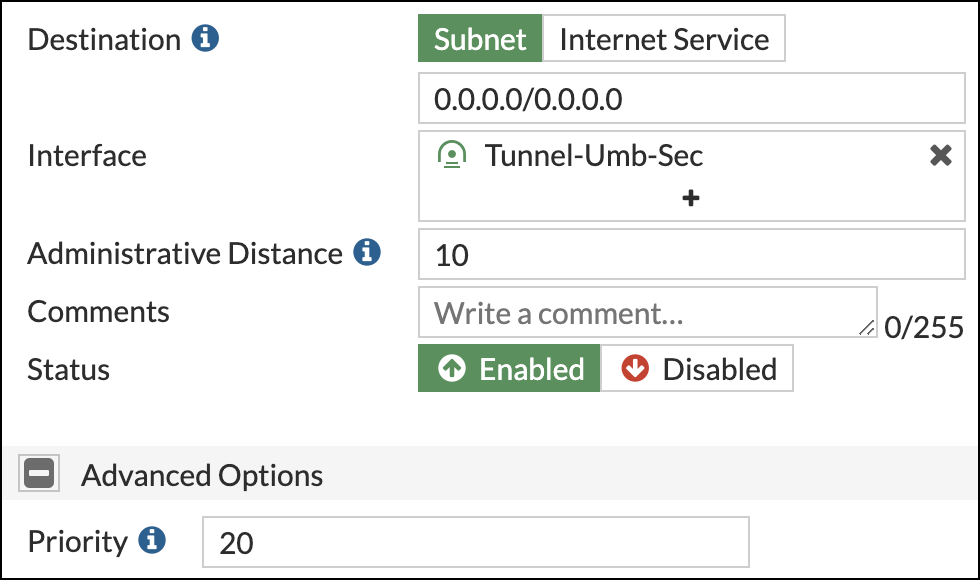
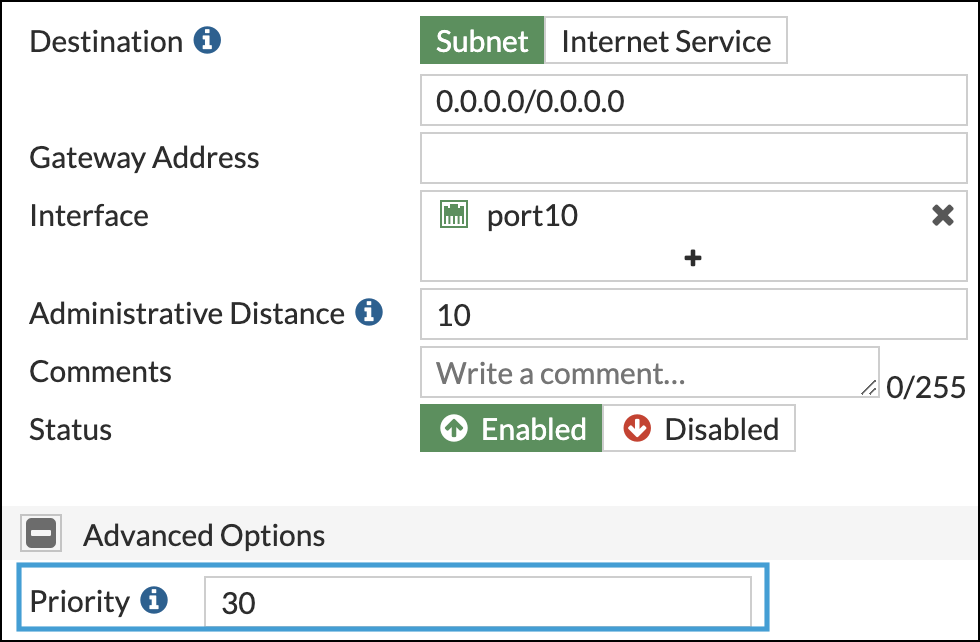
Ensure that the default static route priority is higher than the tunnel static routes.
Test the Configuration
Once the Fortinet deployment is complete, log in into any machine connected to the LAN subnet and run the curl <http://ifconfig.co> command or through a browser access http://ifconfig.co. If everything is working as expected, an IP address in the 146.112.x.x range is returned.
Other Resources
Umbrella Cloud Firewall
Configure Tunnels with Silver Peak < Configure Tunnels with Fortinet IPsec > Manage Accounts
Updated 3 months ago
