Configure Tunnels with Cisco Adaptive Security Appliance (ASA)
You can configure and deploy an IPsec (Internet Protocol Security) IKEv2 (Internet Key Exchange, version 2) tunnel in the Cisco Adaptive Security Appliance (ASA) firewall to connect to an Umbrella data center and the Umbrella Secure Web Gateway (SWG). This guide describes how to configure an IKEv2 IPsec tunnel in Cisco ASA to Cisco Umbrella.
Table of Contents
Prerequisites
The following prerequisites must be met for the tunnel to work successfully.
Licensing and Hardware
- Cisco Umbrella SIG Essentials or SIG Add-On subscription, or a free SIG trial.
- ASA Base or Security Plus license to establish an IPsec tunnel.
Network Access
- You must select an Umbrella SIG data center IP address to use when creating the IPsec tunnel.
In the sample commands,<umbrella_dc_ip>refers to this IP address. We recommend choosing the IP address based on the data center located closest to you. - UDP ports 500 and 4500 must be open before connecting to the tunnel.
- Cisco ASA version 9.16 or lower devices require static public routable IPv4 addresses configured on the interface that connects to the public internet and the Cisco Umbrella SIG data center.
This static public routable IPv4 address must not be subject to a NAT. If NAT is present, the tunnel will fail. Cisco ASA IKEv2 PSK authentication automatically uses this directly configured IPv4 address as its IKE ID. This ID in combination with the PSK is used to successfully authenticate the ASA with the Umbrella SWG. - Cisco ASA version 9.17 or above supports per tunnels identity and IKEv2 FQDN identity. Now that the ASA can be behind NAT, the tunnel in Umbrella should be configured as follows:
- Tunnel type: Other
- Authentication: FQDN
- ASA IPSec profile configuration should include the extra command with tunnel identity (set ikev2 local-identity email-id [email protected])
Multiple IPsec Network Tunnels
A unique set of network tunnel credentials must be used for each IPsec tunnel. Using unique credentials for every tunnel prevents inadvertent outages should one tunnel get re-routed to a nearby datacenter through anycast failover. You can create multiple tunnels as long as each tunnel connects to a unique network/IP on your ASA.
Organizations have a default limit of 50 network tunnels. To increase this limit, contact support or your account manager.
For more information, see Throughput and Multiple Tunnels.
Configure Tunnels in Umbrella
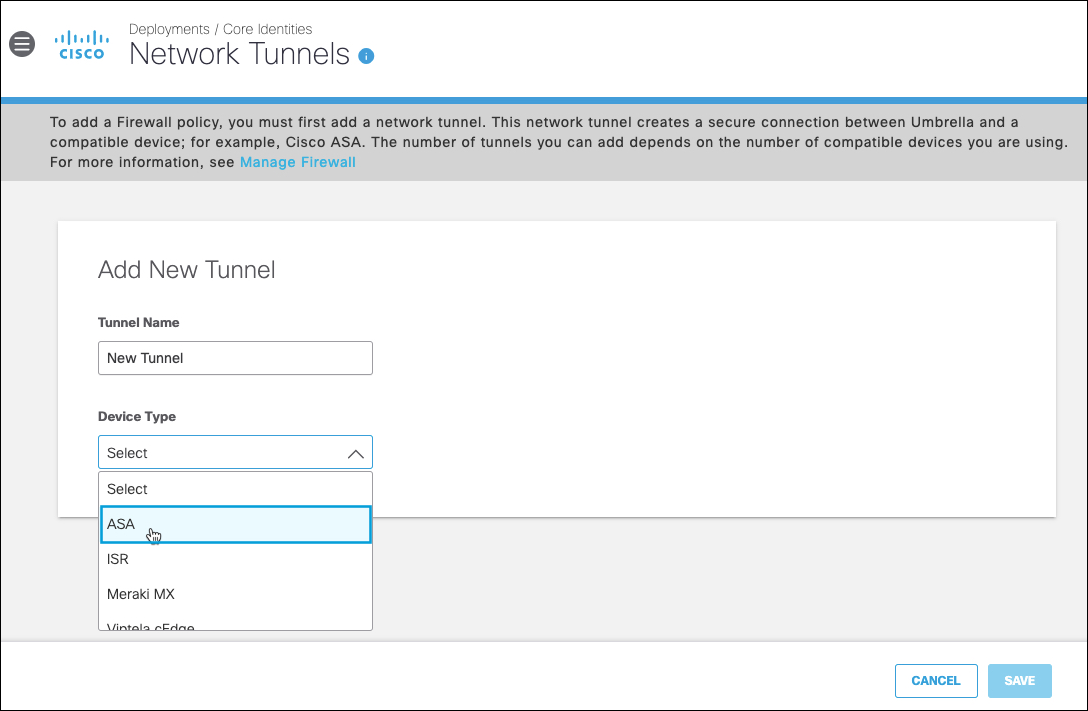
- Navigate to Deployments > Core Identities > Network Tunnels and click Add.

- Under Add New Tunnel, give your tunnel a meaningful Tunnel Name, from the Device Type drop-down list choose ASA.

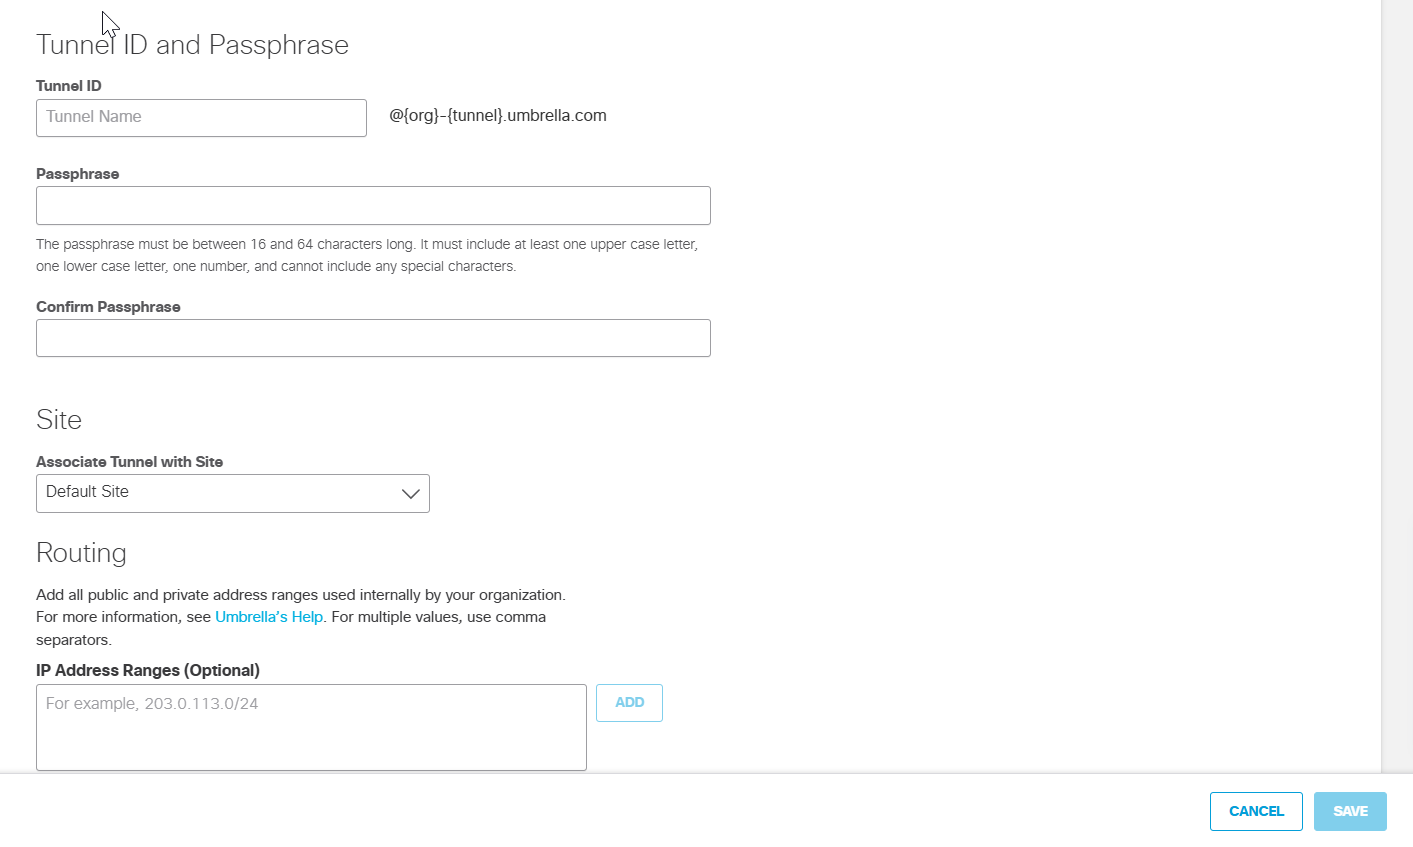
- Under Set Tunnel ID and Passphrase, enter the IP address for the Tunnel ID (IP Address/Network). Enter the Pre-Shared-Key (PSK) Passphrase.
Note: The IP address entered for the Tunnel ID must be the public IP used by the ASA. If this IP is already in use by another customer, you will receive an error. Contact Umbrella support to verify you control the IP address. - Choose an appropriate site from the Associate Tunnel with Site drop-down list and optionally, enter an IP address to the IP Address Ranges field which you would like to send to Umbrella SIG.

- Click Save and then copy the Tunnel ID and Passphrase.
The new tunnel appears in the Umbrella dashboard with a status of Not Established. The tunnel status is updated once it is fully configured and connected with the ASA.
Configure ASA
- Configure the IKEv2 policy. Define the settings according to the supported IPsec parameters. Choose the policy number based on your ASA's existing policies.
- Replace the default device name called
outsidewith the name configured on your device. The device name refers to the public facing interface which the VPN uses to connect.
- Replace the default device name called
crypto ikev2 policy 10
  encryption aes-gcm-256
  integrity null
  group 19
  lifetime seconds 86400
crypto ikev2 enable outside
- Configure the Group Policy and Tunnel Group parameters.
- Replace
<umbrella_dc_ip>with the closest Umbrella SIG Data Center IP. - Replace
[Portal_Tunnel_Passphrase]with the Passphrase you configured in the previous section, Configure Tunnels in Umbrella.
- Replace
group-policy umbrella-policy internal
group-policy umbrella-policy attributes
   vpn-tunnel-protocol ikev2

tunnel-group <umbrella_dc_ip> type ipsec-l2l
tunnel-group <umbrella_dc_ip> general-attributes
  default-group-policy umbrella-policy
tunnel-group <umbrella_dc_ip> ipsec-attributes
  ikev2 remote-authentication pre-shared-key 0 [Portal_Tunnel_Passphrase]
  ikev2 local-authentication pre-shared-key 0 [Portal_Tunnel_Passphrase]
Validate that the command crypto isakmp identity is set to the default value "auto" to determine the correct ID Method for ISAKMP Peers.
- Configure IPsec proposal and profile parameters.
- Define the settings according to the supported IPsec parameters.
crypto ipsec ikev2 ipsec-proposal Umbrella-Ipsec-Proposal
  protocol esp encryption aes-gcm-256
  protocol esp integrity sha-1

crypto ipsec profile Umbrella
  set ikev2 ipsec-proposal Umbrella-Ipsec-Proposal
  !
  !Note: The following command applies only to v9.17 or later
  set ikev2 local-identity email-id [email protected]
- Create a virtual tunnel interface (VTI).
- Replace <umbrella_dc_ip> with the closest Umbrella SIG Data Center IP.
- Replace the Sample IP with any non-existing IP address that is not being used for a VLAN, subnet or existing VLAN connection in your network.
interface Tunnel1
   nameif vti
   ip address x.x.x.1 255.255.255.0 **An unused range**
   tunnel source interface outside
   tunnel destination<umbrella_dc_ip>
   tunnel mode ipsec ipv4
   tunnel protection ipsec profile umbrella
- Configure policy-based routing. In the following examples, the LAN subnet is
192.168.20.0/24and the LAN interface isGigabitEthernet1/2.- Configure PBR to send the internal traffic through the tunnel interface to reach the Umbrella Data Center.
- Set the IP address in
next-hopto the same subnet assigned to the VTI.
access-list ACL-Umbrella line 1 extended permit ip 192.168.20.0 255.255.255.0 any4

route-map Umbrella-PBR permit 10
  match ip address ACL-Umbrella
  set ip next-hop x.x.x.2

interface GigabitEthernet1/2
  policy-route route-map Umbrella-PBR
Test and Verify
Umbrella
View the status of the organization's network tunnels in Umbrella. For more information, see Monitor Network Tunnel Status.
ASA CLI
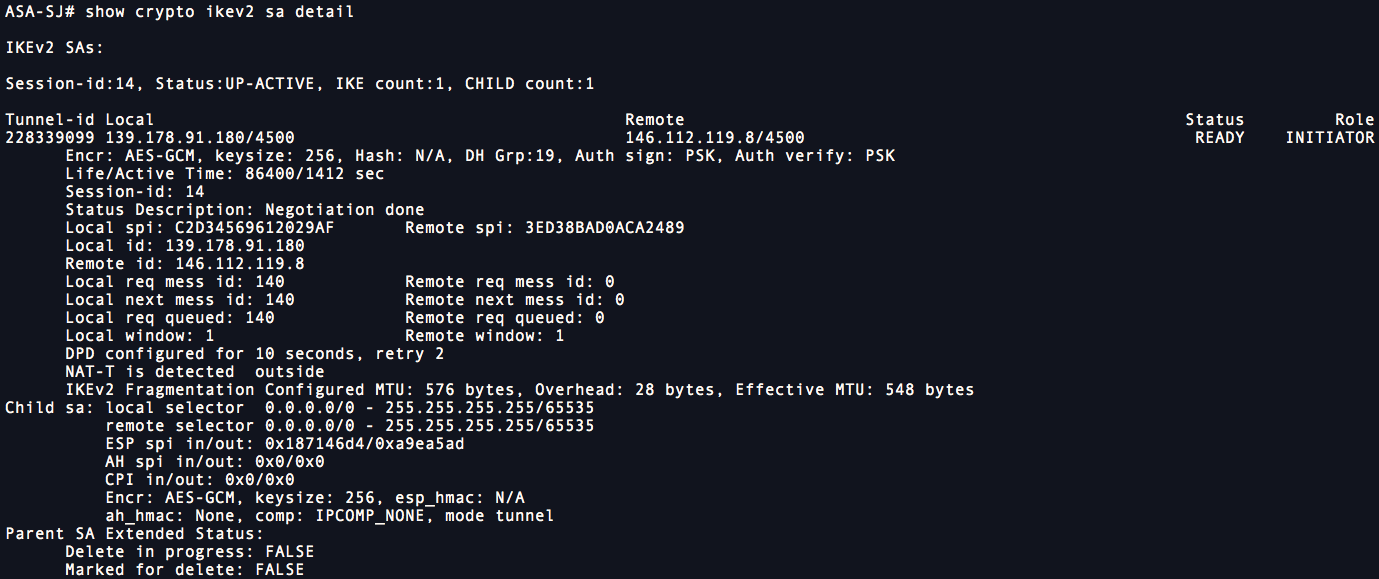
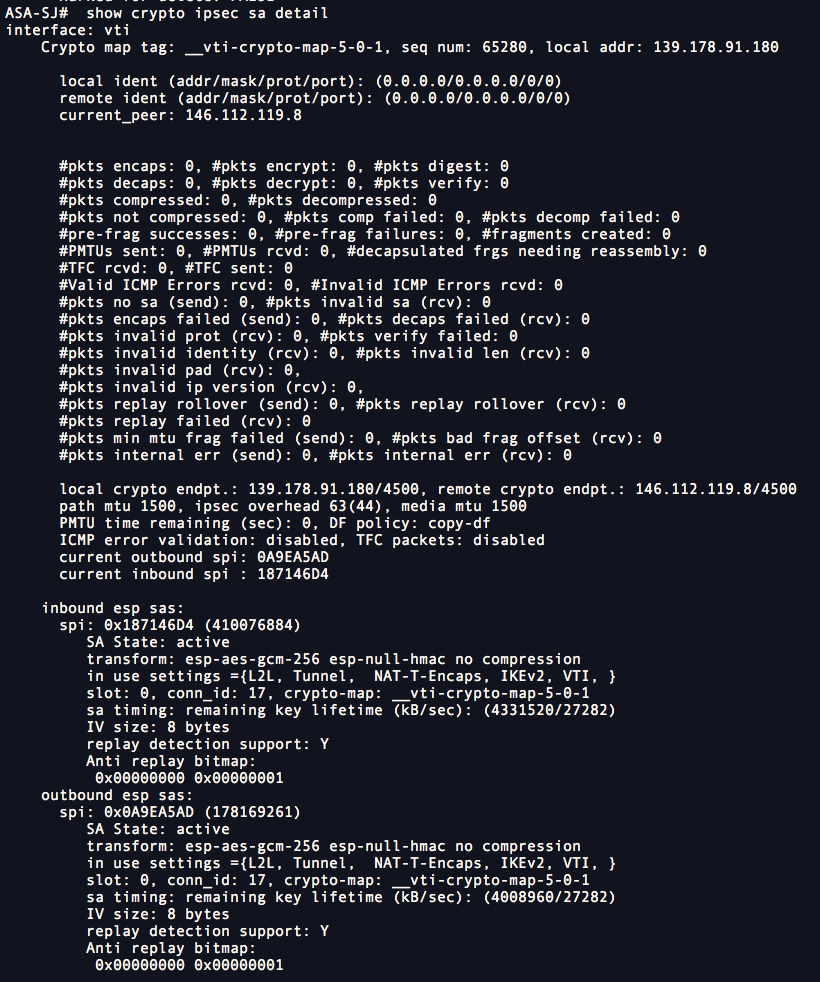
To verify the ASA tunnel status and connection to the Umbrella headend, run the following commands:
show crypto ikev2 sa detail

show crypto ipsec sa detail

Use the following command to simulate a packet from the inside interface, with a specific source IP address and port and a specific destination IP address and port. The response indicates whether the packet flows through the tunnel.
packet-tracer input inside tcp 192.168.20.13 3520 72.163.4.161 443 detailed

Phase: 1
Type: ACCESS-LIST
Subtype:
Result: ALLOW
Config:
Implicit Rule
Additional Information:
 Forward Flow based lookup yields rule:
 in  id=0x7f8d35d7da90, priority=1, domain=permit, deny=false
    	hits=3848, user_data=0x0, cs_id=0x0, l3_type=0x8
    	src mac=0000.0000.0000, mask=0000.0000.0000
    	dst mac=0000.0000.0000, mask=0100.0000.0000
    	input_ifc=inside, output_ifc=any

Phase: 2
Type: PBR-LOOKUP
Subtype: policy-route
Result: ALLOW
Config:
route-map umbrella-pbr permit 10
 match ip address pbr-umbrella
 set ip next-hop 11.11.11.12
Additional Information:
 Matched route-map umbrella-pbr, sequence 10, permit
 Found next-hop 11.11.11.12 using egress ifc vti

Phase: 3
Type: NAT
Subtype: per-session
Result: ALLOW
Config:
Additional Information:
 Forward Flow based lookup yields rule:
 in  id=0x7f8d34b62c90, priority=0, domain=nat-per-session, deny=false
    	hits=459, user_data=0x0, cs_id=0x0, reverse, use_real_addr, flags=0x0, protocol=6
    	src ip/id=0.0.0.0, mask=0.0.0.0, port=0, tag=any
    	dst ip/id=0.0.0.0, mask=0.0.0.0, port=0, tag=any, dscp=0x0
    	input_ifc=any, output_ifc=any

Phase: 4
Type: IP-OPTIONS
Subtype:
Result: ALLOW
Config:
Additional Information:
 Forward Flow based lookup yields rule:
 in  id=0x7f8d35d85db0, priority=0, domain=inspect-ip-options, deny=true
    	hits=456, user_data=0x0, cs_id=0x0, reverse, flags=0x0, protocol=0
    	src ip/id=0.0.0.0, mask=0.0.0.0, port=0, tag=any
    	dst ip/id=0.0.0.0, mask=0.0.0.0, port=0, tag=any, dscp=0x0
    	input_ifc=inside, output_ifc=any


Phase: 5
Type: VPN
Subtype: encrypt
Result: ALLOW
Config:
Additional Information:
 Forward Flow based lookup yields rule:
 out id=0x7f8d35dfabc0, priority=70, domain=encrypt, deny=false
    	hits=152, user_data=0x78dc, cs_id=0x0, reverse, flags=0x0, protocol=0
        src ip/id=0.0.0.0, mask=0.0.0.0, port=0, tag=any
    	dst ip/id=0.0.0.0, mask=0.0.0.0, port=0, tag=any, dscp=0x0
    	input_ifc=any, output_ifc=vti

Phase: 6
Type: VPN
Subtype: ipsec-tunnel-flow
Result: ALLOW
Config:
Additional Information:
 Reverse Flow based lookup yields rule:
 in  id=0x7f8d36c3cd90, priority=69, domain=ipsec-tunnel-flow, deny=false
    	hits=152, user_data=0x84dc, cs_id=0x0, reverse, flags=0x0, protocol=0
    	src ip/id=0.0.0.0, mask=0.0.0.0, port=0, tag=any
    	dst ip/id=0.0.0.0, mask=0.0.0.0, port=0, tag=any, dscp=0x0
    	input_ifc=vti, output_ifc=any


Phase: 7
Type: NAT
Subtype: per-session
Result: ALLOW
Config:
Additional Information:
 Reverse Flow based lookup yields rule:
 in  id=0x7f8d34b62c90, priority=0, domain=nat-per-session, deny=false
    	hits=461, user_data=0x0, cs_id=0x0, reverse, use_real_addr, flags=0x0, protocol=6
    	src ip/id=0.0.0.0, mask=0.0.0.0, port=0, tag=any
    	dst ip/id=0.0.0.0, mask=0.0.0.0, port=0, tag=any, dscp=0x0
    	input_ifc=any, output_ifc=any

Phase: 8
Type: IP-OPTIONS
Subtype:
Result: ALLOW
Config:
Additional Information:
 Reverse Flow based lookup yields rule:
 in  id=0x7f8d35e547a0, priority=0, domain=inspect-ip-options, deny=true
    	hits=291, user_data=0x0, cs_id=0x0, reverse, flags=0x0, protocol=0
    	src ip/id=0.0.0.0, mask=0.0.0.0, port=0, tag=any
    	dst ip/id=0.0.0.0, mask=0.0.0.0, port=0, tag=any, dscp=0x0
    	input_ifc=vti, output_ifc=any


Phase: 9
Type: FLOW-CREATION
Subtype:
Result: ALLOW
Config:
Additional Information:
New flow created with id 547, packet dispatched to next module
Module information for forward flow ...
snp_fp_inspect_ip_options
snp_fp_tcp_normalizer
snp_fp_translate
snp_fp_adjacency
snp_fp_encrypt
snp_fp_fragment
snp_fp_tracer_drop
snp_ifc_stat

Module information for reverse flow ...
snp_fp_inspect_ip_options
snp_fp_ipsec_tunnel_flow
snp_fp_translate
snp_fp_tcp_normalizer
snp_fp_adjacency
snp_fp_fragment
snp_fp_tracer_drop
snp_ifc_stat


Result:
input-interface: inside
input-status: up
input-line-status: up
output-interface: vti
output-status: up
output-line-status: up
Action: allow
Configure Tunnels with Meraki MX< Configure Tunnels with Cisco Adaptive Security Appliance (ASA) > Configure Tunnels with Cisco ISR
Updated about 2 months ago
